Important: Localization Support
Insights 19.10 contains limited localization support for the following scenarios:
- Processes and queues in Orchestrator named using non-ascii characters (ex: Japanese).
- Custom process and queue tables created in the Insights cube based on these process and queue names will contain no data.
- Table Grouping based on these process and queue names will not work.
Dashboards depending on filters for job status in languages using non-ascii characters.
Dashboards that depend on job status, such as the ROI dashboard, and the processes dashboard, will not be filtered correctly as the status will not be localized correctly.Robot logs for successfully completed processes will not be ingested if the translation of "execution ended" in the language of the Robot used to run this process, or the Studio this process was developed on, contains non-ascii characters.
For full localization support, please use the 20.10 Insights release.
The installation artifacts are provided when you first purchase Insights or they can be provided by your customer success manager or our support team.
Important!
Before proceeding with installation, ensure that you meet the Hardware and Software Requirements for Insights.
The
UiPathPlatformInstaller.execan also be used to install/update Orchestrator with Insights enabled, however it does not accept command line parameters.
Enabling Insights in Orchestrator
Prior to installing Insights you must first install Orchestrator, or update your existing Orchestrator instance, with the Insights feature enabled. See About Installation for complete details about Orchestrator installation.
Note:
Insights is licensed at Orchestrator
hostlevel, not at the tenant level.After installation is complete, you must also update your Host license to ensure the Insights feature is activated.
After you have obtained the UiPathOrchestrator.msi installer:
- Open an elevated command prompt.
- Change the directory to that where the installer is located. For example,
cd C:\UiPath. - Run the installer with the necessary Insights command parameters:
| Command | Description |
|---|---|
ADDLOCAL | Enables you to select which features to install. It supports the following options:OrchestratorFeature - installs Orchestrator.InsightsFeature - adds the Insights feature to an Orchestrator installation(clean or existing). |
DB_INSIGHTS_DATABASE_NAME | Indicate the name of the Insights database. Note: The Orchestrator and Insights databases cannot have the same name and the Insights database cannot previously exist, it is created by the installer. |
DB_INSIGHTS_SERVER_NAME | Indicate the server name on which the Insights database must be setup. Note: Orchestrator and Insights must be installed on separate servers. |
DB_INSIGHTS_AUTHENTICATION_MODE | Indicate the authentication mode to be used. The available options are:WINDOWS - Windows authentication is used.SQL - SQL authentication is used. If selecting this option, you must also provide the DB_INSIGHTS_USER_NAME and DB_INSIGHTS_PASSWORD parameters. |
DB_INSIGHTS_USER_NAME | Indicate the SQL username. Only required when DB_INSIGHTS_AUTHENTICATION_MODE is set to SQL. |
DB_INSIGHTS_PASSWORD | Indicate the SQL username. Only required when DB_INSIGHTS_AUTHENTICATION_MODE is set to SQL. |
Examples:
- New Orchestrator installation using Windows Authentication:
UiPathOrchestrator.msi ADDLOCAL=OrchestratorFeature,InsightsFeature DB_INSIGHTS_DATABASE_NAME=UiPathInsights DB_INSIGHTS_SERVER_NAME=sqlserver01 DB_INSIGHTS_AUTHENTICATION_MODE=WINDOWS - Existing Orchestrator installation using SQL Authentication:
UiPathOrchestrator.msi ADDLOCAL=InsightsFeature DB_INSIGHTS_DATABASE_NAME=UiPathInsights DB_INSIGHTS_SERVER_NAME=sqlserver01 DB_INSIGHTS_USER_NAME=sa DB_INSIGHTS_USER_PASSWORD=p@ssw0rd DB_INSIGHTS_AUTHENTICATION_MODE=SQL
- Complete the Orchestrator installation as detailed here.
Insights Installation
Note:
If you have previously installed Insights, had a failed installation, or want to uninstall it to proceed with a clean installation, you must first:
- From Windows Services Manager, stop the
Sisense.AdvancedFormulaservice.- Open an elevated command prompt and run:
sc delete "Sisense.AdvancedFormula".- NOTE : Failed install only or if you did not stop Sisense.AdvancedFormula prior to uninstalling - Delete C:\Program Files\sisense and c:\ProgramData\sisense folders if they exist.
- Disable any active tenants using the
UiPath.InsightsAdminTool.- Proceed with uninstalling Insights.
- Run the
UiPathInsightsInstaller.exeinstaller as an administrator. The UiPath Insights Installer wizard is displayed. - Select the Check here to accept the license agreement check box to agree to the terms in the agreement, then click Next. The Insights Server Configuration is displayed.
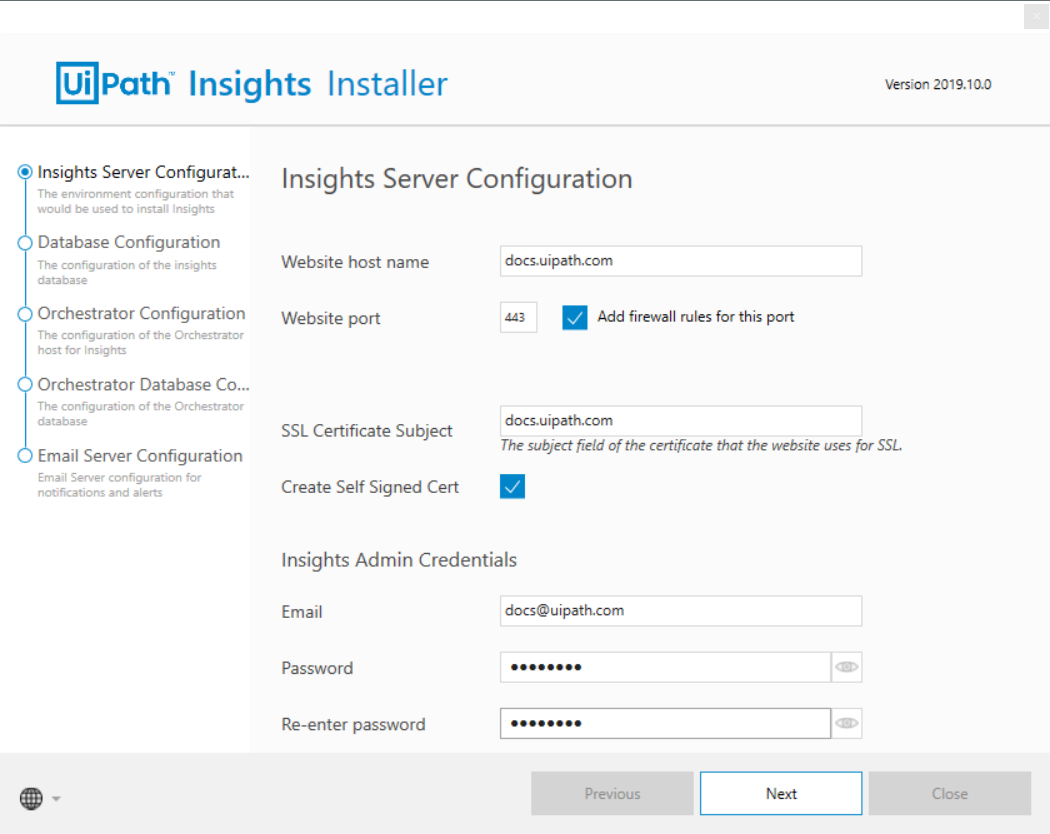
- Change the Server Configuration as desired:
- Website host name - used to identify the device on which Insights is installed. By default this is set to the machine host name but can be edited.
- Website port - the port to be used for Insights communication. By default this is set to
443to enable use ofHTTPS. - Add firewall rules for this port - if selected, automatically adds firewall rules for this port to ensure your machine's security.
Note: The installer does not overwrite an existing firewall rule. For example, if there is already a firewall rule for port443you will need to manually add the ruleprogram=All. - SSL Certificate Subject - the subject name of the SSL certificate you want to use to secure connections with Insights. By default, this is filled in with the full computer name but may be edited.
Note: The SSL certificate subject must match the Website host name provided above. If using an existing certificate, it must be marked as exportable and be installed under the Local Machine Personal Certificate Store. - Create Self Signed Cert - if selected, automatically creates a self-signed certificate with subject name specified above. For using Edge or Internet Explorer with self-signed certificates, see here.
Note: If also using a self-signed certificate on your Orchestrator machine, the Orchestrator and Insights certificates must be added to the trusted root on both machines. - Email - the email of the local Insights admin user.
Note: This must not match the email address of any user defined in Orchestrator. - Password - the password for the local Insights admin user. It must be 8-20 characters in length and contain at least 1 uppercase letter, 1 lowercase letter, 1 number, and 1 special character (
!,@,#,$,%,^,&,*).
- Click Next. The Insights Database Configuration is displayed.
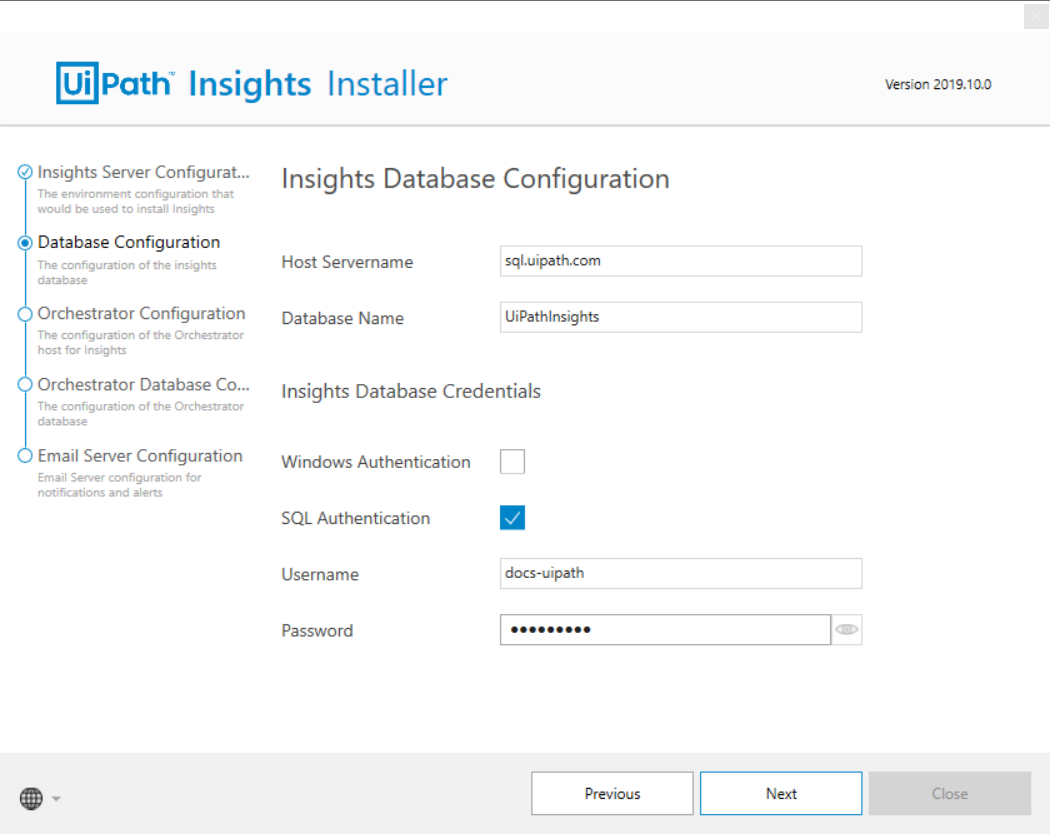
-
Fill in the database details, as follows:
- Host Servername - the name of the SQL Server machine where the Insights database is located. You can also specify a custom port number here using a colon, such as
sql.uipath.com:1733. - Database Name - the name of the Insights database specified when installing Orchestrator.
- Windows Authentication - if selected, the connection to Insights is made using a domain account. See additional configurations steps, below.
- SQL Authentication - if selected, the connection to Insights is made using SQL authentication. If using this option, the Username and Password fields become editable and you must provide the SQL username and password used to connect to the database.
- Host Servername - the name of the SQL Server machine where the Insights database is located. You can also specify a custom port number here using a colon, such as
-
Click Next. The Orchestrator Configuration is displayed.
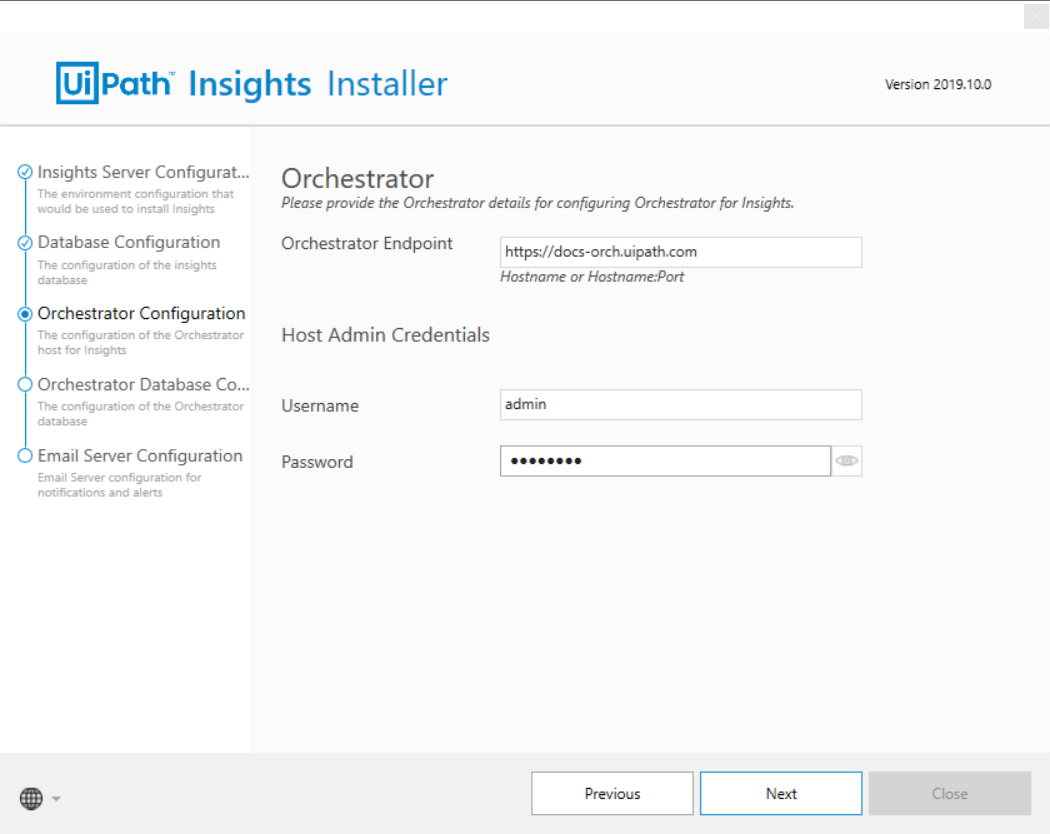
- Provide the connection details for your Orchestrator instance, as follows:
- Orchestrator Endpoint - the URL of your Orchestrator.
- Username - the username of the Host tenant. By default, this is
adminand cannot be edited. - Password - the password for the Host admin account.
- Click Next. The Orchestrator Database Configuration is displayed.
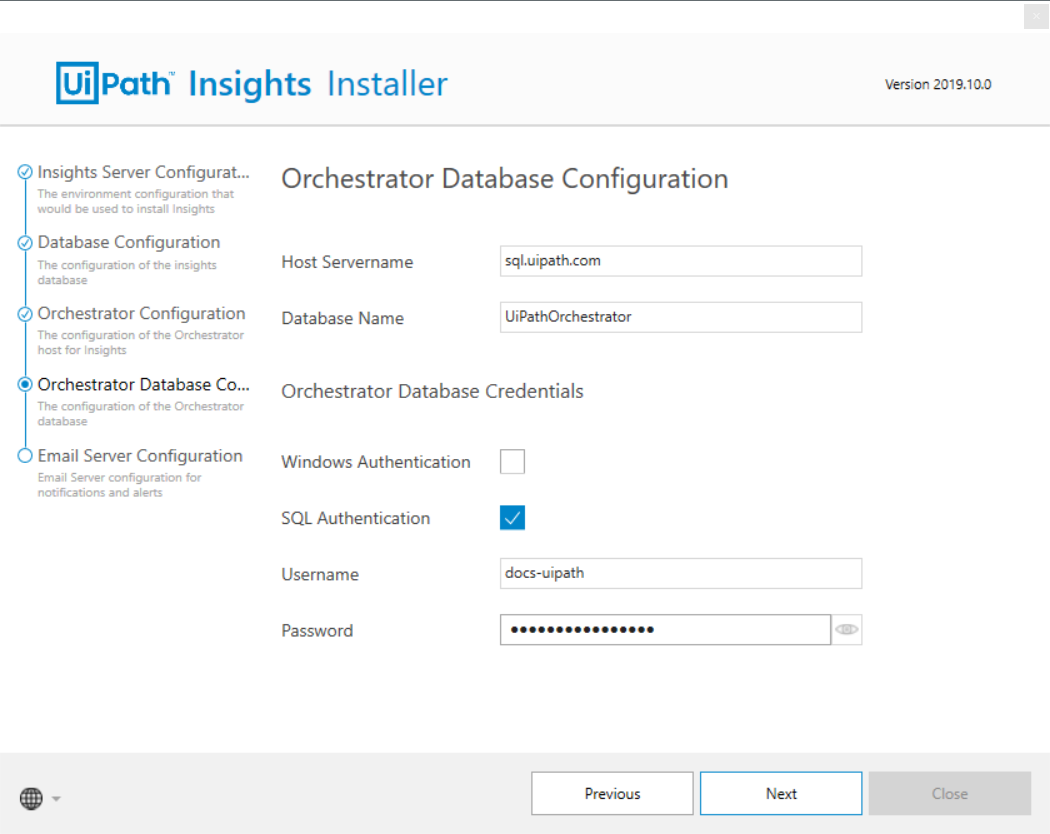
- Fill in the Orchestrator database details, as follows:
- Host Servername - the name of the SQL Server machine where the Orchestrator database is located. You can also specify a custom port number here using a comma, such as
sql.uipath.com,1733. - Database Name - the name of the Orchestrator database specified when installing Orchestrator.
- Windows Authentication - if selected, the connection is made using a domain account.
- SQL Authentication - if selected, the connection is made using SQL authentication. If using this option, the Username and Password fields become editable and you must provide the SQL username and password used to connect to the database.
- Host Servername - the name of the SQL Server machine where the Orchestrator database is located. You can also specify a custom port number here using a comma, such as
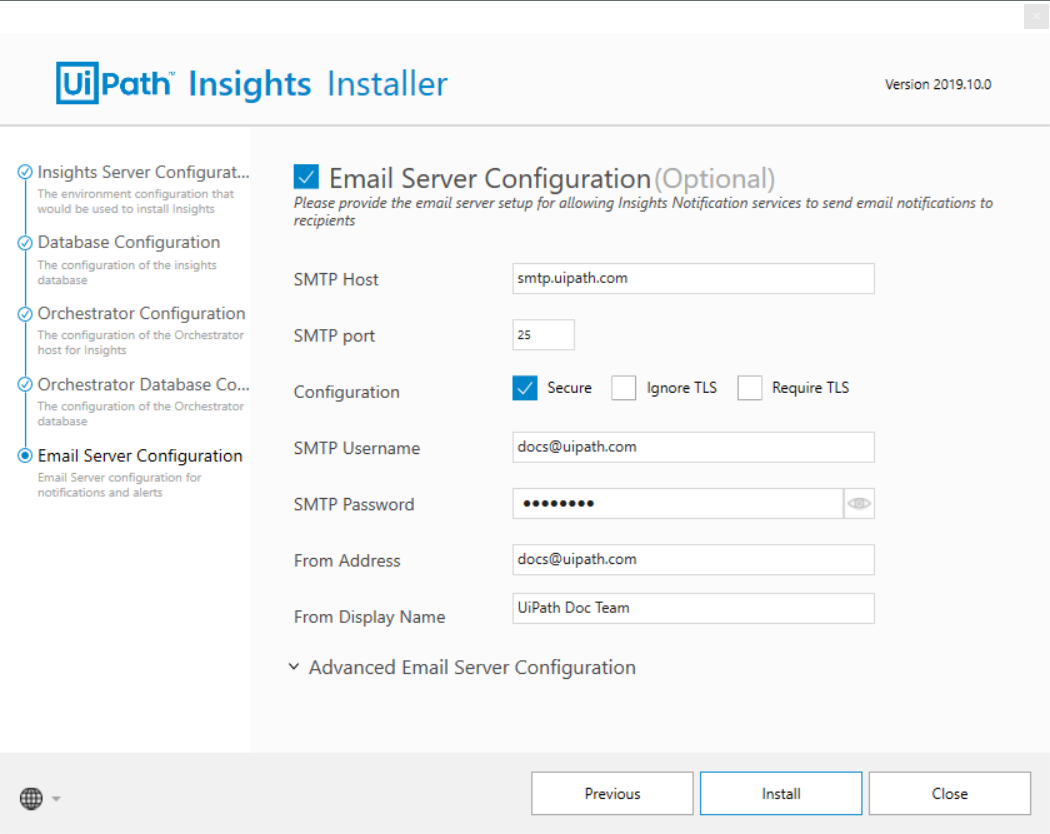
- Click Next. The Email Server Configuration is displayed.
Note:
If you do not configure an email server then no Insights email alerts and notifications are sent. You can, however, add an email server configuration after installation by using the Modify function of the Windows Add or Remove Programs feature.
- If desired, configure your email server for Insights notifications, as follows:
- SMTP Host - enter your SMTP host.
- SMTP Port - enter your SMTP port. By default this is set to
25but can be edited. - TLS Configuration - used to set the email server security settings. It has the following options:
- Secure - if checked, the connection will use TLS.
- Ignore TLS - if selected (and Secure is not), TLS will not be used. Select this option when connecting to a non-secure SMTP server.
- Require TLS - if selected (and **Secure is not), it requires the connection to be upgraded to TLS regardless of email server support.
- SMTP Username - the email address to send mail messages from.
- SMTP Password - the password for the email address used above.
- From Address - the email address to send mail messages from. It must match that provided for SMTP Username, above.
- From Display Name - a display name for the email address.
- Advanced Email Server Configuration - it has the following options:
- Debug - if selected, Insight logs all SMTP traffic. Should only be used for troubleshooting.
- Logger - if selected, Insights logs all events (e.g. server connection).
- Connection Timeout - time, in milliseconds, to wait for a connection to be established.
- Greeting Timeout - time, in milliseconds, to wait for the greeting after a connection is established.
- Socket Timeout - duration, in milliseconds, of inactivity to allow.
- Click Install. The installation process starts. Once completed, click Close to exit the installer.
Important:
After Insights installation has finished:
- Ensure the .NET Trust Level of the Sisense app is set to
Full.- Open the
consts.jsfile located in theC:\Program Files\Sisense\app\query-proxy-service\src\commondirectory and set theHEALTH_CHECK_TIMEOUTparameter to100000.- Restart the
Sisense.QueryProxyservice.
Windows Authentication Configuration
If you are using Windows Authentication to connect to the Insights database (Step 4, above), you must modify the logon properties of the Sisense.CLRConnectorsContainer and Sisense.JVMConnectorsContainer services as follows:
- Open Windows Services Manager.
- Right-click on
Sisense.CLRConnectorsContainerand select Properties. - From the Log On tab select the This account radio button.
- Enter the username and password of the account used to connect to the Insights SQL database and click OK.
- Repeat this process for the
Sisense.JVMConnectorsContainerservice. - Open the
descriptions.jsonfile located in theC:\Program Files\Sisense\DataConnectors\JVMContainer\Connectors\UiFrost\directory. - Add the following flag in the
descriptions.jsonfile and save:"startAsUser":false.
Tenant Setup
After Insights has been installed, you must then enable it for your desired tenant(s) using the UiPath.InsightsAdminTool.exe command-line utility.
Important!
Each tenant enabled triggers a "warm start' process that fetches the last 30 days of data into the Insights database.
Depending on the volume of data and hardware capabilities, it may be several hours before all tenant data is processed and viewable in Insights.
- On the machine where Insights is installed, open an elevated command prompt.
- Navigate to the
\Orchestrator\Toolsdirectory. For example,cd C:\Program Files (x86)\UiPath\Orchestrator\Tools. - Run the
UiPath.InsightsAdminTool.exeutility with the necessary command parameters:
| Command | Description |
|---|---|
enable | Enables Insights for a specified tenant. |
interactive | Used to enable Insights and will prompt the user for tenant selection. |
--tenant, -t | Mandatory. The tenant name. |
--user, -u | Mandatory. The admin user of the Orchestrator Host tenant. This is always admin and cannot be edited. |
--password, -p | Mandatory. The password for the Orchestrator Host tenant admin account. |
--debug, -d | Enables debug messages in the output. Set to false by default. |
--prompt | If enabled, prompts the user for each feature. Set to false by default. |
--log-file | If set, writes tool logs to the specified local file. Empty by default. |
--help | Displays the help screen. Set to false by default. |
--version | Displays the tool version. |
--lang | Language code to use for dashboards localization. Default is English. Supported language codes: en (English)zh-CN (Chinese)pt (Portuguese)pt-BR (Portuguese Brazil)es (Spanish)es-MX (Spanish Mexico)fr (French)it (Italian)ja (Japanese)de (German)ru (Russian) |
Example: UiPath.InsightsAdminTool.exe enable -u admin -p SecretP@ssword -t Default --log-file log.txt
- Repeat Step 3 for any additional tenant for which you want to enable Insights.
- Restart the Orchestrator site in IIS.
Note: For multi-node Orchestrator deployments, all nodes must be restarted. - Run this script to enable the recommended anti-virus exclusions.
- Installation and setup is now complete and you may begin using Insights.
Note: If you are installing Insights 19.10.6, there are some additional steps needed to complete the installation. These steps can be found here.
Important!
For deployments where the maximum number of per tenant, or total, processes and queues with custom fields is reached, you must Enable Table Grouping before proceeding with Insights in order to avoid impacted performance.
Updated about a year ago