About Activities Packages and Sources
An activities package is a bundle of activities that can help you automate a certain application (UiPath.Excel.Activities) or a category of apps (UiPath.Mail.Activities), or use certain technologies in your automations (UiPath.System.Activities). Every activity is part of an activities package.
A package source is the location from which StudioX installs activities packages. Packages come from a variety of sources and it is important to configure those sources to ensure that all the activities packages you need are available in your projects.
An activities package that is installed in a project is known as a project dependency.
The following packages are available by default for all StudioX projects: UiPath.UIAutomationX.Activities, UiPath.System.Activities, UiPath.Excel.Activities, and UiPath.Mail.Activities.
Managing Package Sources
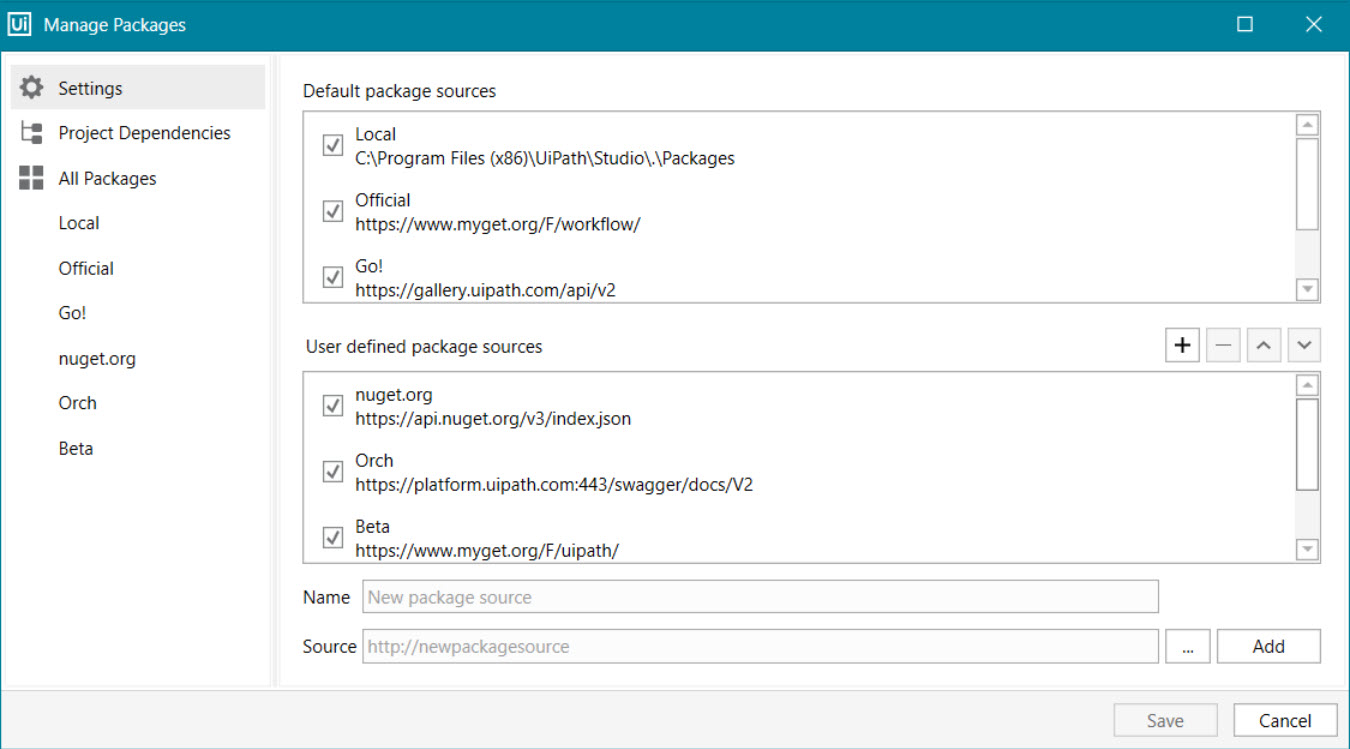
StudioX uses NuGet feeds to install activity packages, and it is configured by default with the following feeds:
- Local - The feed that comes installed by default with StudioX. This package source is enabled by default.
- Official - The official UiPath feed, where you can find the activities packages that are officially supported by us. This package source is disabled by default.
- Community - The open-source packages developed by the RPA community. You can find more details on our forum. This package source is disabled by default.
- Orchestrator - The Robot activities feed is added by default if it is connected to Orchestrator. This package source is enabled by default.
When installing or upgrading StudioX Community Edition, all default sources are enabled. For StudioX Enterprise, Local and Orchestrator sources are enabled by default, together with the sources configured in the UiPath.settings file.
For automation projects that use activities found on sources other than the recommended Local and Orchestrator, it is advised to enable the required sources from the Manage Packages window before running the project. Settings for user-defined sources are preserved upon upgrading to a later StudioX Enterprise edition.
Note:
When connected to Orchestrator, an activities NuGet feed hosted on the server is added by default, so that each time you deploy a package to an environment, the Robot machine has access to all the activities it needs to execute the automation project. For more info, see the About the Activities Feed chapter.
When executing an automation project from StudioX, the Robot downloads the specified or indicated package version it needs to execute the project, in accordance to the previously set runtime rules for each project. If the dependency used during execution has a Strict runtime rule and the exact package version was not found, an error is thrown.
Note:
All activities present on the machine, regardless of where they are retrieved from, are decompressed and installed in the
%localappdata%\UiPath\Activitiesfolder.
When running the .msi installer, if you choose to install the local activities feed, the %ProgramFiles(x86)%\UiPath\Studio\Packages folder is created, containing all of the packages in the local feed.
If you choose not to install the local activities feed, the folder is still created, but contains only the default activities, UiPath.UIAutomationX.Activities, UiPath.System.Activities, UiPath.Excel.Activities and UiPath.Mail.Activities, together with dependencies previously set to a project.
Note:
Publishing to a secure feed can be authenticated either through the Robot Key, Orchestrator credentials, Windows authentication or API key.
Adding Custom Sources
Note:
In Enterprise installations, a custom activity feed can only be used in workflows started from StudioX on that user. Starting a job on the same machine from Orchestrator or the Agent (Robot Tray) results in the Robot not being able to retrieve the appropriate package. To avoid such scenarios, you should add the custom feed in the
UiPath.settingsfile under the ActivitiesFeed property instead of using the method below.
- In the Manage Packages window, click Settings. The package sources are displayed.

- Click on the
 button to add a feed to the User defined package sources category.
 - Fill in the name of the package source or the name of the NuGet feed.
- In the Source field, type the local drive folder pathway, the shared network folder pathway or the URL of the NuGet feed.
- Click on Add. The new feed is automatically added among the User defined package sources and in the All Packages category of the Manage Packages window. The feed is enabled by default.
- Click Save to apply all changes.
User defined and default package sources can be enabled or disabled from the Manage Packages window.
Please note that feeds are added on the spot. Clicking the Close or Cancel button after adding a feed does not revert changes.
Adding Secure Sources
If you want to add a custom NuGet feed that requires authentication, you can follow the steps explained here.
You need to add the NuGet feed, username and password values in the NuGet.config file, located at the following path: %AppData%\NuGet. When it’s done, the feed should be visible in the Manage Packages window.
<packageSources>
  <add key="nuget.org" value="https://api.nuget.org/v3/index.json" />
  <add key="FeedName" value="https://FeedSource" />
  </packageSources>

 <packageSourceCredentials>
  <FeedName>
    <add key="Username" value="YourUsername" />
    <add key="Password" value="YourPassword" />
  </FeedName>
</packageSourceCredentials>
Please take into account that key="ClearTextPassword" should replace key="Password" when unencrypted passwords are used.
Removing Custom Sources
Note:
Only User defined package sources can be removed from the Manage Packages window.
- In the Settings category, click on any of the feeds under the User defined package sources section.
- Click the Remove
 button. The feed is removed from the All Packages category and the User defined package sources section.
 - Click on Save to apply the changes.
Please note that feeds are removed on the spot. Clicking the Close or Cancel button after removing default or custom feeds does not revert changes.
Managing Packages
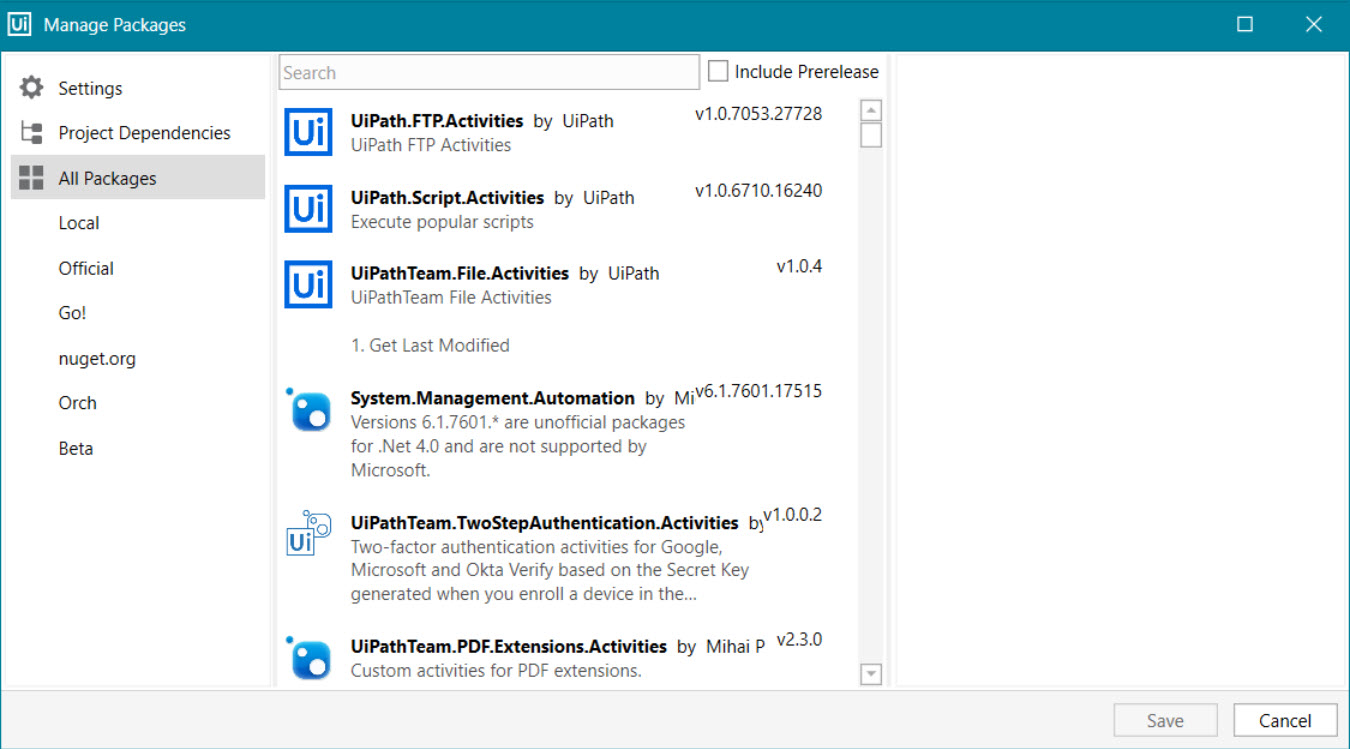
The package manager functionality enables you to download activities packages, view the ones already installed for your project and update them, as well as add and remove your own. It shows the list of available packages per source and the list of dependencies for the current project. The Manage Packages window always opens with the Project Dependencies list.

Details about packages and libraries are displayed in the right panel of the Manage Packages window, as you can see in the screenshot above.
Note:
Release notes for activities packages are not visible in the Manage Packages window due to a NuGet v3 limitation.
When selected, the Include Prerelease check box next to the Search bar displays the beta versions of packages, if available.
Installing Packages
Note:
An internet connection is required to download and install activities packs.
- In the Manage Packages window select the All Packages category. This opens a list of all packages gathered from your feeds.
- Scroll down the list to find the package you wish to install or type in its name in the search bar. Check the Include Prerelease box to include beta versions of activity packages, where available.
- Select an activity package to view its description, version, dependencies, the project URL and the date when it was published.
- Click on the drop-down list next to Version to pick a version of the package, and then set a Runtime Rule. To read more about runtime rules for project dependencies, see Setting Dependency Rules.
- Click on the Install button. Alternatively, click on the
 icon next to the package name to mark it with the
  icon, making it ready for installation.
 - The License Acceptance window is prompted if the activity package requires you to read and accept the licensing terms. Click on View License to read licensing terms.
- Click I Accept to agree with the license terms and install the package.
- Click I Decline to cancel the installation and return to the Manage Packages window.
Note:
When installing multiple activity packages, the License Acceptance window shows a link to the License Agreement for each of them. By clicking I Accept or I Decline, you either accept or decline the license agreements for all packages.
- Packages that don't have License Agreements are installed in your project only after you click Save.
After you install an activities package, the package becomes a project dependency.
Note:
If during the installation of an activity package the path gets corrupted, the installation doesn’t complete. It is recommended to backup and then clear the content of the following local folders
%userprofile%\.nuget\packagesand%userprofile%\AppData\Local\UiPath\.cache.
Updating Packages
- Click the Manage Packages button in the ribbon menu. This opens the Manage Packages window, with the Project Dependencies category selected. The
 icon shows which packages are currently installed.
 - Default dependencies are displayed, together with the versions that are currently linked to the project.
- If an update is available for a package, the icon
 is displayed next to the available version number. Click the icon to update the package. The
  icon is shown next to the package, meaning that dependencies are ready to be installed.
 - Click Save to install the update.
- If the License Acceptance window prompts you to read and accept the licensing terms, click View License to read the licensing terms, and then click I Accept to install the updated package.
Uninstalling Packages
- Click the Manage Packages button in the ribbon menu. This opens the Manage Packages window, with the Project Dependencies category selected.
- Select the package you want to remove, and then click the Uninstall button next to the package.
- Click Save to uninstall the package.
When running an automation project, the Manage Packages button is disabled, meaning that activity packages cannot be installed or removed until the execution has stopped.
Setting Dependency Rules
Activities packages are available in multiple versions, which is why upon installing or updating them from the Manage Packages window, you can set dependency runtime rules for each of them.
The Runtime Rule specifies which package version to install at runtime. It features two available options:
- The Strict runtime rule is the default state for dependencies added upon process creation. It means that only the specified version of the package is used at runtime to execute the parent process.
- The Lowest Applicable Version runtime rule means that if the target package isn’t found, the next higher version is searched in order to resolve dependencies.
Note:
You cannot save projects containing invalid activities. Install the needed dependency and then save the project.
Updated 2 years ago