In this example, we will create an automation for the following tasks:
- Copy values from an Excel file.
- Paste the values to specific fields in a desktop application.
- Copy the transaction number from the desktop application.
- Paste the value to a cell in the Excel file.
- Click a button in the desktop application to submit the data.
- Display a confirmation message that contains the transaction number and the account number retrieved from the application.
We will create a project and start by adding an Excel File Card to indicate the Excel file to use. We will then add an Application Card that will contain the activities that interact with the application. At the end, we will add a Message Box activity to display the confirmation message.
Step 1: Set up the project and download the necessary files.
- Create a new project using the default settings.
- Download and extract the archive with the automation project in this tutorial using the button at the bottom of this page. Copy the file Transaction.xlsx to your project folder, and double-click the file DoubleUI.exe to open the DoubleUI application.
Step 2: Add the Excel file to the project.
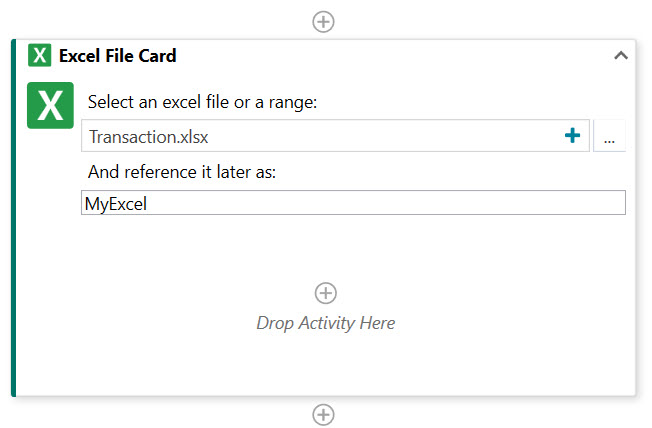
- In the Activities panel, select the Excel tab, and then double-click Excel File Card. An Excel File Card activity is added to the Designer panel.
- In the Excel File Card activity:
- Click
 to the right of the Browse for an Excel file field, and then browse to and select the file Transaction.xlsx.
 - In the field And reference it later as enter
MyExcel.
You have indicated that you want to work with the file Transaction.xlsx that will be known in your project as MyExcel.
- Click

Step 3: Add the application and the activities to perform in it.
- In the Activities panel, select the Automation tab, and then drag an Application Card activity and drop it inside the Excel File Card activity. An Application Card activity is added to the Designer panel. Because the data in the Excel file is available everywhere in your automation, you can also drop the Application Card below the Excel File Card if you want to.
- In the Application Card activity, click Indicate Application, and then move the mouse pointer on the DoubleUI application. When the window is highlighted, click anywhere in DoubleUI.
The Application Card is updated and a screenshot of the window appears inside the activity. - In the Activities panel, select the Automation tab, and then drag a Type Into activity and drop it inside the Application Card activity. A Type Into activity is added in the Application Card.
- In the Type Into activity:
- Click Indicate Target, then move the mouse pointer on the Cash In field in the DoubleUI.exe application and, when it is highlighted, click the field. Make sure to click the field where you can type, not the Cash In label next to it. In the Type Into activity, an image of the anchor element (the label of the field) is displayed under Find this and an image of the target element (the field where to type) is displayed under Type here. The name of the activity has been updated to include the label of the field.
- Click
 on the right side of the Type this field, and then select MyExcel > Indicate in Excel. In the Excel file, select the B1 cell (the Cash In value) and click Confirm in the UiPath tab of the Excel ribbon menu. The Type this field displays your selection as [MyExcel] Sheet1!B1.
You have indicated that you want to copy the Cash In value from the Excel file to the Cash In field in the DoubleUI.exe application.
- Repeat steps 3-4 two more times to add Type Into activities to copy the On Us Check and Not On Us Check values from the Excel file (cells B2 and B3 respectively) to the corresponding fields in the DoubleUI application.
- In the Activities panel, select the Automation tab, and then drag a Get Text activity and drop it inside the Application Card activity after the last Type Into activity. A Get Text activity is added in the Application Card.
- In the Get Text activity:
- Click Indicate Target, then move the mouse pointer on the Transaction # value in the DoubleUI.exe application and, when it is highlighted, click the value. Make sure to click the value next to the Transaction # label, not the label itself. In the Get Text activity, an image of the anchor element (the label of the field) is displayed under Find this and an image of the target element (the field from where to get the text) is displayed under Get this. The name of the activity has been updated to include the label of the field.
- Click
 on the right side of the Save to field, and then select MyExcel > Indicate in Excel. In the Excel file, select the B4 cell (the Transaction # value) and click Confirm in the UiPath tab of the Excel ribbon menu. The Save to field displays your selection as [MyExcel] Sheet1!B4.
You have indicated that you want to copy the value for the Transaction # from the DoubleUI.exe application to the B4 cell in Sheet1 of the Excel file.
- In the Activities panel, select the Automation tab, and then drag a Click activity and drop it inside the Application Card activity after the Get Text activity. A Click activity is added in the Application Card.
- In the Click activity, click Indicate Target, then move the mouse pointer on the Accept button in the DoubleUI.exe application and, when it is highlighted, click the button. In the Click activity, an image of the target element is displayed under Click on this. The name of the activity has been updated to include the label of the button.
You have indicated that you want to click the Accept button from the DoubleUI.exe application. - In the Activities panel, select the Automation tab, and then drag a Get Text activity and drop it inside the Application Card activity after the Click activity. A Get Text activity is added in the Application Card.
- In the Get Text activity:
- Click Indicate Target, then move the mouse pointer on the Account # value in the DoubleUI.exe application and, when it is highlighted, click the value. In the Get Text activity, an image of the label of the field is displayed under Find this and an image of the value is displayed under Get this.
- Click
 on the right side of the Save to field, and then select Save for Later Use. Enter the name Account # for the value.
You have indicated that you want to copy the value for the Account # from the DoubleUI.exe application and you saved the value under the name Account # for use later in your project.

Step 4: Add and configure the Message Box activity.
- In the Activities panel, select the System tab, and then drag a Message Box activity and drop it after the last activity. Because the data in the Excel file is available everywhere in your automation and Message Box is not an UI Automation activity, you can drop the Message Box inside the Excel File Card, inside the Application Card, or outside them, in other words anywhere in the automation as long as it is the last activity.
- In the Message Box activity, click
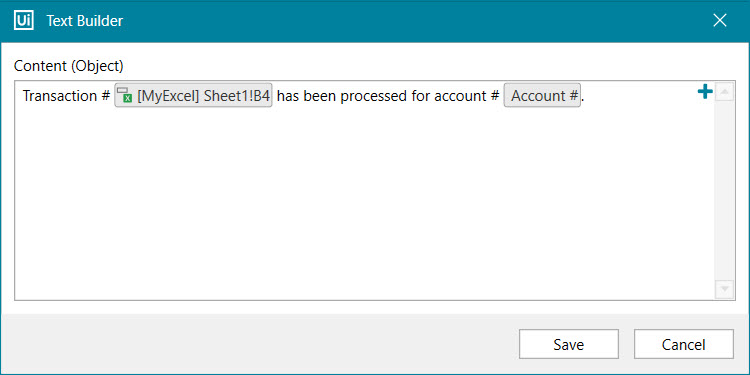
 on the right side, and then select Text. The Text Builder window appears.
 - We want add to display a text similar to: "Transaction # 123 has been processed for account # 456`. To achieve this:
- Enter the text "Transaction # ".
- Click
 on the right side of the window, and then select MyExcel > Indicate in Excel. In the Excel file, select the B4 cell (the Transaction # value) and click Confirm in the UiPath tab of the Excel ribbon menu. You have added the transaction number value from the Excel file.
The text should now look like this: "Transaction #MyExcel Sheet1!B4". - Enter the text "has been processed for account # ".
- Click
 on the right side of the window, and then select MyExcel > Use Saved Value > Account #. You have added the account number value that you saved for later use earlier.
The text should look like this:

- Click Save in the Text Builder.
- Click Save in the ribbon menu to save the automation, then click Run to execute the automation.
The values are copied from the Excel file and entered in the DoubleUI application, the Transaction # from the DoubleUI application is copied to the Excel file, and a message box displaying the transaction and account numbers appears at the end.
Updated 2 years ago