Multi-tenant
Orchestrator offers a multi-tenancy option. By using more than one tenant, users can split a single instance of Orchestrator into multiple deployment environments, each with its own Robots, processes, logs and so on. All tenants share the same Orchestrator database.
This enables isolation of desired resources from the rest of the organization. Automation resources are accessible from only within that tenant.
Folders
Each tenant can be further organized and managed under Folders. Folders enable you to limit access to the administration of the automation (i.e. who can create Robots, access certain Processes, etc.) while sharing the automation itself across the necessary departments of your organization.
Robots
Use meaningful names and descriptions for each provisioned Robot.
For Unattended Robots, the Windows credentials are needed in order to run unattended jobs on them. For Attended Robots, credentials are not needed because the jobs are triggered manually by human agents, directly on the machine where the Robots are installed.
Every time a new Robot is provisioned, the type of the Robot should be chosen accordingly.
The next step after registering the Robot to Orchestrator is to check if its status is Available, in the Robots page.
Environments
Use meaningful names and descriptions for each environment created.
Orchestrator Environments should map the groups of process execution. Each environment should have a specific role in the company business logic.
If a Robot is going to execute two different roles, it can be assigned to multiple environments. If you have multiple Robots on the same machine, it is recommended that you group them in the same environment. Otherwise, some errors might occur when deploying different versions of the same process.
Access management between Robots and processes is done by using Environments properly.
Processes
Once in a while, old versions of processes that are not used anymore should be deleted. Versions can be deleted one-by-one, by selecting them manually and clicking the Delete button or the Delete Inactive button. The latter deletes all the process versions that are not used by any process.
Note:
It’s recommended to keep at least one old version to be able to rollback if something is wrong with the latest process version.
Assigning Packages to Environments
It is good practice to assign each package published to Orchestrator to an environment. The deployment decision is taken in the Processes page. All the Robots from the environment get access to the package version set for this process.
When a new version of a process is available, an icon informs the user.
Rolling back to the previous version is always an option if something goes wrong after updating. This can be done by pressing the Rollback button.
Jobs
If the Robot needs to run multiple processes with no interruption, all the jobs should be triggered one after another even if the Robot is busy. These jobs go in a queue, with the Pending status, and when the Robot is available again, Orchestrator triggers the next job.
It’s better to stop a job than to kill it.
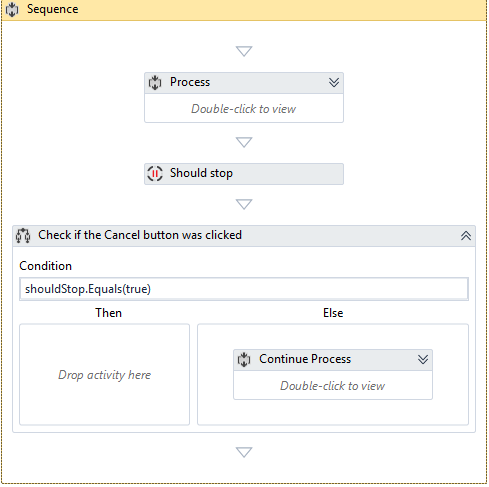
To be able to stop a job, the Should Stop activity is needed in the process workflow. This activity returns a Boolean that indicates if the Stop button was clicked.
The Kill button sends a Kill command to the Robot. This should be used only when needed, because the Robot might be right in the middle of an action.
Triggers
Besides the obvious functionality, triggers can be used to make a Robot run 24/7. Jobs can be scheduled one after another (at least one minute distance). If the Robot is not available when the process should start, the process is added to the jobs queue and is executed as soon as a Robot becomes available.
Queues
Use a meaningful name and description for each queue created.
At the end of the life cycle of each transaction, it is mandatory to set the result of the item processing. Otherwise, transactions that have the New status are automatically transitioned to Abandoned after 24 hours.
Using the Set Transaction Status activity, a queue item's status can be set to Successful or Failed. Keep in mind that only the Failed items with Application ErrorType are going to be retried if configured.
When two or more types of items should be processed by the same Robots, there are at least two ways to manage them using queues:
- Create multiple queues, one for each type and create a process that checks all the queues in a sequence and the one with new items should trigger the specific process.
- Create a single queue for all the items and for each item, create an argument “Type” or “Process”. By knowing this parameter, the robot should decide what process should be invoked.
Transactions
The Add Transaction Item activity brings the option of getting all the Transactions functionalities without using a queue, but one should still be created before. This activity adds an item to the queue and sets its status to InProgress. Start using the item right away and don’t forget to use the Set Transaction Status activity at the end of your process.
Logs
The Add Log Fields activity adds more arguments to Robot logs for a better management. After using it in the workflow, the Log Message activity also logs the previously added fields.
Updated 3 years ago

