The following procedure has to be followed only if you did not enable Windows authentication during the installation process, as described here.
To enable Windows Authentication in Orchestrator, perform the following actions:
- Open IIS (Internet Information Services Manager).
- In the Connections section, navigate to the UiPath Orchestrator site. The Features View panel is updated accordingly.
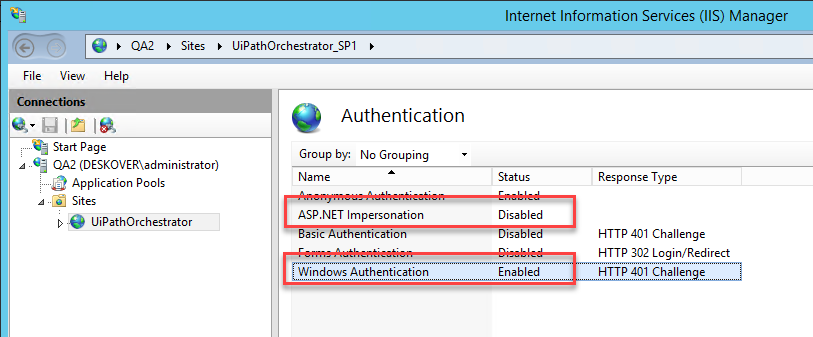
- Double-click Authentication. The Features View section is updated accordingly.
- Select the Windows Authentication option and, in the Actions section, click Enable. Windows authentication is now enabled for the UiPath Orchestrator site.
- Make sure that the ASP.NET Impersonation option is Disabled.
- In the Connections panel, navigate to the Orchestrator Server Node. The Features View is updated accordingly.
- In the Management section, double-click Configuration Editor. The Features View is updated accordingly.
- In the Section drop-down list, navigate to
system.webServer/httpErrors. The Features View is updated accordingly.
- In the Actions panel, click Unlock Section. If the section is not locked, skip this step.
- Select the
defaultPathattribute and click Unlock Attribute in the Actions panel. - Close IIS.
- Open the
Web.configfile.
- Set the
WindowsAuth.Enabledparameter totrue. - In the
WindowsAuth.Domainparameter, enter the Windows domain that the AD group is in. - Save the
web.configfile. - Access Identity Server's Windows settings within the External Providers page (read here how to access Identity Server).
- Select the Enabled check box.
- (Optionally) Select the Force automatic login using this provider check box. This parameter enables or disables Windows automatic login.
- Enter a value in the Display name parameter. For example,
Windows.
- Click Save to save the changes to the external identity provider settings.
- Restart the IIS site after performing any configuration changes within Identity Server.
- Add your AD users as explained here.
Updated 2 years ago
See Also
| About Installation |


