Deploying Processes
Note that creating a process requires your user to have View permission on Packages and View and Create permissions on Processes. For deploying processes in classic folders, View permissions on Environments is also required. Read more about roles.
- Click Add. The Deploy Process window is displayed.
- Select a package from the Package Name list. The latest version of the package is automatically selected. If the package has input and/or output parameters, they are also displayed.
- In the Display Name filed, add the name to be displayed on all pages which mention, list or monitor processes.
If left empty, the name of the package is used instead.
If left empty, thePackageName_AssociatedEnvironmentNamesyntax is used instead.
- From the Package Version list, select the version of the package that you want to use.
- Only for classic folders. From the Environment list, select the environment that you want to use.
- Type a Description for the process. We recommend adding a description, especially when there are many processes deployed to Orchestrator.
- If the package has input parameters, you can also provide values for them in the Input Values tab.
- Switch on the Enable Recording option so that, in the event of a job failure, the last moments of the execution are recorded and available for download as execution media. Configure the Scaling, Frequency, and Duration options as desired.
Note
The Recording option is only displayed on the Deploy Process window if you have View permissions on Execution Media.
- Switch on the Automatically Start Process option to set this process to launch automatically when the Robot agent starts.
- Click Create. The Deploy Process window is closed and the process is displayed in the Processes page.
Managing Package Versions
Note that managing package versions for a process requires View and Edit permissions on Processes, and View permissions on Packages.
Single Process
If a process has multiple versions available, you can select which one to use from the View Processes page:
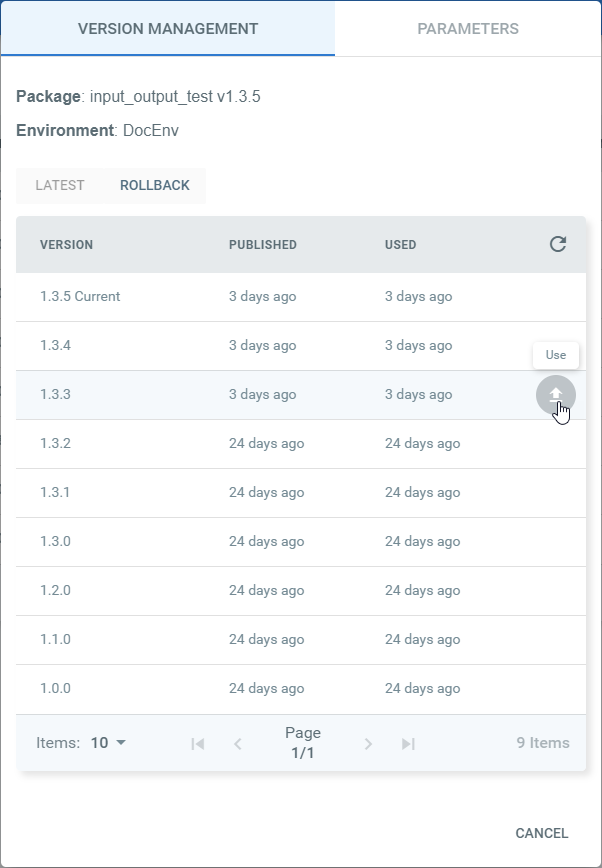
- Click More Actions > View Process button for a process with multiple package versions available. The View Process window is displayed.
- On the Version Management tab:
a. Click the Use button for the corresponding version that you want to use. The View Process window is closed and your configuration is saved. If the version you updated the process to was not the latest, the exclamation mark icon is still displayed next to the process.
b. Click the Latest button if you want to update the process to the latest available package version. The View Process window is closed and your configuration is saved.
c. Click the Rollback button. This enables you to return to the previously used version.
Multiple Processes
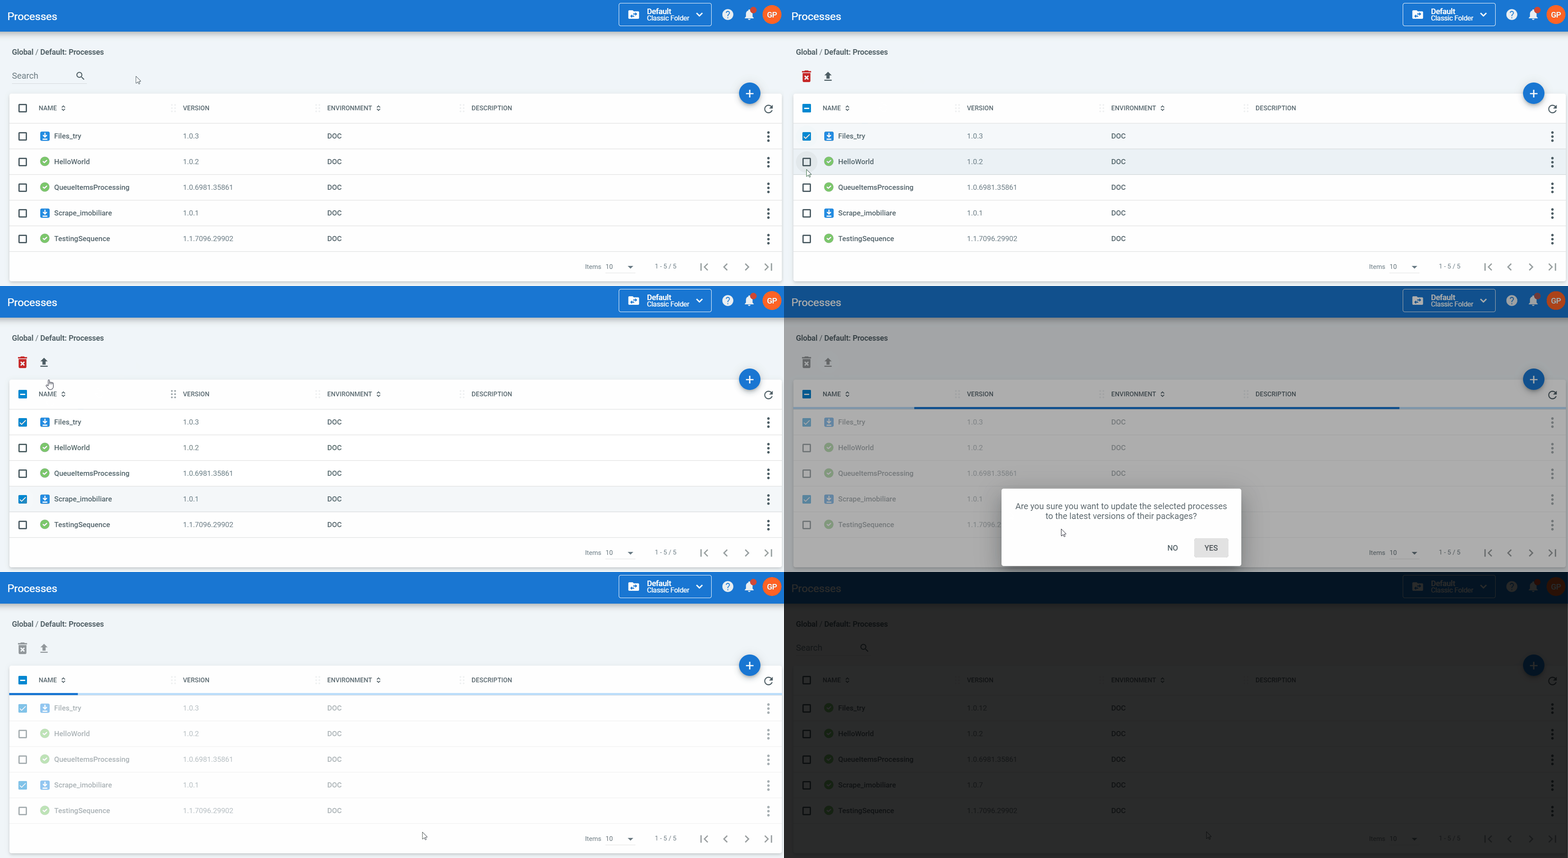
Update multiple processes to the latest available version as follows:
- On the Processes page, select the processes you want to update to the latest available package version.
- Click Use Latest.
Note
The Use Latest button is only enabled if your selection contains at least one process not using the latest available package version. The button is disabled if your selection contains processes using the latest available package version.
- Click Yes on the displayed confirmation window. The selected processes are updated to the latest version, and the icons are updated accordingly. If, for any reason, a process is not updated, an error message is displayed.
Managing the Value of Input Parameters
If a process has one or more input parameters, you can edit their values at the process level:
- Click More Actions > View Process button for a process with multiple versions available. The View Process window is displayed.
- In the Parameters tab, click the Edit button next to the input parameter you want to add a value for.
- Add the desired value, and click Save. The value of the input parameter is saved.
- Repeat step number 3 as many times as you need.
- Click Update. The values of all the input parameters are saved. For more information on how to fill in these values, please click here.
You can also remove the value of an input parameter by clicking the corresponding Clear Value button.
Managing Process Settings
On the Process Settings window you can:
- Switch on the Automatically Start Process option to set this process to launch automatically when the Robot agent starts.
- Edit execution media settings at the process level,
- Click More Actions > Process Settings for the desired process. The Process Settings window is displayed.
- Edit the Display Name of the process, if desired.
- Toggle the Enable Recording option to either enable or disable the recording functionality.
- If the functionality is enabled, edit the Scaling, Frequency, and Duration fields as desired.
- Toggle the Automatically Start Process option to either enable or disable it for this process.
- Click Update to save your changes, or Cancel to return to the Processes page without saving your changes.
Monitoring a Process
Click More Actions > Monitor Process button of the desired process to see the Monitoring page associated with it. Due to the Monitor Process button being displayed on the Processes page, you also need View on Processes to access the monitoring page from here.
Alternatively, select it from the Processes Overview widget (Monitoring > Jobs).
Note that monitoring a process requires your user to have View permissions on Jobs and on Monitoring. Additionally, Edit on Monitoring is required in order to disable errors from the Error Feed widget on the Monitoring > Jobs page. View on Environments is required in order to filter the pages by environment.
Removing Processes
Note that removing a process requires your user to have View and Delete permissions on Processes, as well as View permissions on Packages. For process deployed in classic folders, View permission on Environments is also required. Read more about roles.
- In the Processes page, select the processes that interest you.
- Click the Remove button. The process is deleted from the Processes page and the database. Please note that deleting a process is not going to delete the package from Orchestrator, but only its association with the environment/folder.
Alternatively, if you want to delete only one process, click the corresponding Remove button.
If you remove a process that has triggers associated with it, these are also removed, regardless if they are enabled or disabled.
Note:
You cannot remove a process if it is associated with an active job (it has one of following statuses: Pending, Running, Stopping and Terminating).
Updated 2 years ago


