Configure a machine to support ADFS and make sure you have access to the ADFS Management software. Address to your system administrator in this regard.
Configure ADFS to Recognize a New Orchestrator Instance
Note
The below steps are valid for the ADFS Management tool. Please note that the below procedure is a broad description of a sample configuration. For a fully detailed how-to, visit the official ADFS Documentation.
- Open ADFS Management and define a new relying party trust for Orchestrator as follows:
a. Click Relying Party Trusts.
b. In the Actions panel, click Add Relying Party Trust. The Add Relying Party Trust Wizard is displayed.
c. In the Welcome section, select Claims Aware.
d. In the Select Data section, choose the Enter data about relying party manually option.
e. In the Specify Display Name section, in the Display name field, insert the URL of the Orchestrator instance.
f. The Configure Certificate section does not need any specific settings so you may leave it as it is.
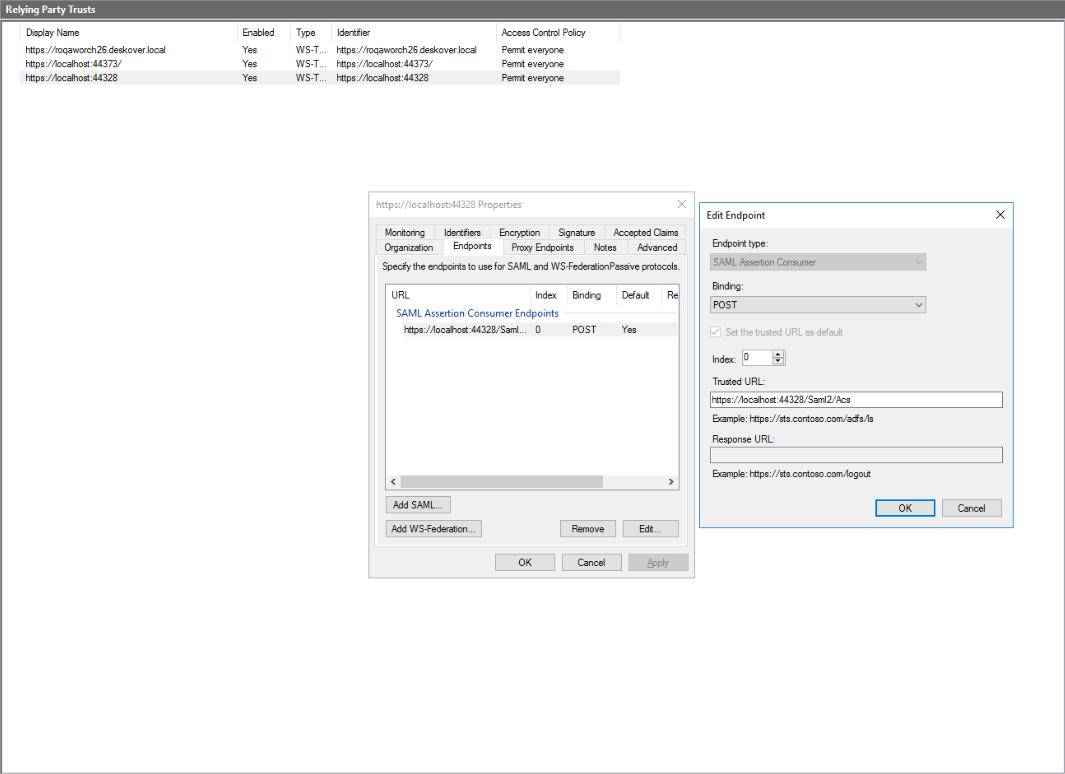
g. In the Configure URL section, select the Enable support for the SAML 2.0 Web SSO Protocol and fill in the URL of the Orchestrator instance plus the suffixSaml2/Acsin the Relying party SAML 2.0 SSO service URL field. For example,https://platform.uipath.com/Saml2/Acs.
h. In the Configure Identifiers section, fill in the URL of the Orchestrator instance in the Relying party trust identifier field.
i. In the Choose Access Control Policy section make sure to select the Permit everyone access control policy.
j. The next two sections (Ready to Add Trust and Finish) do not need any specific settings so you may leave them as they are.
k. The newly added party trust is displayed on the Relying Party Trusts window.
l. Make sure that the default value for your URL is Yes (Actions > Properties > Endpoints).

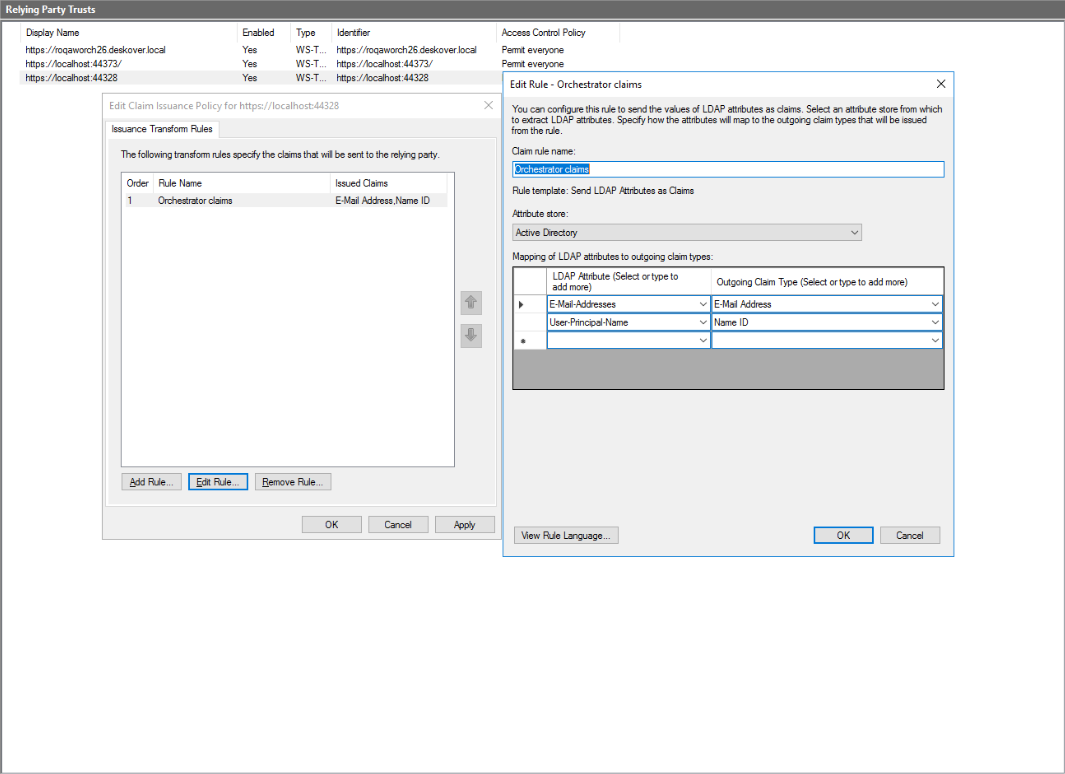
- Select the relying party trust and click Edit Claim Issuance Policy from the Actions panel. The Edit Claim Issuance Policy wizard is displayed.
- Click Add rule and create a new rule using the Send LDAP Attributes as Claims template with the following settings:

- Once ADFS is configured, open PowerShell as an administrator and run the following commands:
Set-ADFSRelyingPartyTrust -TargetName "DISPLAYNAME" -SamlResponseSignature MessageAndAssertion(ReplaceDISPLAYNAMEwith the value set on point 1.e.)Restart-Service ADFSSRV
Set Orchestrator to Use ADFS Authentication
- Define a user in Orchestrator and have a valid email address set on the Users page.
- Import the signing certificate provided by the Identity Provider to the Windows certificate store using Microsoft Management Console. See here how to do that.
- Make sure that the following configuration block is present in
web.config:
<configuration>
  <appSettings>
       <add key="ExternalAuth.Saml2.Enabled" value="true" />
  </appSettings>
  <sustainsys.saml2 entityId="https://platform.uipath.com" returnUrl="https://platform.uipath.com">
       <identityProviders>
              <add entityId="http://dskadfs.deskover.local/adfs/services/trust" signOnUrl="https://dskadfs.deskover.local/adfs/ls/" allowUnsolicitedAuthnResponse="true" binding="HttpRedirect">
                     <signingCertificate storeName="My" storeLocation="LocalMachine" x509FindType="FindByThumbprint" findValue="30c4de7f241904544ca663689146769c914c5dd2"/>
              </add>
       </identityProviders>
  </sustainsys.saml2>
</configuration>
- Replace all occurrences of
https://platform.uipath.comwith the URL of your Orchestrator instance. - Set the
entityIdparameter to the value obtained by configuring ADFS authentication. - Set the
signOnUrlparameter to the value obtained by configuring ADFS authentication. - Set the
findValueattribute of thesigningCertificateparameter to the thumbprint of the certificate, as provided in the Windows certificate store. Details here.
Note
Whenever filling in the URL of the Orchestrator instance, make sure it does not contain a trailing slash. Always fill it in as
https://platform.uipath.com, nothttps://platform.uipath.com/.
Updated 2 years ago