Importing an Acquired Web Certificate
This is the most secure method because the certificate is issued by a trusted Certification Authority. The certificate needs to be imported in IIS.
The Personal certificate store is where the Windows installer searches for the certificate based on the name you provided when prompted.
Creating a Domain Certificate on the Web Application Server
An explanation on how to create a Domain Certificate to enable the HTTPS protocol for the communication between the Robots and Orchestrator can be found in the procedures below.
In order to create a Domain Certificate, you need to install the Active Directory Certificate Services (Certification Authority) server role on a server in the domain - usually, on the Domain Controller, but not necessarily.
It is preferable to use a Domain Certificate rather than a self-signed one because no certificate has to be installed on Robot computers in the former case. The Domain Certificate is trusted by all the computers in the domain.
- Open IIS Manager.
- Select the local machine.
- Open Server Certificates.
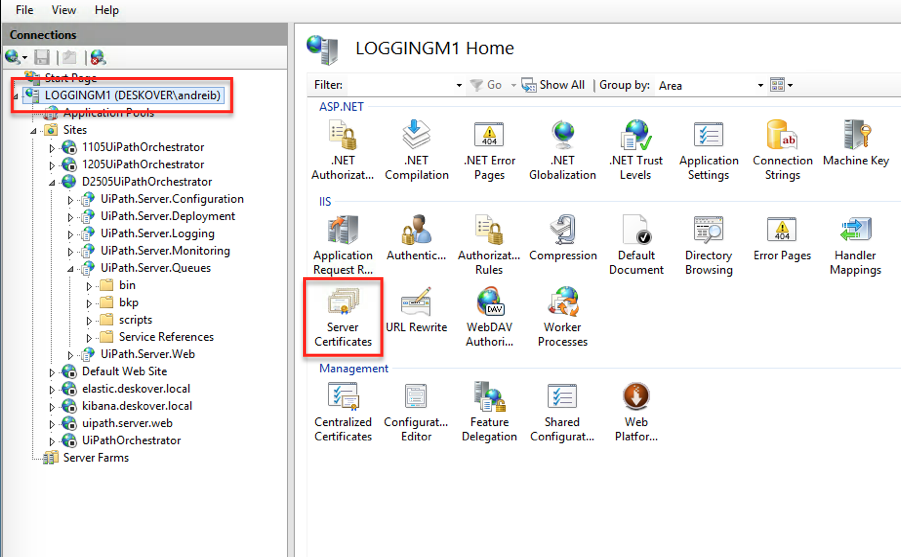
- In the Actions panel, click Create Domain Certificate. The Create Certificate window is displayed.
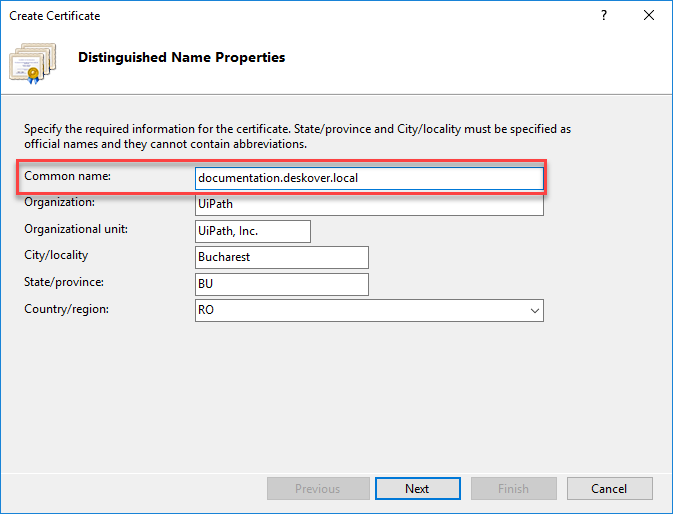
- Provide all the required information - all the fields are mandatory.
Note:
The pattern of the input that has to be provided in the Common name field is
hostname.full_domain_name. The full domain name is found in the System window in the Domain field.
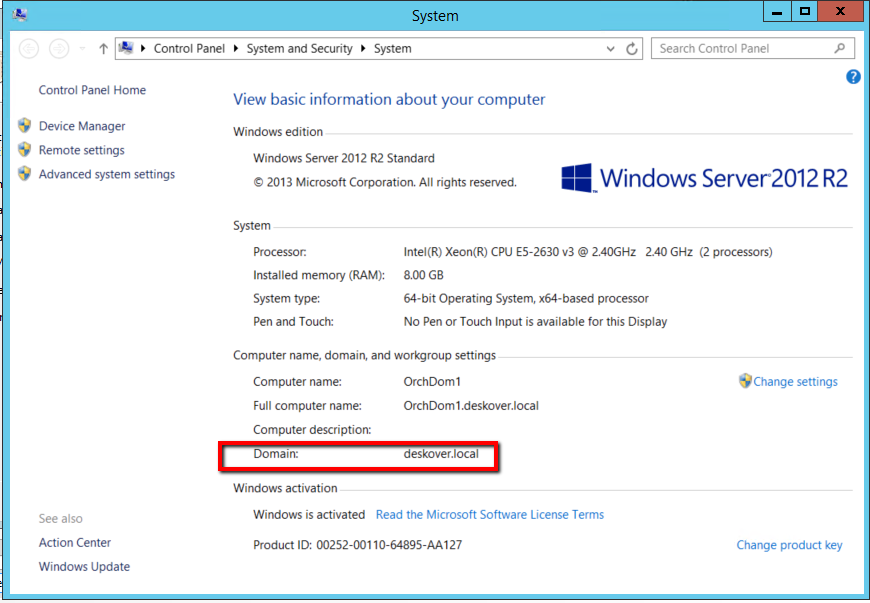
In this example, the Common name is documentation.deskover.local.
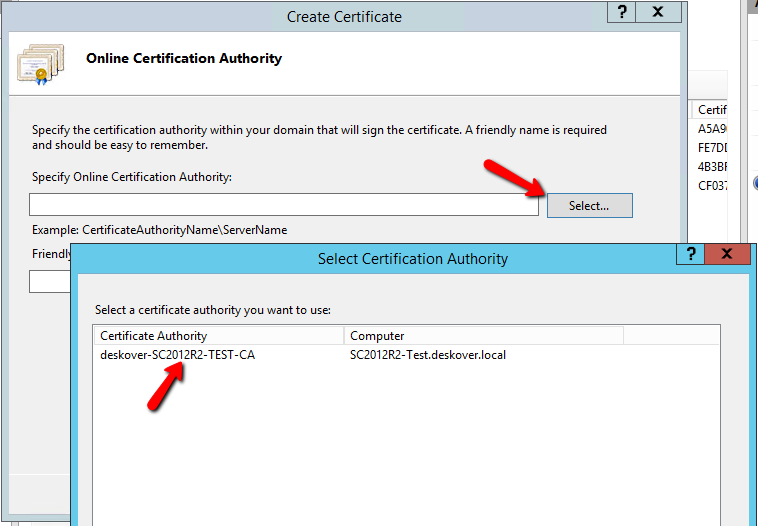
- Click Next. The Online Certification Authority page is displayed.
- Click the Select button. A list of certificates is displayed.
- Select a certificate from the list.
Important!
If the list does not contain any item, here are some possible explanations:
You have not requested a certificate for the domain from a certificate authority yet.
The certification authority did not issue any certificate.
The application server, or the machine on which Orchestrator is installed, has been added to the domain too recently. Not all the domain policies have been applied on this computer. You can either wait or force the domain policy update.
- Provide a friendly name, such as
OrchestratorCertificate, and then click Finish.
Important!
If you perform the actions above before installing Orchestrator, type the input entered previously in the Common name field when prompted for the certificate name during the installation process.
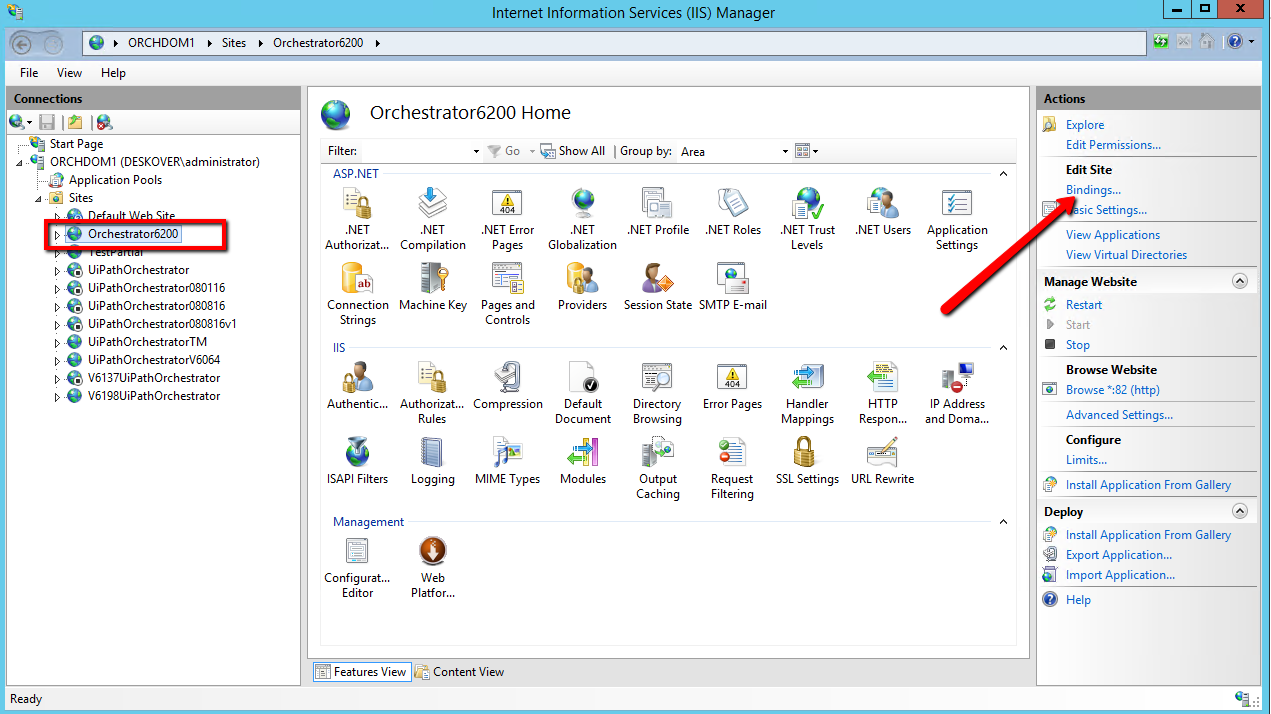
If Orchestrator has already been installed, change the Orchestrator site binding from HTTP to HTTPS by completing the following steps:
- In the Actions panel, click the Bindings button. The Site Bindings window is displayed.
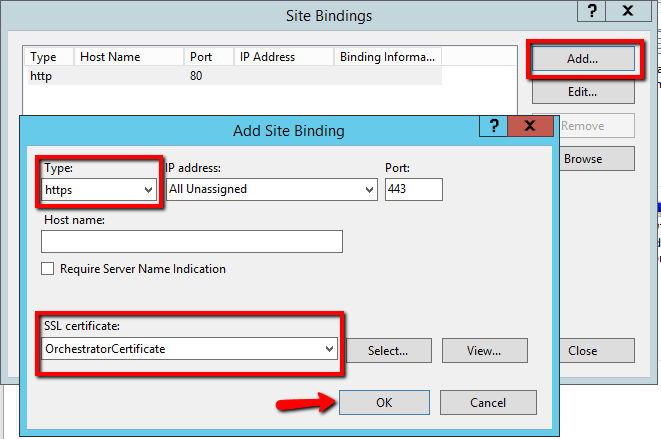
- Click Add. The Add Binding Site window is displayed.
- From the Type drop-down list, select the HTTPS protocol.
If necessary, change the value in the Port field from the default to a different one. Subsequently, the port has to be opened in the firewall as well. - From the SSL Certificates drop-down list, select the name of the certificate.
- Click OK. Your settings are saved and the Add Site Binding window closes.
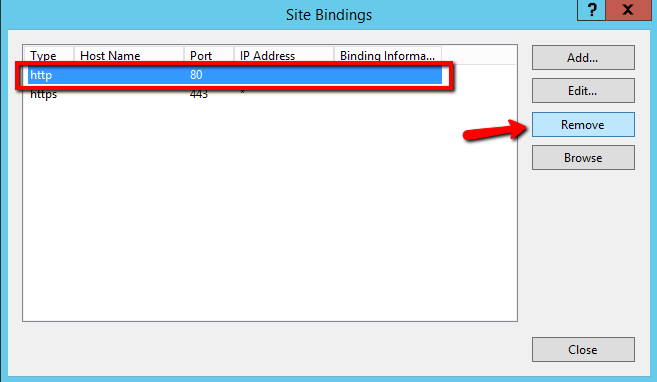
- In the Site Bindings window, remove the HTTP protocol from the list.
In any browser, the Orchestrator URL you need to use contains the FQDN, which is https://orchdom1.deskover.local in this example.
In the Robot Settings window, use the FQDN name preceded by HTTPS, as in the screenshot below.
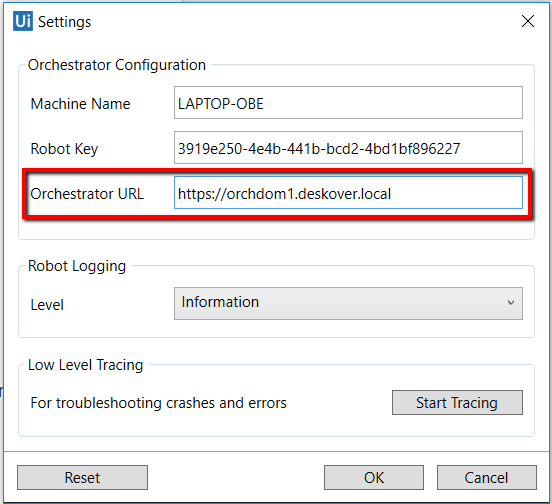
No certificate needs to be installed on the Robot machines because the domain certificate is trusted by all the computers in the domain.
Creating a Self-Signed Security (SSL) Certificate and Deploying it to Client Machines
Creating a Self-Signed Certificate in IIS
- Open IIS Manager and select the local machine.
- Double-click the Server Certificate folder on the Features View. The Features View is updated accordingly.
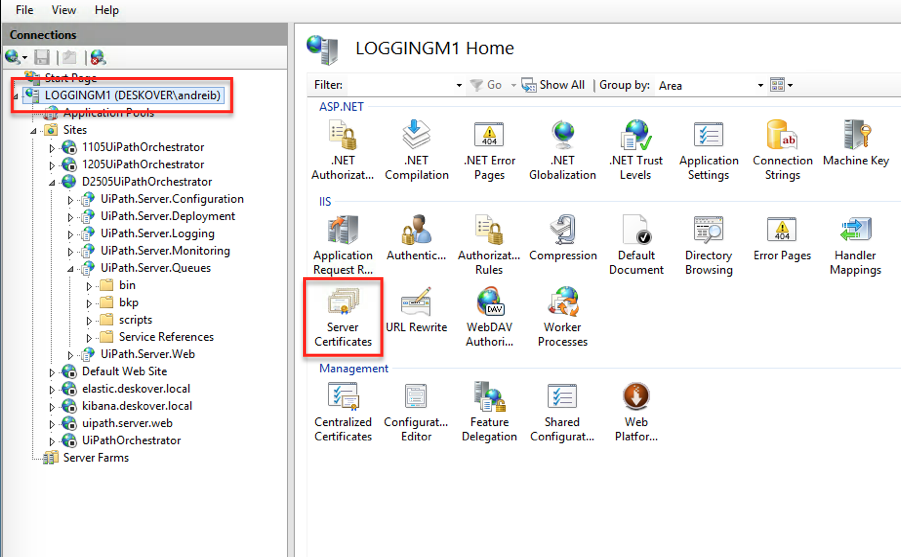
- In the Actions panel, click on Create Self-Signed Certificate.
- Enter the friendly name of the certificate. In this example, the name is OrchestratorCertificate.
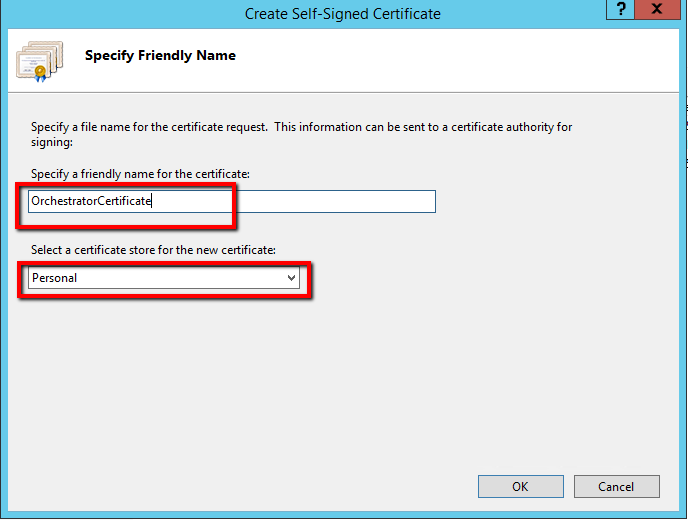
- The Personal option in the certificate store section does not need to be changed, so you can proceed by clicking OK. The certificate is displayed in the Server Certificates list. The Issued To column contains the fully qualified domain name (FQDN) of the current server.
All the Robots that connect to Orchestrator should use the FQDN.
The IIS server now contains the certificate, which is used by the Robots to communicate with Orchestrator securely. The public key of the certificate needs to be extracted and placed in a .cer file. The certification file has to be imported and the certificate has to be installed on each Robot machine. Find how to export the public key of the self-signed certificate in the section below.
Exporting Self-Signed Certificates
- Press Windows + R and type
CERTLM.msc. The Certificates Local Machines application is displayed. - Expand the Personal folder and click on Certificates. The list of certificates is displayed in the main panel.
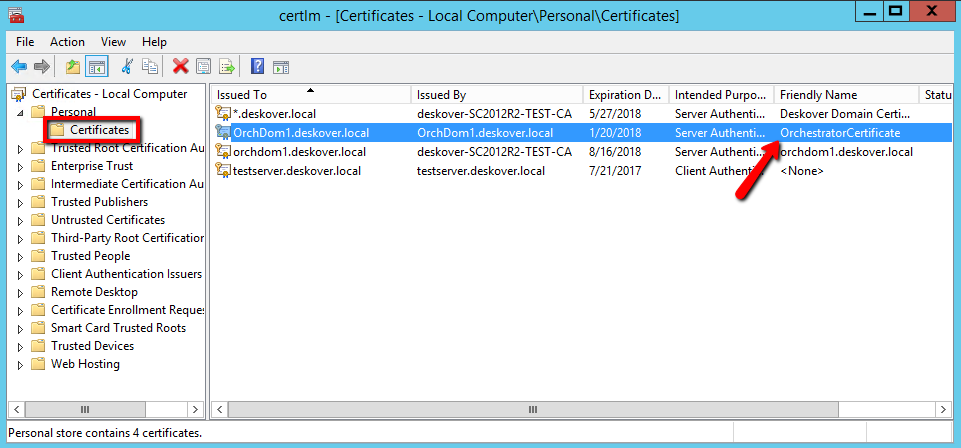
- Right-click your certificate and select All Tasks > Export. You are prompted to export the private key.
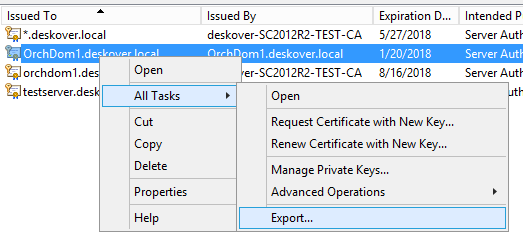
- Select No and click Next. The Certificate Export Wizard window is displayed.
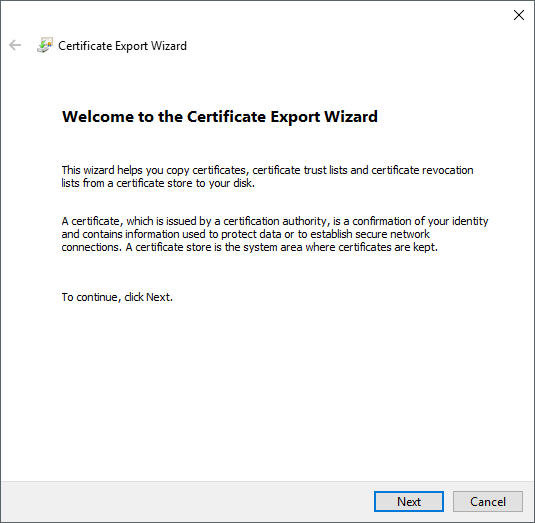
- Click Next. The Export Private Key step is displayed.
- The default option for the file format is DER encoded binary X.509 (.CER). It does not need to be changed, so proceed by clicking Next.
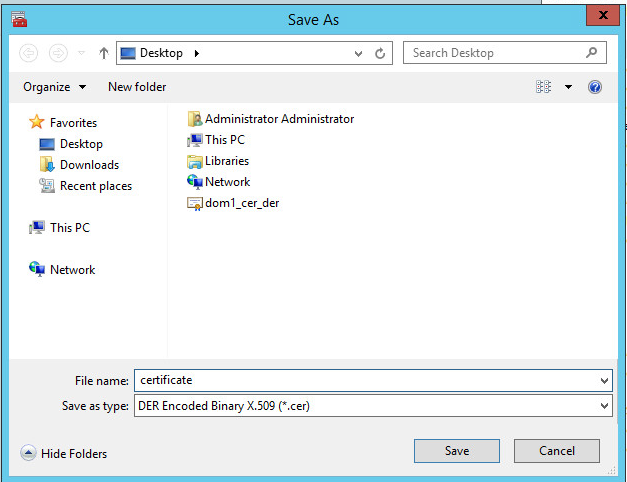
- Enter the location where the certificate file should be exported.
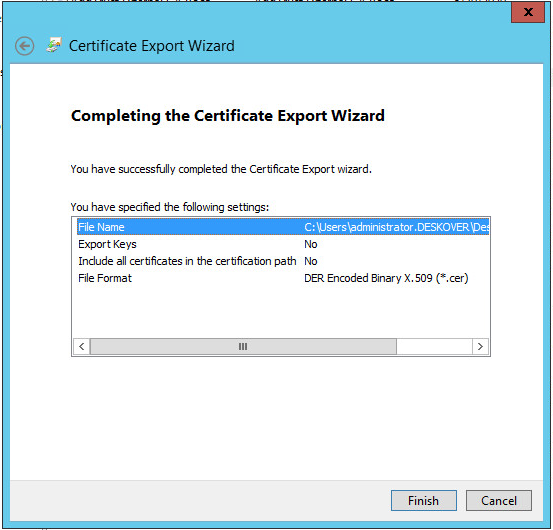
- Confirm your settings by clicking Finish.
- Copy the exported certificate with the public key to the Robot machines.
To change the Orchestrator site binding from HTTP to HTTPS:
- Click Add. The Add Site Binding window is displayed.
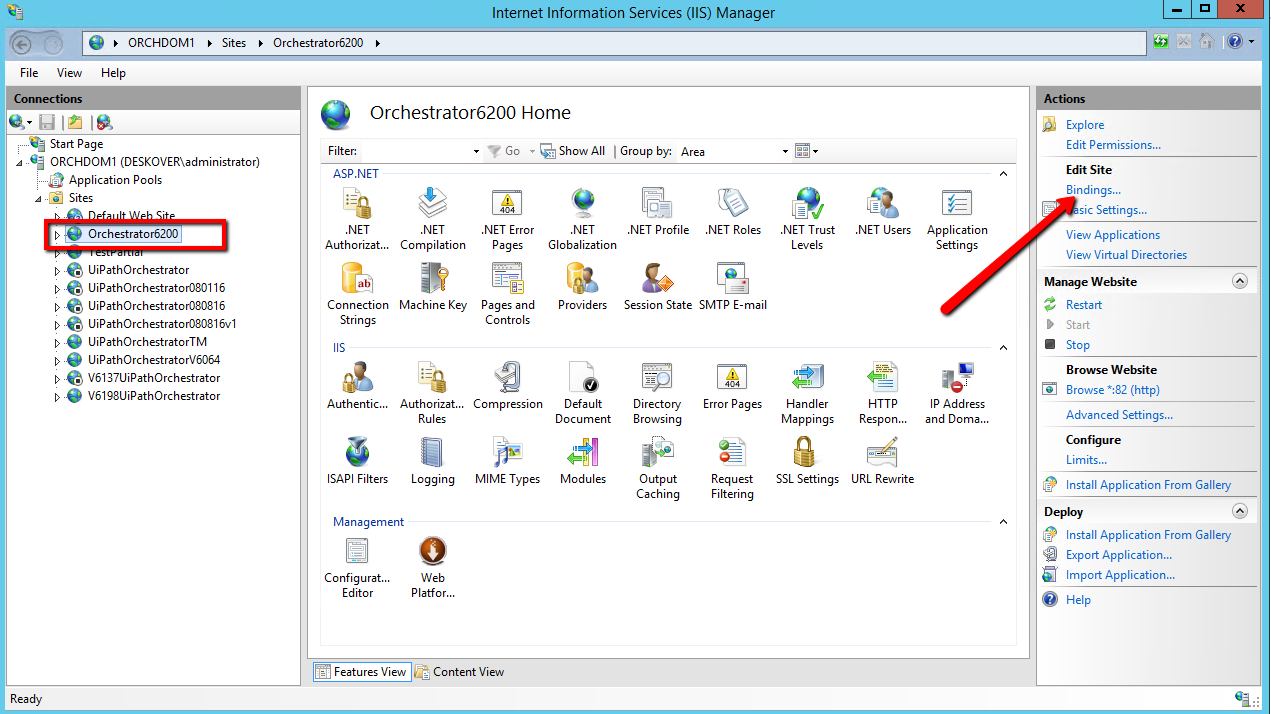
- From the Type drop-down list, select HTTPS.
If necessary, change the value in the Port section from the default to a different one. Subsequently, the port has to be opened in the firewall as well.
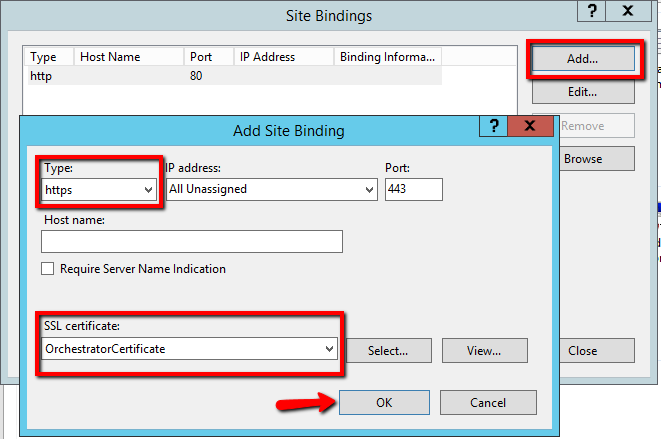
- From the SSL certificate drop-down list, select the self-signed certificate and click OK. Note that the friendly name is displayed.
- Remove the HTTP protocol from the Site Bindings list.
In any browser, the Orchestrator URL you need to use contains the FQDN, which is https://orchdom1.deskover.local in this example.
Installing Self-Signed Certificates
Follow the steps below to install the public key of the self-signed certificate on the Robot machines.
- Right-click your certificate and select Install Certificate. The Certificate Import Wizard window is displayed.

- Select Local Machine and click Next.
- Click Yes to allow this app to make changes to your PC. The Certificate Import Wizard window is displayed.
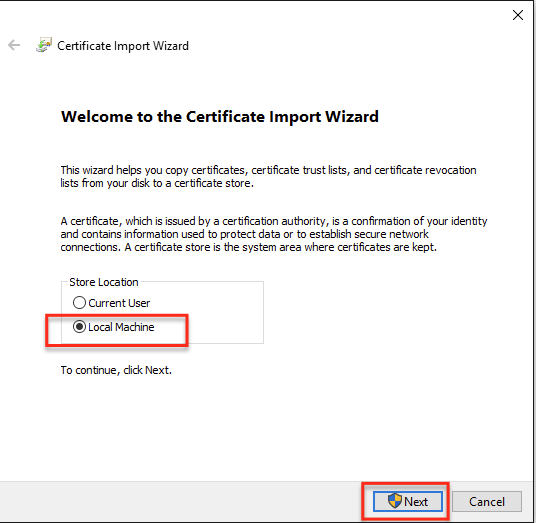
If the Local Machine option or the Certificate Import Wizard window is not displayed, perform the steps spanning between 3.1 and 3.11. Otherwise, you can move on to step 4.
3.1. Start MMC.exe.
3.2. On the File menu, click Add/remove Snap-in. The Add or Remove Snap-in window is displayed.
3.3. Double-click Certificates. The Certificates Snap-in window is displayed.
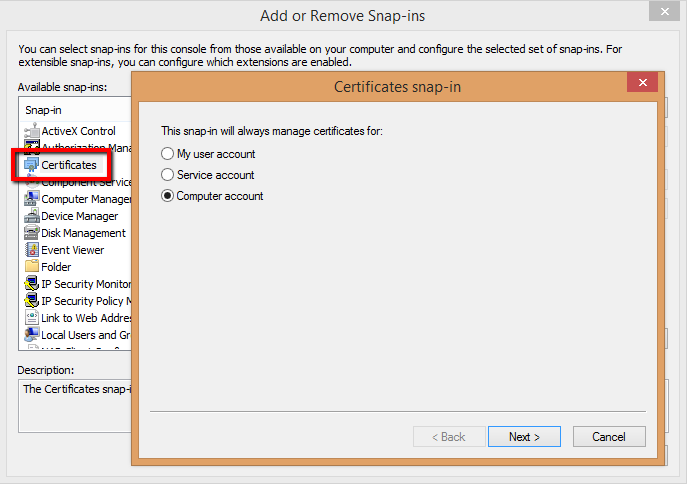
. 3.4. Select the Computer account option and click Next. The Select Computer step is displayed.
3.5. Select Local computer, click Finish. The Certificates Snap-in window closes.
3.6. In the Add or Remove Snap-in window, click OK. Your setting are saved, and the Certificated for the Local Computer are displayed in the Microsoft Management Console.
3.7. Ensure the Certificates node contains the "(Local computer)" phrase. Expand the Trusted Root Certification Authorities folder and click Certificates.
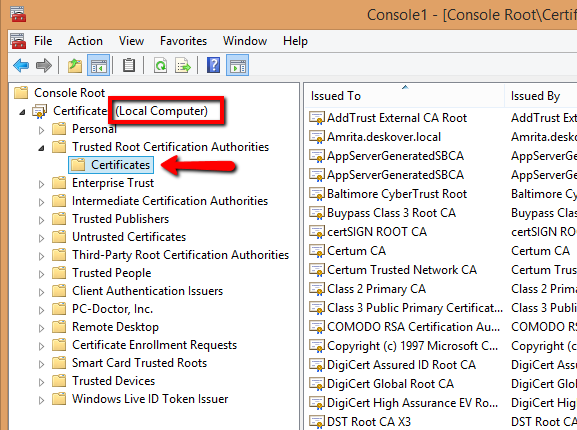
. 3.8. Right-click Certificates, and select All Tasks > Import. The Certificate Import Wizard window is displayed, confirming that you are importing the certificate in the Local machine store. If the certificate is not imported in the Local machine store, it is not be recognized by the Robot.
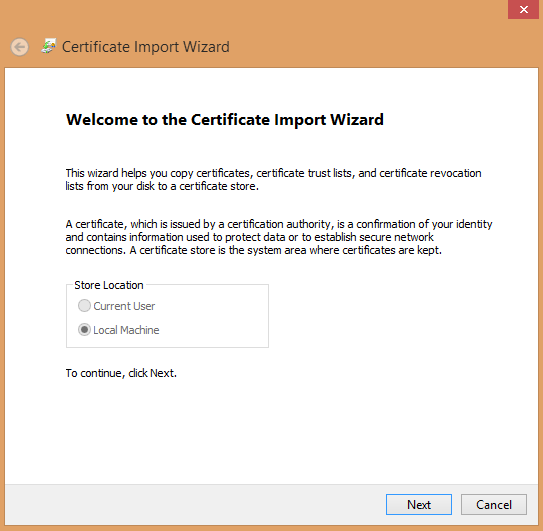
. 3.9. Click Next. A field that enables you to browse for the certificate is displayed.
3.10. Select the file to be imported, and click Next. The Certificate Store step is displayed, which confirms that you are importing to the Trusted Root Certification Authority.
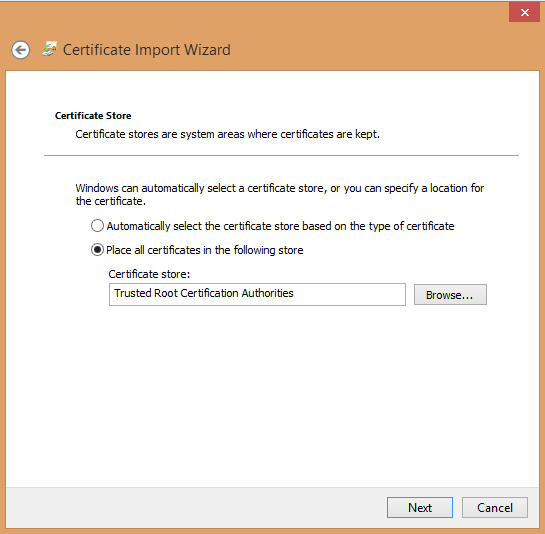
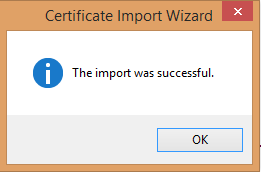
. 3.11. Click Next and then Finish. The The import was successful. message should be displayed as in the screenshot below.
. 3.12. Proceed by moving on to step 9.
- Select Place all certificates in the following store.
- Click Browse and select Trusted Root Certification Authorities from the Select Certificate Store window..
- Click OK, followed by Next. The Select Certificate Store window closes.
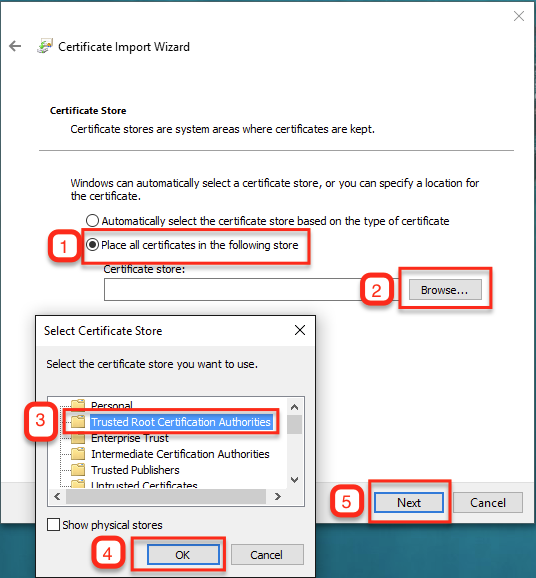
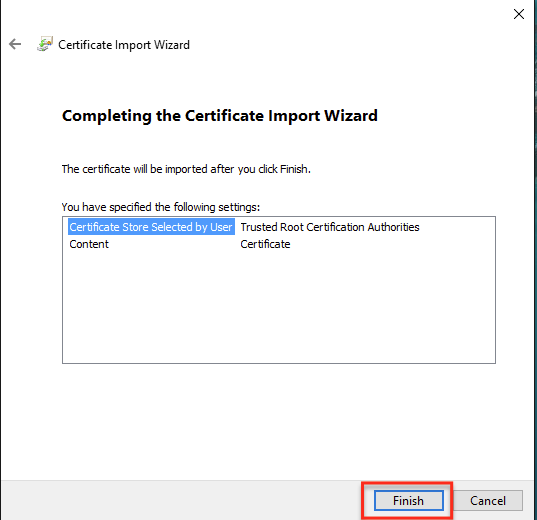
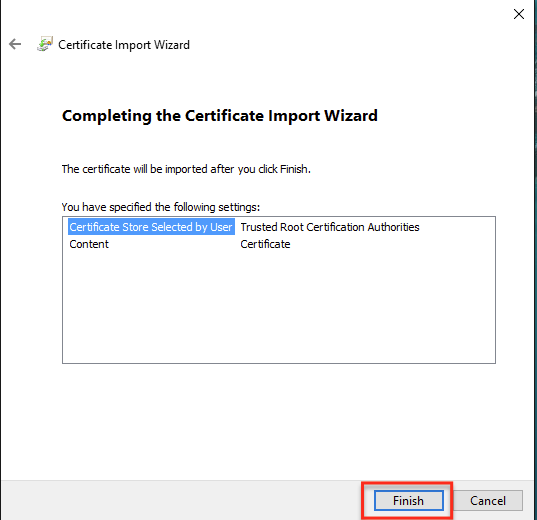
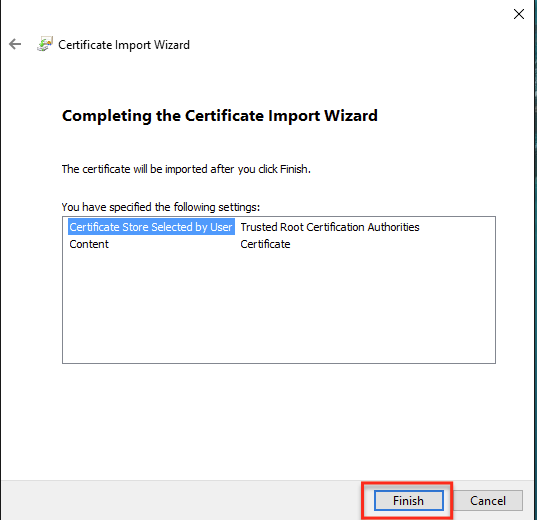
- In the Certificate Import Wizard, click Next. The Completing the Certificate Import Wizard step is displayed.
- Click Finish.
- Perform a logout/login on the machine. If you are not connected to the specific Robot machine that has the same user as the Robot, you need to perform the login/logout with the Robot’s user.
- In the Robot Settings window, you need to use the HTTPS protocol.
Firefox – Allowing Exceptions
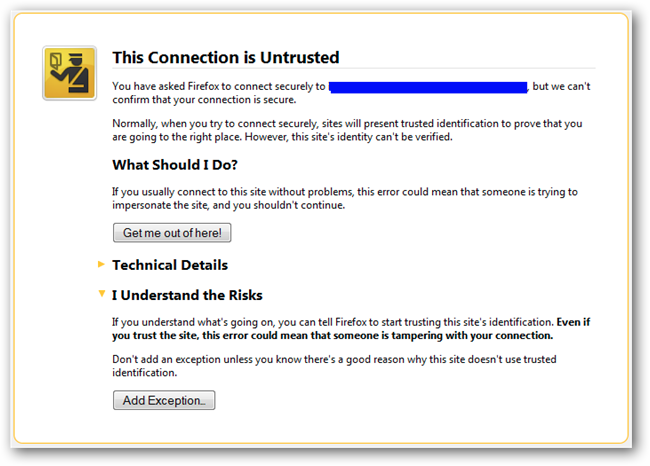
Firefox handles the process a bit differently, as it does not read the certificate information in the Windows store. Rather than installing certificates, it allows you to define exceptions for SSL certificates on particular sites.
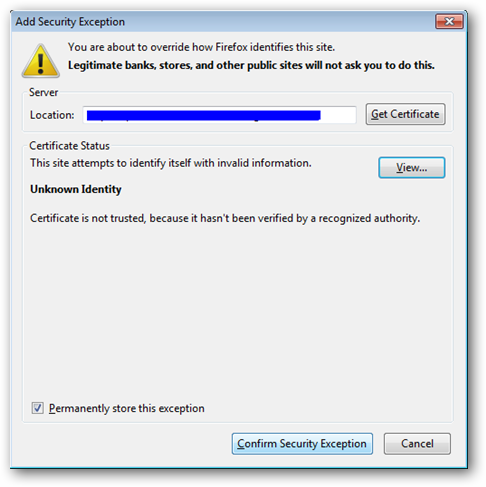
When you visit a site which has a certificate error, the warning message in the screenshot below is displayed. The URL you are trying to access is displayed in the blue area. To create an exception to bypass this warning on that specific URL:
- Click the Add Exception button. The Add Security Exception window is displayed.
- In the Add Security Exception window, click Confirm Security Exception to configure this exception locally.
Note:
If a particular site redirects to subdomains within itself, you may get multiple security warning prompts with slightly different URLs every time. Add exceptions for those URLs by following the steps above.
Updated 2 years ago