Defining a Trigger
Time Trigger
-
On the Triggers page, click Add. The Triggers > Add page is displayed.
-
On the Select Trigger Type section, choose Time.
-
In the Name field, add a name for the trigger to easily identify it.
-
From the Process drop-down, select the process you want to configure a time trigger for.
-
On the Execution Target tab, select the rule for the process execution on you Robot(s).
- Select All to execute the process on all available Robots in the associated environment.
- Select Specific Robots to execute the process on specific Robots. All the Robots in the environment associated to the selected process are available for you to choose from.
- Select Allocate dynamically to execute the process as soon as a Robot becomes available, for a predefined number of times.
-
(Optionally) On the Parameters tab, provide values for input parameters, if your process has any. More details here.
-
From the Timezone drop-down, select the time zone according to which the trigger is to be set off. Please note that the trigger time zone is not dependent on the tenant time zone (configured in the Settings page).
-
Select the execution frequency of the trigger (Minutes, Hourly, Daily, Weekly, Monthly, Advanced). On the right side of this section, configure the details depending on the chosen option (frequency, exact time or a cron expression). Orchestrator uses an open-source library to parse and display cron descriptions, which can be found here.
-
(Optionally) Select a non-working days calendar, if you want your trigger to stop firing on certain non-business days. More details here.
-
(Optionally) Enable the Stop Job After toggle, and enter the amount of time that needs to pass before the job is either stopped or killed. Select if you want the job to be Stopped or Killed after the stop time elapses.
Note: The amount of time specified here elapses according to the specifications, even if the job is queued. For example, if you schedule a job to run at 1 p.m. and set it to stop after 20 minutes, the job stops at 1:20 p.m. even if it had stayed in a queue until 1:15 p.m., and then started.
- (Optionally) Enable the Disable Trigger at toggle, and enter the date and time when the trigger is to be disabled. More details here.
Queue Trigger
-
On the Triggers page, click Add. The Triggers > Add page is displayed.
-
On the Select Trigger Type section, choose Queue.
-
In the Name field, add a name for the trigger to easily identify it.
-
From the Process drop-down, select the process you want to configure a queue trigger for.
Note: Queue triggers and SLA predictions are interdependent in terms of queue-process association. So whenever configuring one, the other is prefilled such as to have parity between the configurations. Say I define a queue trigger for queue Y to use process X. SLA predictions for queue Y can only be made using process X, therefore X is prefilled and read-only when enabling queue SLA for Y.
-
(Optionally) On the Parameters tab, provide values for input parameters, if your process has any. More details here.
-
From the Timezone drop-down, select the time zone according to which the trigger is to be set off. Please note that the trigger time zone is not dependent on the tenant time zone (configured in the Settings page).
-
From the Queue drop-down select the queue which fires the trigger, if new queue items are added into it.
-
Fill in the Minimum number of items that trigger the first job. This means the item-processing job is only started after the targeted queue has at least this number of new items. Deferred queue items are not counted.
-
Fill in the Maximum number of pending and running jobs allowed simultaneously. This represents the maximum number of allowed pending and running jobs, counted together. For 2 or more jobs allowed simultaneously, the third option needs to be defined as described below.
-
On the Another job is triggered for each __ new item(s) field define the number of new queue items (on top of the number configured for the Minimum number of items that trigger the first job option) to trigger a new job.
-
(Optionally) Select a non-working days calendar, if you want your trigger to stop firing on certain non-business days. More details here.
-
(Optionally) Enable the Disable Trigger at toggle, and enter the date and time when the trigger is to be disabled. More details here.
Editing a Trigger
Click the corresponding Edit button, make the intended changes, and then click Update in the Edit Trigger window. You can edit all the fields.
Disabling a Trigger
To disable a trigger, click the corresponding More Actions button, and then Disable. A disabled time trigger is marked by the ![]() icon in front of it. A disabled queue trigger is marked by the
icon in front of it. A disabled queue trigger is marked by the ![]() icon in fron of it.
icon in fron of it.
Alternatively, you can select it and then click the Disable icon.
You can also configure your trigger to get automatically disabled at a specific date and time in the future. You can do that as follows:
- Click the corresponding Edit button.
- Enable the Disable Trigger at option.
- Fill in the desired date and time.
- Click Update for the changes to take effect.
Enabling a Trigger
To enable a trigger, click the corresponding More Actions button, and then Enable. An enabled time trigger is marked by the ![]() icon in front of it. An enabled queue trigger is marked by the
icon in front of it. An enabled queue trigger is marked by the ![]() in front of it.
in front of it.
Alternatively, you can select it and then click the Enable icon.
Removing a Trigger
To remove a trigger, click the corresponding More Actions button, and then Remove.
Alternatively, you can select it and then click Remove.
Displaying Jobs Started by a Trigger
To display the jobs started by a specific trigger, click the More Actions button, and then View jobs. This displays the Jobs window, which comprises all the jobs executed in the past through the selected trigger (if any).

Managing Non-Working Days
Creating New Calendars
- Open the Non-Working Days tab on the Settings page. A list with all the calendars previously defined is displayed, ordered alphabetically.
The BankHoliday calendar is displayed here, if it exists. This calendar is created when upgrading your Orchestrator to 19.10 if you had non-working days defined in your previous version. - Click Add to create a new calendar and type its name in the blank, highlighted field. The name must be unique, and it may contain a maximum of 150 alphanumeric characters. You can't create calendars with no names or containing only space characters.
- Click Save or press Enter on your keyboard to save the new calendar. The calendar is saved and displayed in the list of calendars.

- For the selected calendar, define non-working days either manually, or by uploading a .csv file, or a combination of these.
- In the Triggers page, when creating a new trigger or editing an existing one, select the desired calendar from the Non-working days restriction drop-down.
Note
The Non-working days restrictions drop-down is disabled for triggers with a timezone different than the timezone set at tenant level (Settings page > General tab). A tenant without an explicitly defined timezone inherits it from the host.
- Click Update for the changes to take effect. Every change made to a calendar subsequently propagates to all triggers associated with that calendar.

Manually Selecting Non-Working Days
- Click a calendar to select it. The calendar on the right-side of the window is updated accordingly.
- On the displayed calendar click the dates on which you want your triggers to stop firing. Click again on a selected date to deselect it.
- Click Save to save the selected dates as non-working days.

Uploading .csv Files
.csv FilesEnables you to upload a series of dates into a selected calendar, directly from a .csv file. Please note that the file must be populated beforehand using a predefined format so that the upload operation is successful. The new dates from your uploaded file overwrite any dates already contained in the calendar.
Important!
The .csv file must contain
ExcludedDatecolumn header. All the non-working days must be within that column, written in theYYYY-MM-DD,YYYY/MM/DDorYYYY MM DDformat.
Expand the Example section below for more information.
- On the selected calendar click Upload csv.
- Navigate to the desired .csv file, select it and click Open. Orchestrator parses the file to confirm it meets formatting rules (see the example section below).
- Click Yes in the confirmation dialog to overwrite the dates already contained in the calendar with the new dates from your uploaded file.
- Click Save to save the modified calendar.

OR:
- Drag & Drop the desired .csv file over the selected calendar's top part. Orchestrator parses the file to confirm it meets formatting rules (see the example section below).
- Click Yes in the confirmation dialog to overwrite the dates already contained in the calendar with the new dates from your uploaded file.
- Click Save to save the modified calendar.

Example
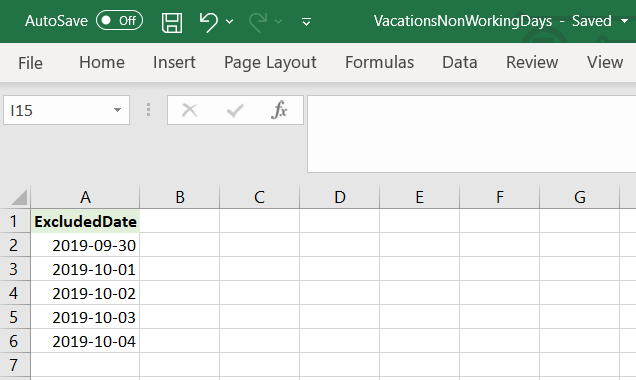
Let's say you upload into a calendar the content of the following .csv file. An easy way to create such a file is to populate the data into an excel file and save it as a .csv file:
Or you can download a .csv file with all the pre-filled column headers and customize it to your needs.
Notice that this file contains a predefined column header, ExcludedDate. Enter all your non-working days in that column, using YYYY-MM-DD, YYYY/MM/DD or YYYY MM DD format.
Renaming Calendars
- Select a calendar in the Non-Working Days tab on the Settings page.
- Modify the name of the calendar.
- Click Save to save the changed name.

Deleting Calendars
- Select a calendar in the Non-Working Days tab on the Settings page.
- Click Delete.
- Click Yes in the pop-up window to confirm your intent. The calendar is deleted.

Note:
You can only delete calendars that are not attached to any triggers.
You can also remove non-working days from a calendar. After clicking on a non-working day it is no longer marked. Remember to save your changes.

![]() Updated 3 days ago
Updated 3 days ago