Creating a Robot
There are two types of Robots you can create in Orchestrator according to the Robot/Machine interaction: Standard and Floating. A Standard Robot can only work on a single standard machine, while a Floating Robot can work both on standard machines and templates.
Creating a Standard Robot
Prerequisites:
- Permission to create Robots (Create permissions on Robots and View permissions on Machines)
- The name of the machine which has to be connected to Orchestrator, and on which a Robot is installed. You may find it using either method from below:
- In Control Panel -
Control Panel\System and Security\System. - In the UiPath Robot tray, on the Orchestrator Settings window.
- In Control Panel -
- The username that is used to access the specified machine
- The password for the specified username (not required for Attended Robots)
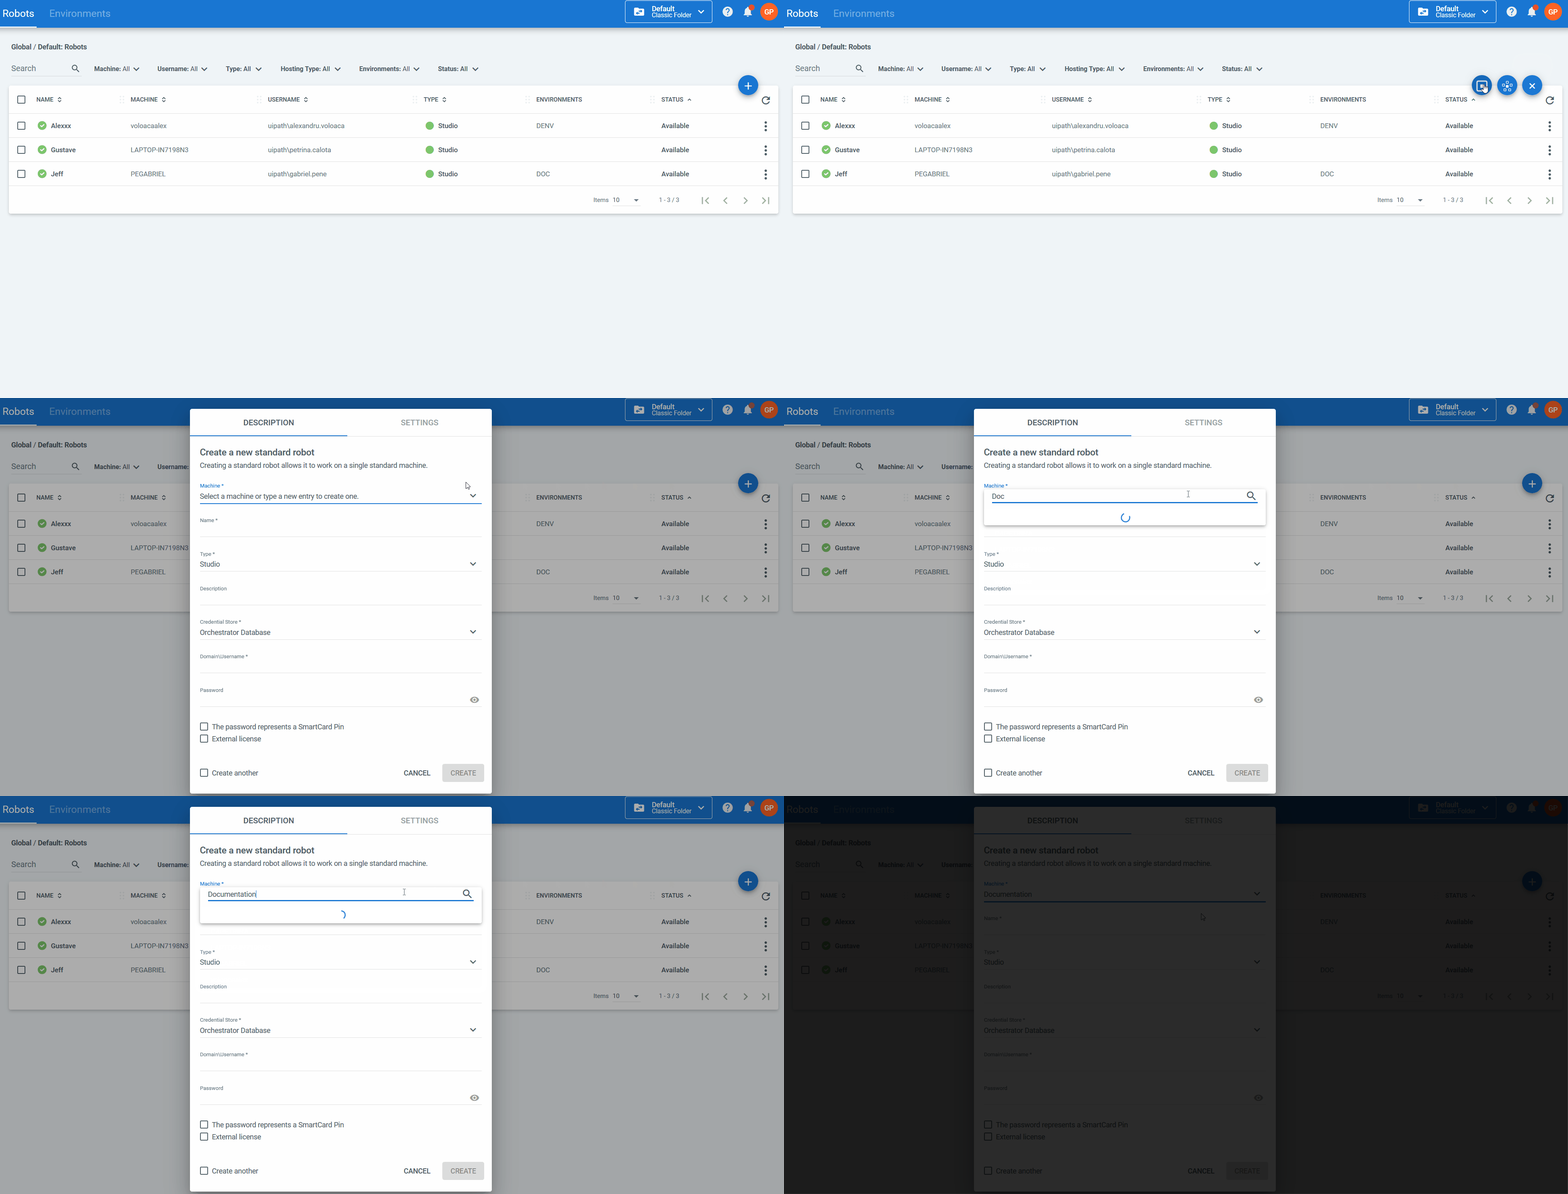
- In Orchestrator, on the Robots page, click Add. The options to add a Standard Robot or a Floating Robot are displayed.
- Click the Standard Robot button. The Create a New Standard Robot window is displayed.
- Select the Standard Machine you want to register your Robot on. There are two possibilities:
- You had already created the machine on the Machines page beforehand. In this case, you can select it from the Machine drop-down list.
- You had not created the machine. In this case, simply type the name of a new one on the Machines field and click the Provision Machine button. Note that this step also adds the machine in the Machines page after creating the Robot.

- In the Name field, type any name for the Robot.
- Select the desired robot type from the Type drop-down list. For more information, see the About Robots page.
If you want to connect to Orchestrator a Studio or StudioX which is already licensed locally, please select the Stand-alone license check box, as this ensures Orchestrator does not allocate a license from its pool of licenses. - (Optional) Add a description for the Robot. We recommend populating this field, especially when dealing with an environment with many robots.
- In the Credential Store field, select where the credentials for this robot are stored. See Credential Stores for details.
- In the Domain\Username field, type the username that is used to login to the specified machine. If the user is in a domain, you are required to specify it in a
DOMAIN\usernameformat. You must use short domain names, such asdesktop\administratorand NOT
desktop.local/administrator. - (Optional) Fill in the Password field (not displayed for Attended Robots). There are two possibilities:
- One authentication option - The
Features.SmartCardAuthentication.Enabledparameter is set toFalse:- Basic authentication credentials - Fill in the Windows password for the specified username
- Two authentication options - The
Features.SmartCardAuthentication.Enabledparameter is set toTrue:- Basic authentication credentials - Make sure The password represents a SmartCard Pin option is unchecked, and then fill in the Windows password for the specified username.
- SmartCard authentication - Check The password represents a SmartCard Pin option and then fill in the corresponding SmartCard pin.
- One authentication option - The
- Click Create. The Robot is now displayed on the Robots page and provisioned to Orchestrator, but it is offline.
Creating a Floating Robot
Prerequisites:
- Permission to create Robots (Create permissions on Robots)
- The username that is used to access the specified machine
- In Orchestrator, on the Robots page, click Add. The options to add a Standard Robot or a Floating Robot are displayed.
- Click Floating Robot. The Create a New Floating Robot window is displayed.
- In the Name field, type any name for the Robot.
- Select the desired robot type from the Type drop-down list. Only Attended, Studio, and StudioX Robots can be Floating.
- (Optional) Add a description for the Robot. We recommend populating this field, especially when dealing with an environment with many robots.
- In the Credential Store field, select where the credentials for this robot are stored. See Credential Stores for details.
- In the Domain\Username field, type the AD username that is used to login to the specified machine.
- (Optional) Fill in the Password field (not displayed for Attended Robots). There are two possibilities:
- One authentication option - The
Features.SmartCardAuthentication.Enabledparameter is set toFalse:- Basic authentication credentials - Fill in the Windows password for the specified username.
- Two authentication options - The
Features.SmartCardAuthentication.Enabledparameter is set toTrue:- Basic authentication credentials - Make sure The password represents a SmartCard Pin option is unchecked, and then fill in the Windows password for the specified username.
- SmartCard authentication - Check The password represents a SmartCard Pin option and then fill in the corresponding SmartCard pin.
- One authentication option - The
- (Optional) For Studio or StudioX Robots, you have the option to add the Windows password for the specified username.
If you want to connect to Orchestrator a Studio or StudioX which is already licensed locally, please select the Stand-alone license check box, as this ensures Orchestrator does not allocate a license from its pool of licenses. - Click Create. The Robot is now displayed in the Robots page and provisioned to Orchestrator, but it is offline.
Converting a Standard Robot into a Floating Robot
- Click the More Actions button and then Convert to Floating.
Note
Only Attended, Studio, and StudioX Standard Robots can be converted to Floating Robots.
Deleting a Robot
To delete a specific Robot, click the More Actions button and then Remove.
Alternatively, select one or multiple Robots from the Robots page and click Remove.
Note:
You can only delete Robots if they do not have pending or active jobs attached to them. Deleting a Robot also removes it from all associations it may be part of (environments, assets, processes, schedules).
Editing a Robot
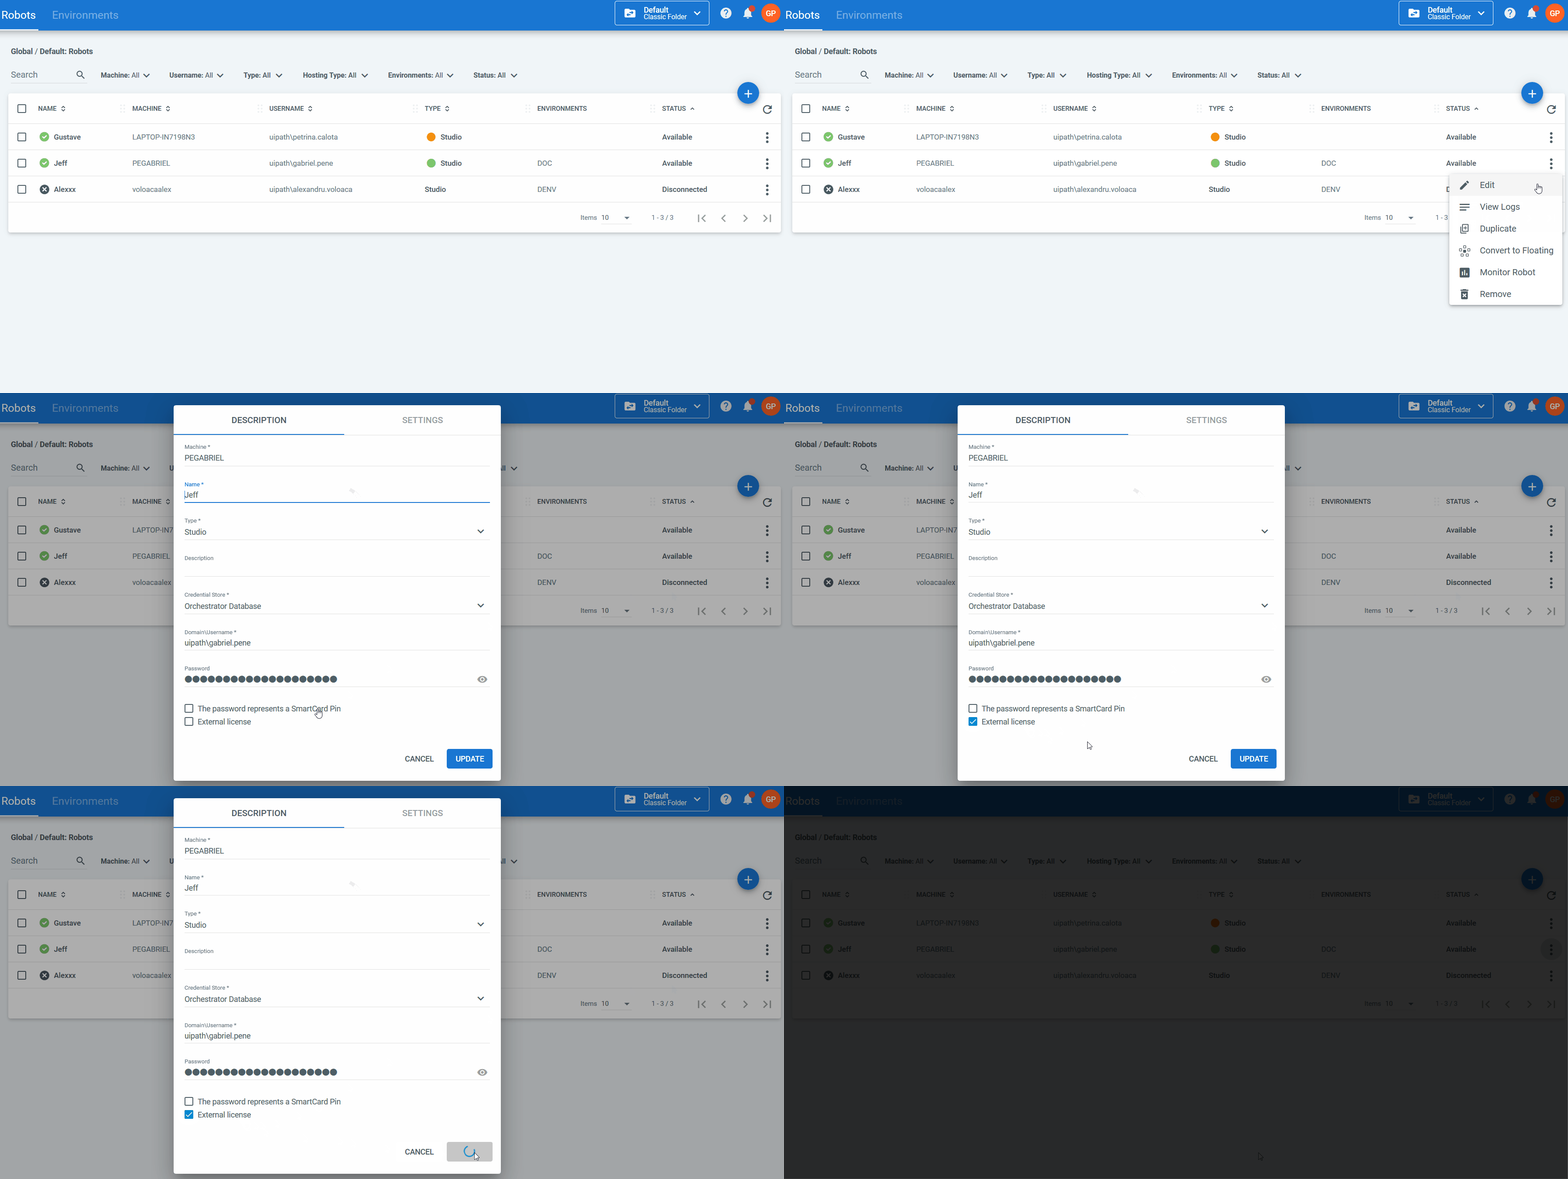
Click More Actions > Edit, make the necessary changes and click Update.

The Description tab allows you to change the following:
- Name
- Domain\Username
- Password (except for the Attended use case)
- The Authentication Type (The password represents a SmartCard Pin check box)
- Type
- Description
Robot settings can be configured in the Settings tab:
- Logging Level
- Allow Development Logging
- Login To Console
- Resolution Width
- Resolution Height
- Resolution Depth
- Font Smoothing
- Auto Download Processes
Note:
When a Robot is busy (executing a process), you cannot edit the following information:
Domain\Username
Machine
Type
Displaying Logs for a Robot
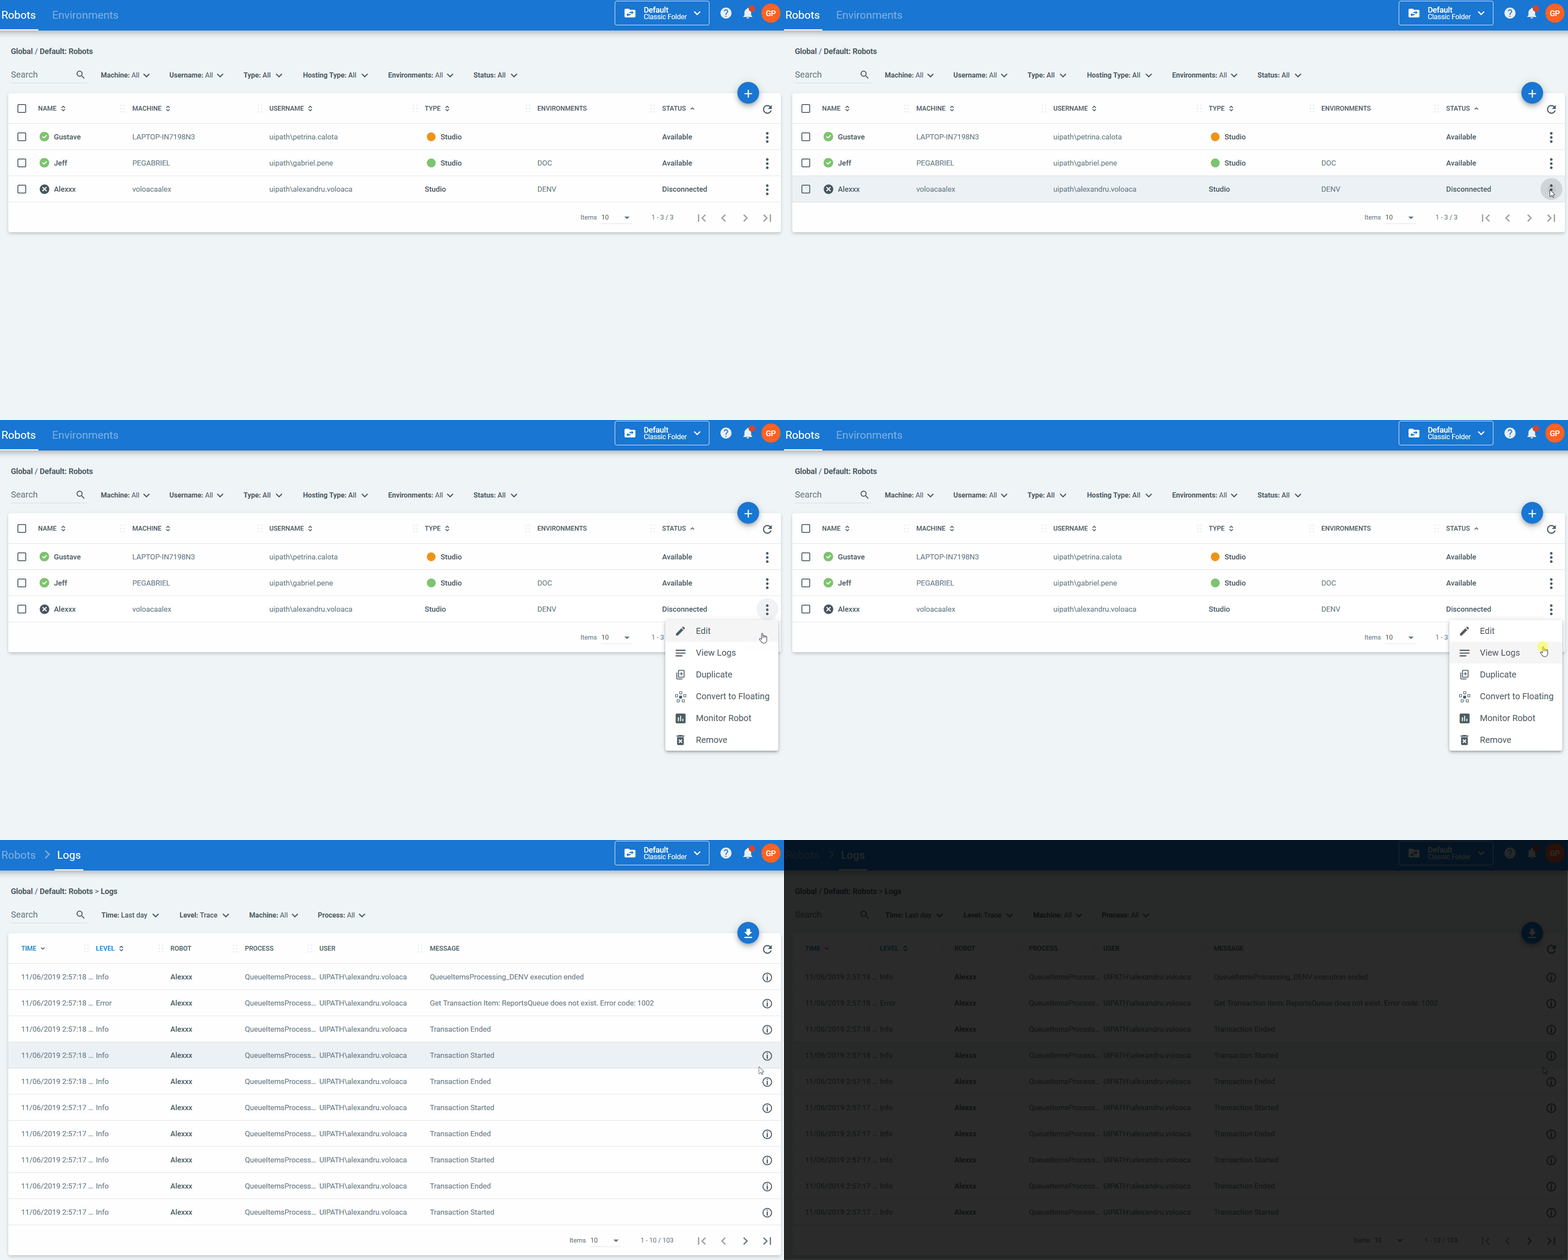
To view the logs of a specific Robot, click the corresponding More Actions button and then View Logs.
Important!
If you edit the Robot name, the messages logged with the previous Robot name are no longer displayed.

Monitoring a Robot
To monitor a specific robot, click the corresponding More Actions button, then Monitor Robot. Alternatively, select it from the Robots Overview widget (Monitoring > Robots).
Note that monitoring a Robot requires your user to have View permissions on Robots and on Monitoring. Additionally, Edit on Monitoring is required in order to disable errors from the Error Feed widget on the Monitoring > Robots page. View on Environments is required in order to filter the pages by environment.
Updated 2 years ago
See Also
| About Robots |
| Connecting Robots to Orchestrator |
| Robot Statuses |
| Field Descriptions |
| How the Connection Between the Robot and Orchestrator Works |