Important!
When deploying multiple Standard Robots from the same machine on Orchestrator, you need to have the same Machine Name and Machine Key for each. To retain the values in the fields, you can click Create Another in the Add Robot window. Alternatively, you can copy the Machine Name and Machine Key from an already deployed Robot by clicking More Actions > Duplicate.
Connecting the Robot to Orchestrator
From Orchestrator and the Orchestrator Settings Window
If you're looking for an overview on creating and connecting a Robot to Orchestrator, watch the video below. Note that this video is a showcase of a standard Robot getting connected to an Automation Cloud service. For a fully detailed how-to and particularities, read the documentation.
Use the name of the machine which has to be connected to Orchestrator, and on which a Robot is installed. You may find it on the relevant machine using either method from below:
- In the UiPath Robot tray, on the Orchestrator Settings window.
- In Control Panel -
Control Panel\System and Security\System. - Open Command Prompt and type hostname.
Important!
Use the name of the machine which has to be connected to Orchestrator, and on which a Robot is installed. You may find it on the relevant machine using either method from below:
In the UiPath Robot tray, on the Orchestrator Settings window.
In Control Panel -Control Panel\System and Security\System.
Open Command Prompt and type hostname.
Important!
Administrator rights are required to perform this procedure for Service Mode Robots.
- Create a Robot, as explained here.
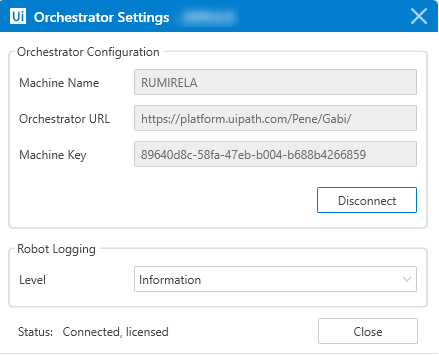
- In the system tray, click the UiPath Robot icon. The UiPath Robot tray is displayed.
- On the Settings menu select Orchestrator Settings. The Orchestrator Settings window is displayed.
- In the Machine Key field, enter the key received from the user who created the Robot in Orchestrator (as obtained from the Machines page).
- In the Orchestrator URL field, enter Orchestrator’s address, such as
https://orch01.deskover.local/. - Click Connect. The Robot is now connected to Orchestrator and has the available status. Each time a Robot is registered to Orchestrator, a Robot user is automatically created and is assigned the Robot role. (You can view it in the Users page.)

Note:
The High-Density Robots feature only works if the same machine name and key are used when registering each Robot per user.
From the Command Line
- Create a Robot, as explained here. If you have multiple Robots on the same machine, you must provision them all to Orchestrator.
- Save the Machine key to the Clipboard or a file, as you need it to connect the Robot to Orchestrator.
- Open the Command Prompt.
- Go to the directory where your UiPath Robot is installed (by default
C:\Program Files (x86)\UiPath\Studio). For example:cd C:\Program Files (x86)\UiPath\Studio. - Use the
--connect,-urland-keycommand line arguments, and the Orchestrator URL and the Machine Key to connect the Robot to Orchestrator. For example:UiRobot.exe --connect -url https://demo.uipath.com/ -key ba1e4809-2f64-4965-bae2-efda62d20164. The Robot is now connected to Orchestrator and has the available status. If you have a High-Density environment, the Robots corresponding to each user are now connected to Orchestrator.
Automatic Enrollment
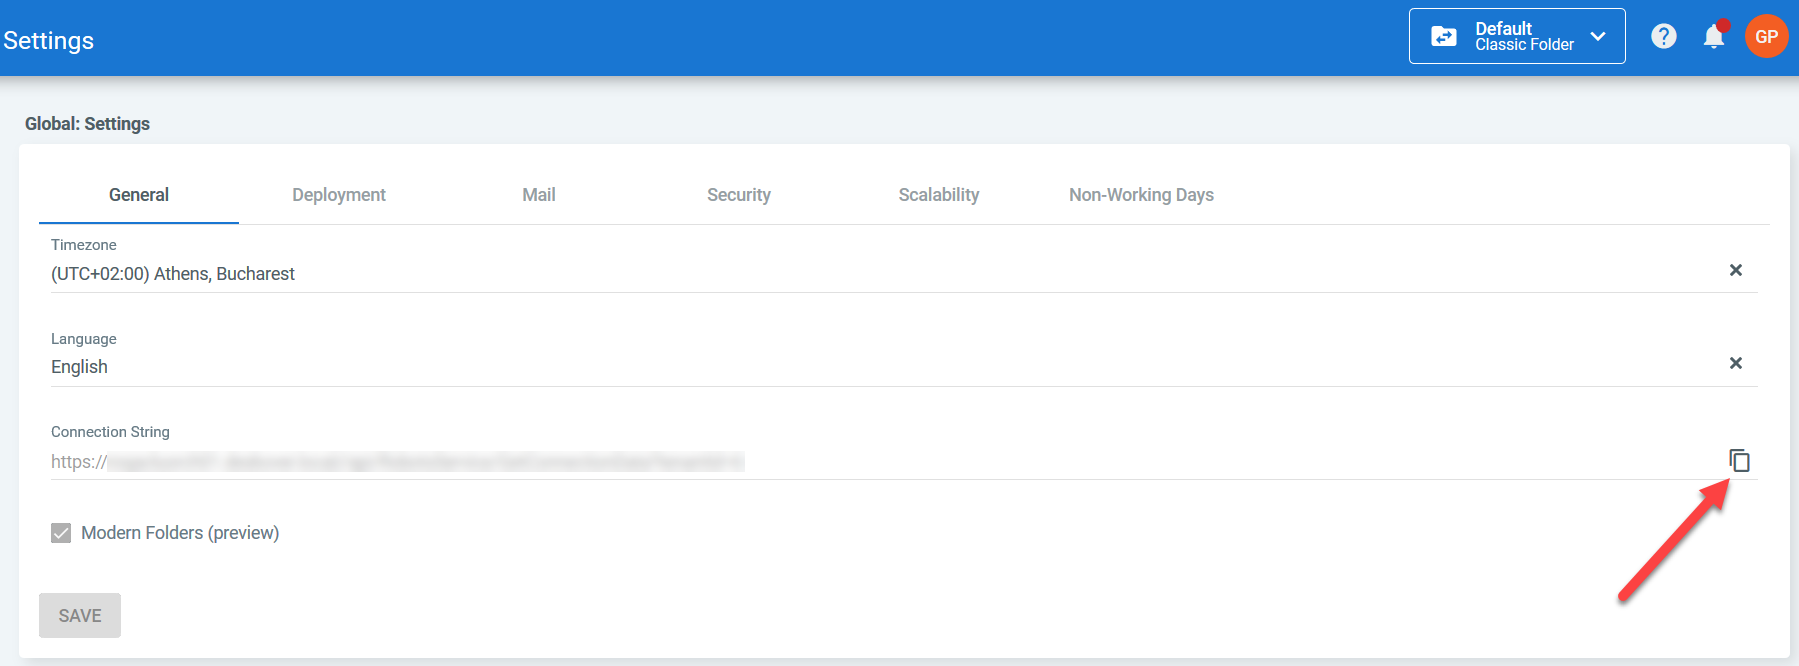
The connection string is a URL that contains the following information:
- the Orchestrator URL - identifies the Orchestrator instance the Robot connects to;
- tenant ID - identifies the tenant the Robot connects to;
- domain name - identifies the domain of the machine; this is only necessary if the machine is in a different domain than that specified for the
WindowsAuth.Domainparameter inweb.config(this is valid for subdomain machines as well). The domain needs to be in a two-way trust relationship with the one set for theWindowsAuth.Domainparameter.
Click here for details about authorization parameters inweb.config.
Here are two examples of connection strings according to the machine's domain:
- Same domain as specified in
web.config-https://demo.uipath.com/api/robotsservice/GetConnectionData?tenantId=1 - Different domain than the one specified in
web.config-https://demo.uipath.com/api/robotsservice/GetConnectionData?tenantId=1&domainName=domain_name
Important!
In order to deploy Robots to Orchestrator using connection string, the following are required:
theWindowsAuth.Enabledparameter from theweb.configfile has to be set totrue
theWindowsAuth.Domainparameter has to be set to a valid domain
the Service Mode Robot has to be installed.
- Create a Robot, as explained here.
- In the Settings page, on the General tab, look for the Connection String field, and click Copy. The connection string is copied to the clipboard.

- Send the connection string to the Robot machine you want to connect to Orchestrator (via e-mail, USB stick etc.)
- Use an automatic deployment tool to install the Robots and provide the connection string copied above in the
CONNECTIONSTRINGparameter used with theUiPathStudio.msiinstaller. The Robot is connected to Orchestrator and is displayed as Available in the Robots page.
Updated a day ago