Orchestrator Server
- Windows Server Operating System - minimum required version: 2008 R2 SP1. Check the Software Requirements for the other supported versions.
- Windows PowerShell - minimum required version: 5.1. To download Windows PowerShell version 5.1, visit this link and install Windows Management Framework 5.1. For additional help, see the Windows PowerShell 5.1 installation documentation.
- .NET Framework - minimum required version: 4.7.2 To find out which .NET version is installed on your computer, please see Finding the Installed .NET Version.
- IIS - minimum required version: 7.5. this is part of the Web Server (IIS) role and is automatically enabled by the provided
InstallRolesAndFeatures.ps1script, which can be found in this archive. - URL Rewrite - Enables the website to redirect the calls to https (
https://servername), instead of http (http://servername). Please download and install URL Rewrite by accessing this link. - Server Roles and Features- We provide a PowerShell script,
InstallRolesAndFeatures.ps1, that automatically adds the required roles and features to the application server(s). The list of roles and features is presented in Server Roles and Features. Please note that this chapter is for informational purposes only. The archive containing the script and the XML file can be downloaded here. - Web-Deploy extension - minimum required version: 3.6, 64bit version. Please note that this is required only for PowerShell script installations, such as the Azure one. Enables you to deploy a website. Please download and install Web Deploy Extension 3.6 by accessing this link.
- Shared Storage/External Drive - Required for multi-node and HA deployments only, a shared storage location for package synchronization between Orchestrator nodes.
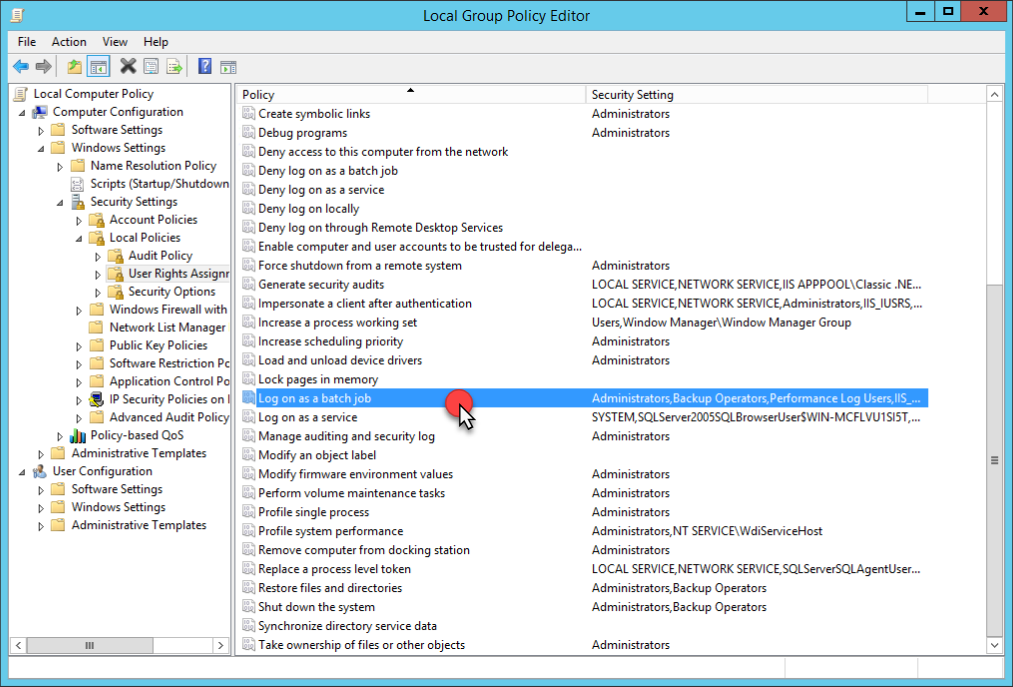
- The Application Pool user needs to have the following rights in the Local Computer Policy:
- Log on as a batch job.
- Log on locally.
- Anonymous Authentication must be enabled.
Web Certificates (SSL Certificate)
HTTPS protocol is mandatory for all communication between Robots and Orchestrator on all the browsers on which the web application is accessed by users.
The following 3 types of web certificates can be used.
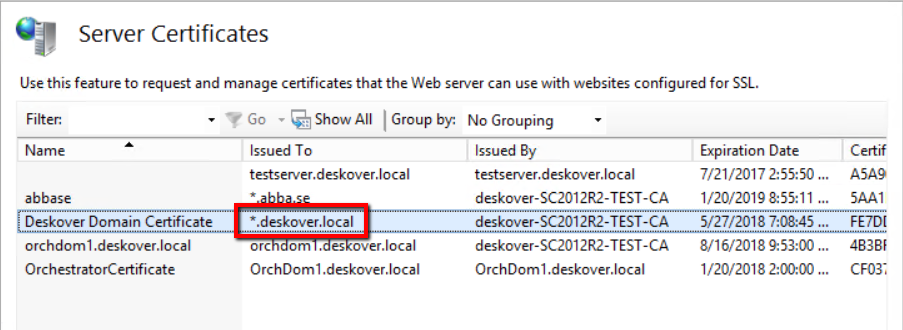
- A web certificate issued by a trusted Certification Authority, such as GoDaddy, VeriSign, etc. The web certificate has to be imported to Server Certificates in IIS. You need to know the name of the "Issued To" entity, which has to be provided when prompted by the Windows installer.
- You are a Certification Authority which can issue certificates trusted in the Windows domain. Please see Using a Certificate for the HTTPS Protocol.
- A self-signed certificate, which is not recommended for Production. The certificate is not trusted inside the domain. For that reason, you need to export its public key, and then import it on all Robot machines. See Using a Certificate for the HTTPS Protocol for further information.
The name of the certificate you provide when prompted by the Windows installer, or the one mentioned in the command line using -sslCertificate is the same one that appears in the Issued To column in Server Certificates in IIS.
SQL Server
A SQL server machine with one of the following versions: 2008 R2 with SP3 as a minimum requirement, 2012, 2014, 2016, 2017, or 2019 Standard or Enterprise Edition.
- The SQL Server product can be either installed on the same machine as the Application Server (not recommended for the Production environment) or provided as a separate machine. The SQL Server machine can be shared with other applications. It does not need to be dedicated to Orchestrator. Click here for prerequisites, restrictions, and recommendations on how to deploy Always On availability groups and here for details about Physical Deployment Options.
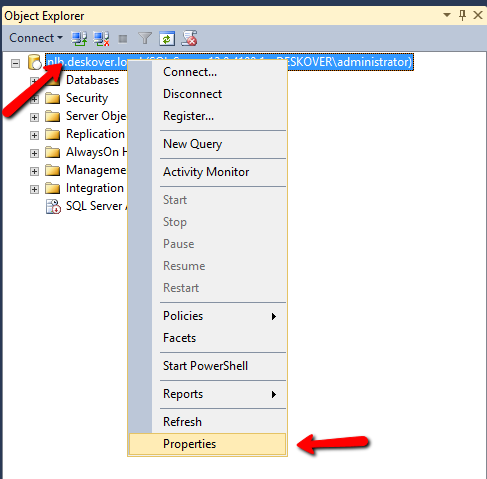
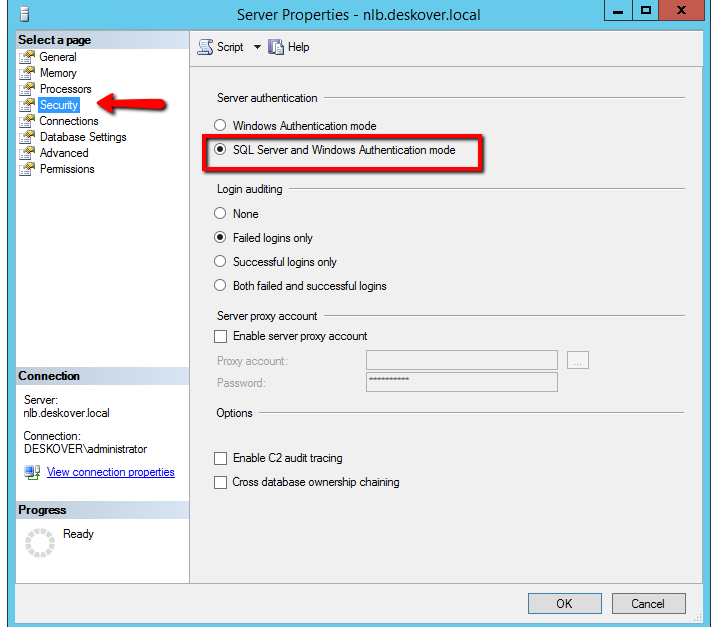
- If you plan to connect Orchestrator to the database using a SQL Server user enable the Windows and SQL Server Authentication mode. Otherwise, "Windows Authentication mode" is enough. If SQL Server is already installed, please select this option as shown in the pictures below:
- The collation sequence has to be the default one -
Latin1_General_CI_AS. - SQL Server Management Studio is necessary to configure the login of the domain user that accesses the SQL Server. The application pool runs on the application server under the name of the domain user.
SQL Server Configuration
Before installing Orchestrator, it is necessary to configure the SQL Server instance that you want to use.
Note:
The Orchestrator SQL database has to be case insensitive (“OrchDB” = “orchdb”). If it is created during the Orchestrator installation process, it is automatically set as such. If not, you have to manually configure it as case insensitive.
Requirements:
- the name of the SQL Server machine;
- the name of the instance, if it’s not the default instance;
- the value of the TCP port, if it’s not the default port - 1433;
- the SQL Server port is open in the firewall of the SQL Server machine;
- the TCP Protocol in SQL Server Configuration Manager has to be enabled;
- the SQL Server service needs to listen on a fixed port, not on a dynamically allocated one;
- public access to the SQL master database is required for the service account running Orchestrator. This is necessary both for installation and for future upgrades.
Select one of the following options through which Orchestrator can connect to the SQL Server database.
- Windows Integrated Authentication. For this option, a new login is required for the SQL Server as a service account. The service account should be a domain user whose password never expires.
To create a new login in SQL Server Management Studio:
a. In the Object Explorer panel, navigate to Security > Logins.
b. Right-click the Logins folder and select New Login. The Login - New window is displayed.
c. Select the Windows Authentication option. The window is updated accordingly.
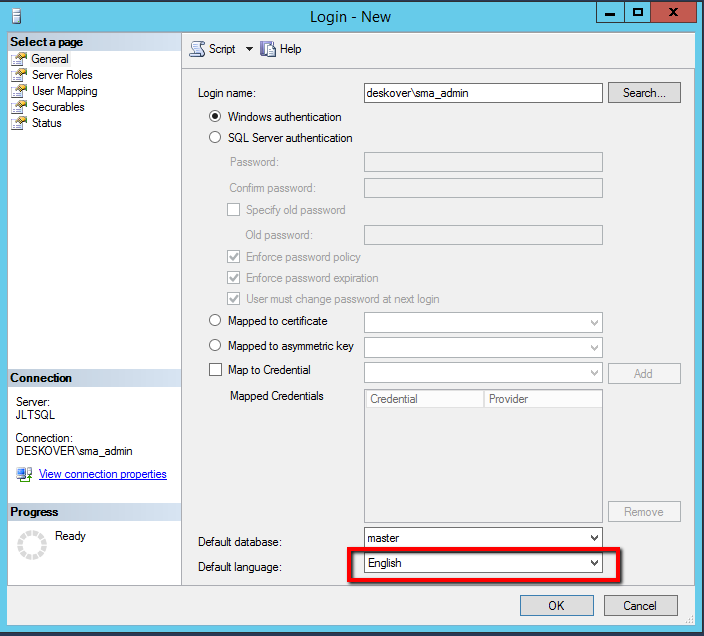
d. In the Login name field, type the user domain you want to use as a service account.
e. From the Default Language list, select English.
Important
Ensure that the Default Language is set to English. If it isn't, the website cannot start, and the Event Viewer on the computer on which Orchestrator is installed displays the following error message: “The conversion of a varchar data type to a datetime data type resulted in an out of range value”.
f. Click OK. Your configurations are saved.
If the service account has already been created and added to the Security > Logins section of the SQL Server, please check whether the Default Language of that SQL account is set to English. If it isn't, please make the necessary adjustments.
- SQL Server username and password. In this case, a SQL Server user is required. We strongly recommend not to use a
saaccount.
To create a new SQL user in SQL Server Management Studio:
a. In the Object Explorer panel, navigate to Security > Logins.
b. Right-click the Logins folder and select New Login. The Login - New window is displayed.
c. Select the SQL Server authentication option. The window is updated accordingly.
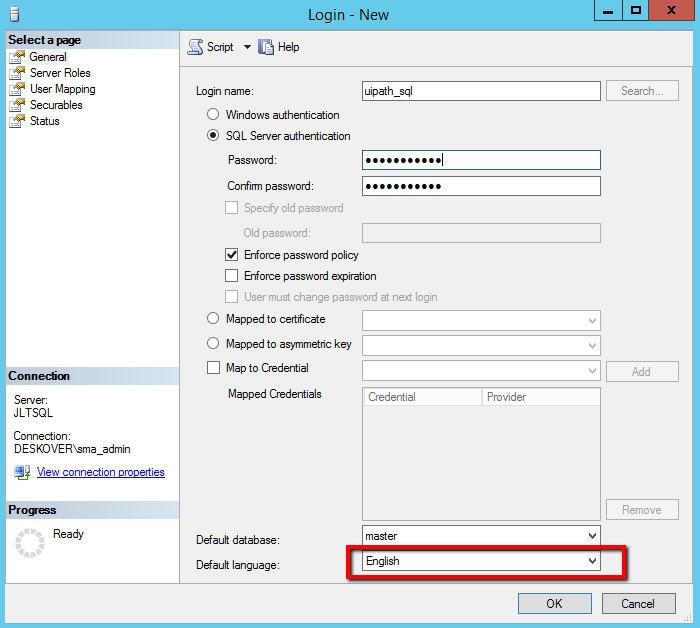
d. Fill in the Login Name, Password, and Confirm Password fields appropriately.
e. Ensure that the Enforce password expiration and User must change password at next login options are not selected.
Important!
Ensure that the Default Language is set to English. If it isn't, the website cannot start, and the Event Viewer on the computer on which Orchestrator is installed displays the following error message: “The conversion of a varchar data type to a datetime data type resulted in an out of range value”.
If the SQL Server account has already been created and added to the Security > Logins section of the SQL Server, please check whether the Default Language is set to English. If it isn't, please make the necessary adjustments.
Regardless of the type of user (domain or SQL) you want to connect to SQL Server, please note that you need to assign it the dbcreator Server Role BEFORE installing Orchestrator, as the database is created during this installation process.
If security restrictions do not allow the use of the dbcreator Server Role in the service account, create the empty database in SQL Server.
The Windows installer connects to SQL Server to verify the existence of the database.
After creating the database, you need to provide the user which connects to the SQL database with the db_owner user mapping role, as in the following screenshot.
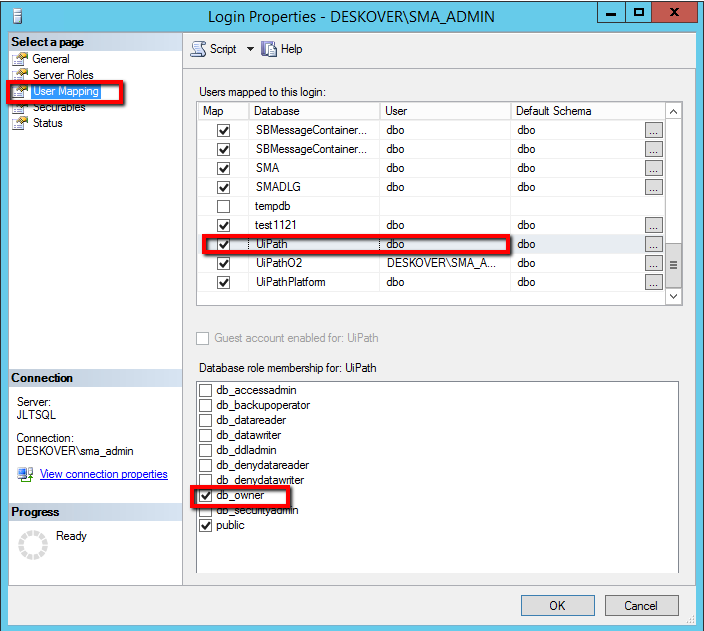
If security restrictions do not allow you to use the db_owner user mapping role with the UiPath login, grant the following:
db_datareaderdb_datawriterdb_ddladminEXECUTEpermission ondboschema
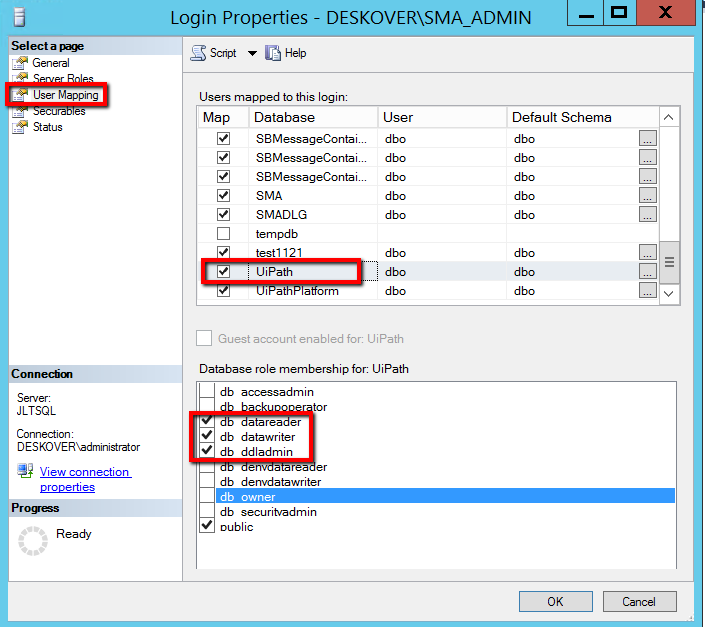
The EXECUTE permission has to be granted by using the GRANT EXECUTE SQL command, as follows.
- if Windows Integrated Authentication is used:
USE UiPath
GO
GRANT EXECUTE ON SCHEMA::dbo TO [domain\user]
GO
- if SQL Server Authentication is used:
USE UiPath
GO
GRANT EXECUTE ON SCHEMA::dbo TO [sql_user]
GO
High Availability Add-on
The High Availability add-on (HAA) for Orchestrator is an in-memory database that is used for caching and is shared among Orchestrator nodes, providing near instant synchronization.
Important!
HAA is mandatory in a cluster environment.
Multi-node Orchestrator deployments use the RESP (REdis Serialization Protocol) for communication, and thus can be configured using any solution relying on this protocol, however HAA is the only such solution supported by UiPath.
The following information is stored in HAA:
- session state - automatically set when installing Orchestrator on multiple nodes
- user sessions from the browser
- Robot heartbeat cache
- associations between users and roles
- associations between users and organization units
- license information
- settings
The High Availability add-on also:
- sends start job commands to all Orchestrator nodes so that it can be further sent to the correct Robots:
- Example: A user manually starts a job on a Robot, on an Orchestrator node. That particular node may not know to which Orchestrator node the Robot is connected to. The node from which you started the job forwards the request to HAA, which in turn, broadcasts the start command to all Orchestrator nodes. The Orchestrator node that has an established connection to the Robot in question sends the start command to it. The other Orchestrator nodes that are not connected to our Robot just ignore the command.
- keeps all packages (
.nupkgfiles) in sync on all nodes (ifNuGet.EnableRedisNodeCoordinationis set totrue):- Example: - If you upload or delete a
.nupkgfile on one Orchestrator node, it sends a message to HAA. The HAA server broadcasts the message to all Orchestrator nodes. Each Orchestrator node, except the one that sent the message, starts to rebuild its own NuGet cache.
- Example: - If you upload or delete a
It is also possible to enable SSL encrypted connections between the Orchestrator nodes and the HAA service, through the LoadBalancer.Redis.ConnectionString web.config parameter. For more information, please see this page.
Network Load Balancer
A network load balancer enables you to distribute the load to multiple nodes, and thus enables an overall better performance of your Orchestrator instance. Additionally, if one of the nodes fails, the rest pick up the load, thus ensuring you have no downtime.
Important!
A network load balancer is mandatory if you want to deploy Orchestrator in a cluster, taking advantage of a high availability model.
We recommend using an F5 load balance with a predictive algorithm, as the load is distributed to nodes that perform better, and therefore, offers a better overall performance of Orchestrator. For more information on algorithms, please take a look here.
Elasticsearch Server
Elasticsearch is optional and is used to store messages logged by the Robots. Logs can be sent to ElasticSearch and/or to a local SQL database, thus enabling you to have non-repudiation logs. When using both ElasticSearch and SQL, they do not affect each other if one of them encounters a problem. These parameters can be changed from the web.config file (C:\Program Files (x86)\UiPath\Orchestrator). For more information, see Logging Configuration.
If you choose to use ElasticSearch, please note that although it is a cross-platform product, which runs on Windows, Linux, or Unix, it requires Java. You can use either OpenJDK or Oracle JRE. A compatibility matrix is provided by Elasticsearch here.
Note:
Please note that starting with April 16, 2019, Oracle has changed their licensing model. Information pertaining to the changes is available here.
If the computers are in a domain, you have to ensure that they are added in the Computers section of the domain server, in Active Directory Users and Computers. This step is required because the computer name is used during the installation process. For example, http://computername.domain.name or http://computername is used instead of http://localhost.
If this is not possible, then the computer name or the IP address should be used during the installation process.
Installing Elasticsearch
- Download Elasticsearch.
- Double-click the Elastic Search Windows installer. The Elastisearch wizard is displayed, at the Locations step.
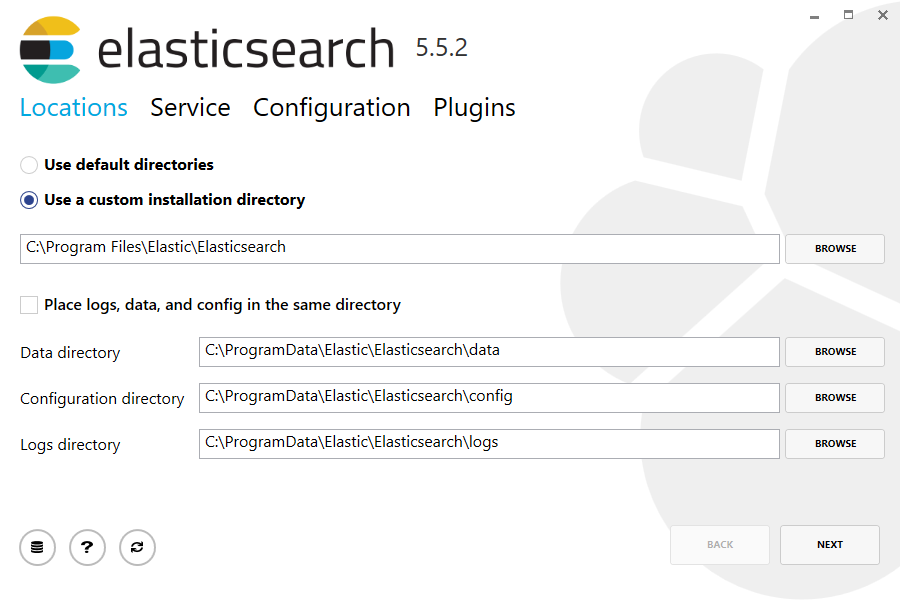
- Use the default directories for installation, data, configuration, and logs, or select custom locations for each.
Note:
If you have another disk than the one where Elasticsearch is installed, you can configure Elasticsearch to store the data on the disc with more free space.
- Click Next. The Service step is displayed.
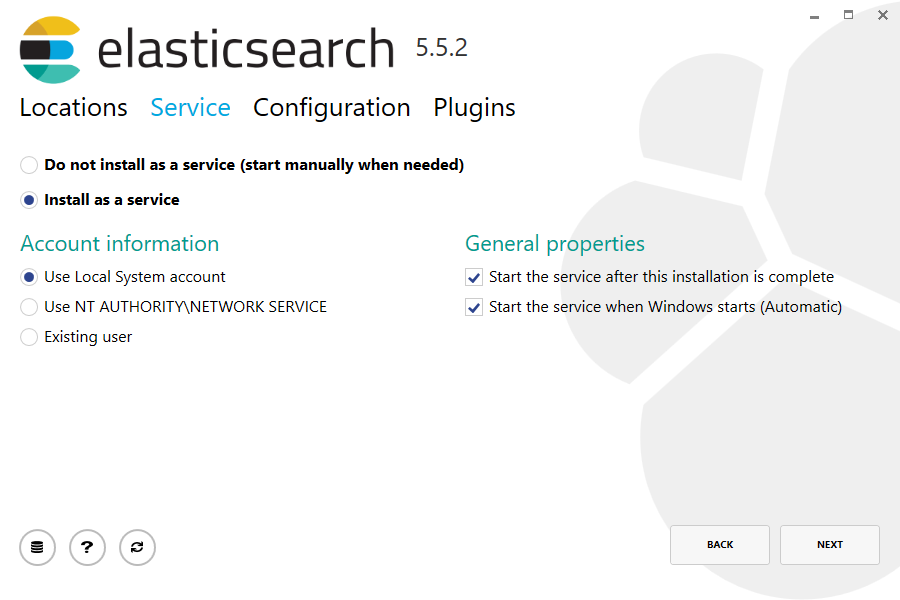
- Ensure that the following options are selected:
- Install as a service
- Start the service after this installation is complete
- Start the service when Windows starts (Automatic)
- Click Next. The Configuration step is displayed.
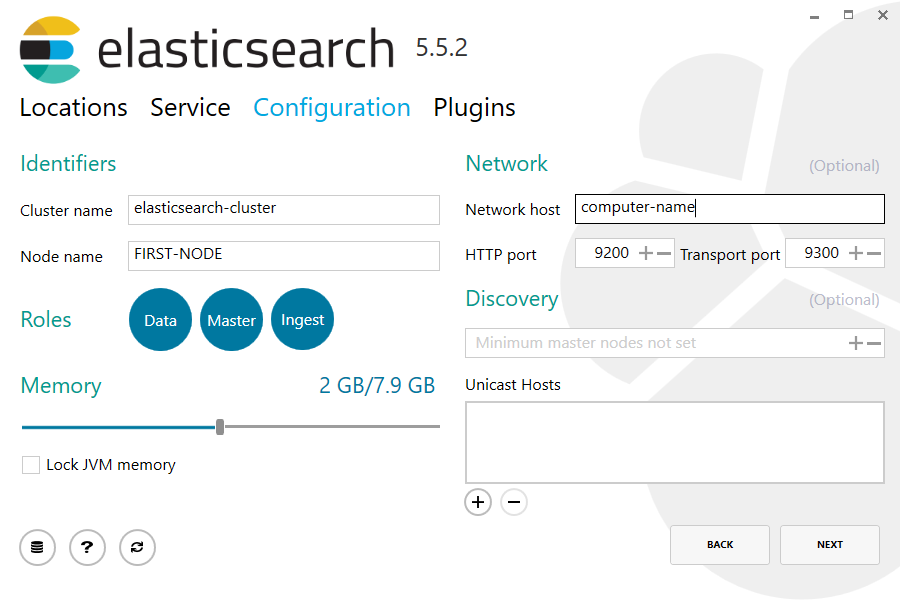
- Configure the following options as desired:
- Cluster name - change the value to something that reflects the purpose of this Elasticsearch installation. This is important if you have several servers with Elasticsearch in your intranet, to avoid autodiscovery.
- Node name - a friendly name for your node.
- Roles - the default options are recommended.
- Memory - the default options are recommended.
- Network host - the computer’s hostname/IP address (you can obtain the machine name in a command prompt by running the command hostname).
- HTTP Port - the default port for Elasticsearch is 9200
Important!
If Orchestrator is installed on a different machine, please remember to open port 9200 in the Firewall of the machine where Elasticsearch is installed.
- Click Next. The Plugins step is displayed.
- (Optionally) Select additional plugins for Elasticsearch, such as X-Pack for security.
- Click Install. ElasticSearch is installed.
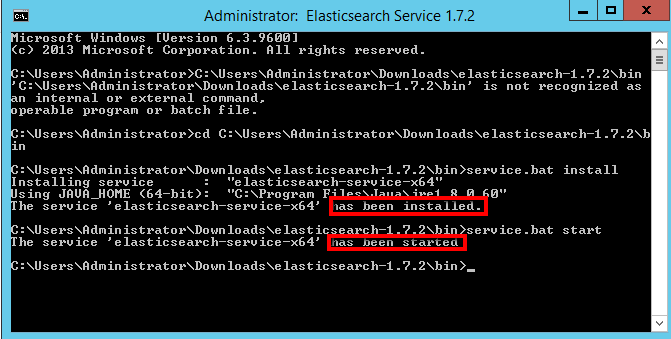
Reducing the Number of Index Sharding
By default, newly created Elasticsearch indexes have five shards. However, for an increased performance, it is recommended to reduce this number to two. For more information, please see the official documentation of Elasticsearch.
To make this change, all you have to do is make a PUT request to your Elasticsearch instance URL in the elasticUrl/_template/uipath_logs format, with the following body:
{
    "template": "*",
    "order": 1,
    "settings": {
        "number_of_shards": 2
    }
}
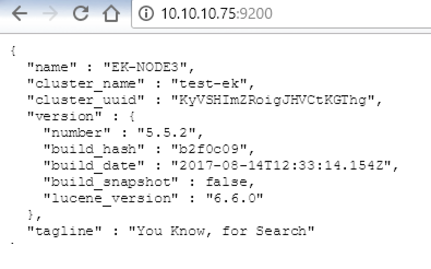
To test your ElasticSearch connection, use any browser to open the following URL: http://computername:9200/. Computername stands for the name of the computer on which Elasticsearch is installed. The browser should either ask you to download a .json file or open and display the file as in the picture below.
Kibana
Kibana is used in combination with Elasticsearch and helps you create custom views based on the logs you send to Elasticsearch, in our case, the ones sent by Robots.
Install Kibana
Note:
Kibana does not need Java to run. If Kibana is installed on a different machine from Elasticsearch, you don’t need to install Java for Kibana to work.
- Download Kibana.
- Unzip the Kibana package.
Note:
Unzip to C:\ or D:\ . You do not need to create a new folder named
kibana-x.y.z-windows, because the files in the archive are already placed in a folder with that name.
- Edit the Kibana configuration file (
C:\kibana-x.y.z-windows-x86\config\kibana.yml), as follows:
Note:
At first, open the file with Wordpad and save it to convert the LF (Line Feed) characters into CRLF (Carriage Return Line Feed) characters. Afterwards, open the file with Notepad.
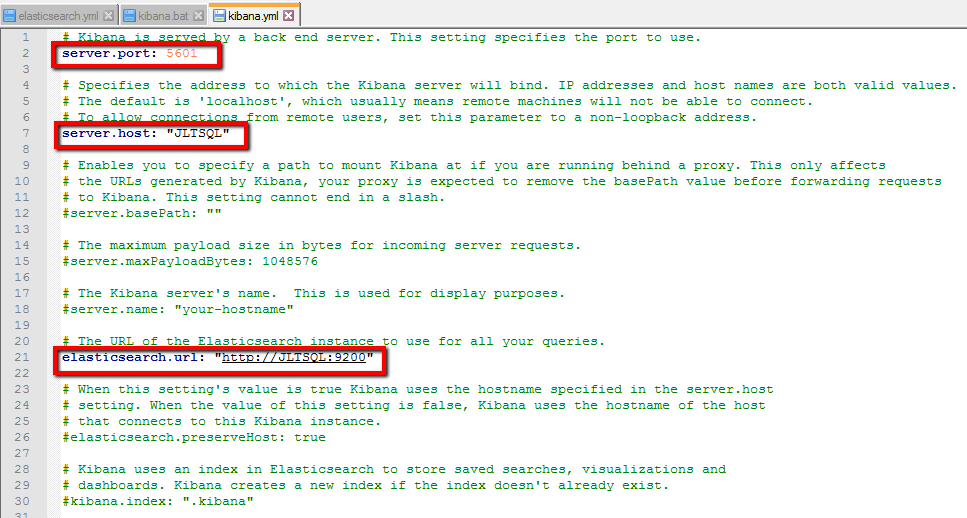
3.1. Uncomment the line that contains server.port. The default value is 5601. It does not need to be changed unless you want Kibana to run on a different port.
3.2. Uncomment the line that contains server.host. Change the value to the name of the computer.
3.3. Uncomment the line that contains elasticsearch.url. Change the value to the Elasticsearch URL, using the name of the computer on which Elasticsearch is installed. For example, http://computername:9200.
Note: For Kibana 6.6.0 or later this line has been replaced by elasticsearch.hosts.
The screenshot below displays an example of a Kibana configuration file in which the computer names of both Kibana and Elasticsearch are JLTSQL:
3.4. Save the file.
- Download the
setup-kibana-service.ziparchive. - Copy the
nssm.exeandsetup_kibana.batfiles from thesetup-kibana-service.ziparchive toC:\kibana-x.y.z-windows-x86\bin. - Open the
setup_kibana.batfile to check whether Kibana is installed in accordance with the location set in theKIBANA_HOMEvariable in the BAT file. If you extracted Kibana to a diferent location, make the necessary changes. - Open Command Prompt as an Administrator and change the folder to
C:\kibana-x.y.z-windows-x86\bin. - Run
setup_kibana.batto install Kibana. - Test whether Kibana responds by typing
http://computername:5601in any web browser.computernamerepresents the name of the computer on which you installed Kibana.
Important!
Open port 5601 in the Firewall of the machine on which Kibana is installed.
- Add a test message in the Elasticsearch database using Kibana:
10.1. In Kibana, navigate to the Dev Tools tab.
10.2. Submit a POST request in the format displayed below. If no error is returned, the Elasticsearch index nameddefault-yyyy.mmis created and the message is added.
POST default-2018.08\logEvent
{
	"message": "Hello Elasticsearch!",
	"@timestamp": "2018-07-03T08:56:56.1219306Z"
}
Important!
Each time a new tenant is added, a corresponding index pattern should be created in Kibana, starting with the name of the tenant.
yyyystands for the year in which the message was added.mmstands for the month in which the message was added. Read Creating an Index Pattern to Connect to Elasticsearch to learn how to create an index pattern in Kibana.
Time Synchronization
Keep in mind that regardless of the type of installation you choose, for the scheduling features to work properly you must ensure that:
- in clustered mode the clocks on all machines have to be synchronized within less than one second;
- the clocks for the database and Orchestrator machines also have to be synchronized;
- if the SQL database enters a faulted state it is recommended to restart the Orchestrator web server from IIS. If you are in an NLB environment, please restart all web servers.
Database Migrations
The Database.EnableAutomaticMigrations parameter in the web.config lets you control when to perform the database migration or creation. This parameter is required when upgrading Orchestrator from an old version that was installed using the scripts.
It can have the following values:
false- The database migration or creation takes place while installing Orchestrator. This is the default option.true- The database migration or creation takes place when you first open Orchestrator.
Updated 9 months ago