A Library is a package which contains multiple reusable components. Libraries are saved as .nupkg files and can be installed as dependencies to workflows using Package Manager.
For example, you could create a library that collects data from an Excel spreadsheet and appends it to another, as explained in the Creating a Basic Library page. Next, the library can be packaged and used in other processes as an activity.
Managing Reusable Component Activities
A reusable component activity represents one or more workflows packaged together as a .nupkg file, and utilized in other processes.
Creating a Library
- Go to the Studio Backstage View > Start > Library. This opens the New Blank Library window.
- Fill in the name and pick a location for the library. The default location is
C:\Users\<current_user>\Documents\UiPath. Add a description and select Create. The new library is created and saved on your local machine.
Note: The library name cannot exceed 128 characters, and the description cannot exceed 500 characters. - The Project Panel displays the tree view with the Project folder, Dependencies, and the
NewActivity.xamlwhich contains the actual workflow.
Note:
By default, the dependencies available for new libraries are the same as for blank new projects, namely
UiPath.Excel.Activities,UiPath.Mail.Activities,UiPath.System.Activities, andUiPath.UIAutomation.Activities, with the Lowest Applicable Version runtime rule.
Add a tooltip and help link to a library by opening the Properties window.
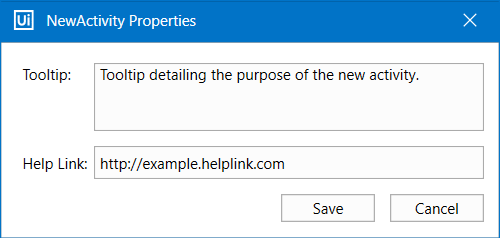
The tooltip is visible in the Activities panel after you've added the new activity. The Help Link opens when you press F1 on the selected activity.
When creating a new library from a template, the Designer panel doesn’t automatically open the .xaml file, unless the library template has a Main.xaml file.
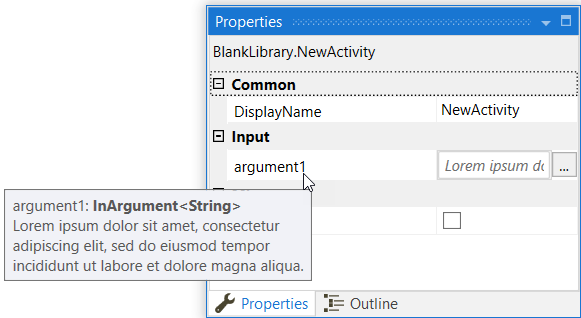
Add an annotation to a used argument in the library to have it displayed later as a tooltip in the activity's Properties panel. Read the Arguments Panel to find out more about adding annotations to arguments.
Note:
In the case of libraries, it is recommended to use
Nothingto assign a null value to a variable, rather than"". This is done to avoid any inconsistencies when using the packaged library as a dependency to a project.
Adjust Library Settings
A set of individual settings can be established for a library project. Such settings are available in the Project Settings window, which can be opened by clicking the  in the Project panel.
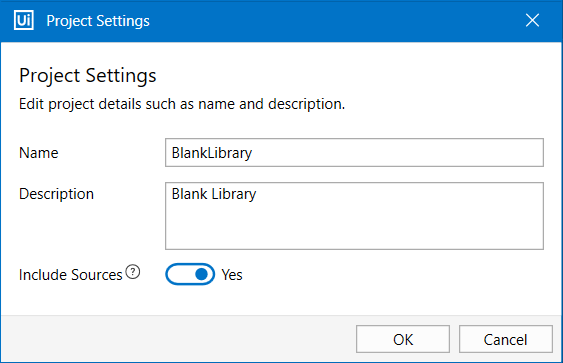
The Project Settings window enables you to change the library’s name and description. Set the Include Sources toggle to Yes to package all .xaml sources within the generated assembly file, including workflows that were previously made private.
Important!
It is highly recommended for libraries and processes to use the same versions of dependencies, or within a difference of minor package updates, to avoid running into breaking changes. This is a best practice of developing and reusing libraries.
If you encounterSystem.MissingMethodExceptionwhen executing a process that invokes a library, you should recompile your library using dependencies with a version closer to the ones used in the aforementioned process.
Publishing a Library
- In the Design ribbon tab, select Publish. The Publish Library window opens.
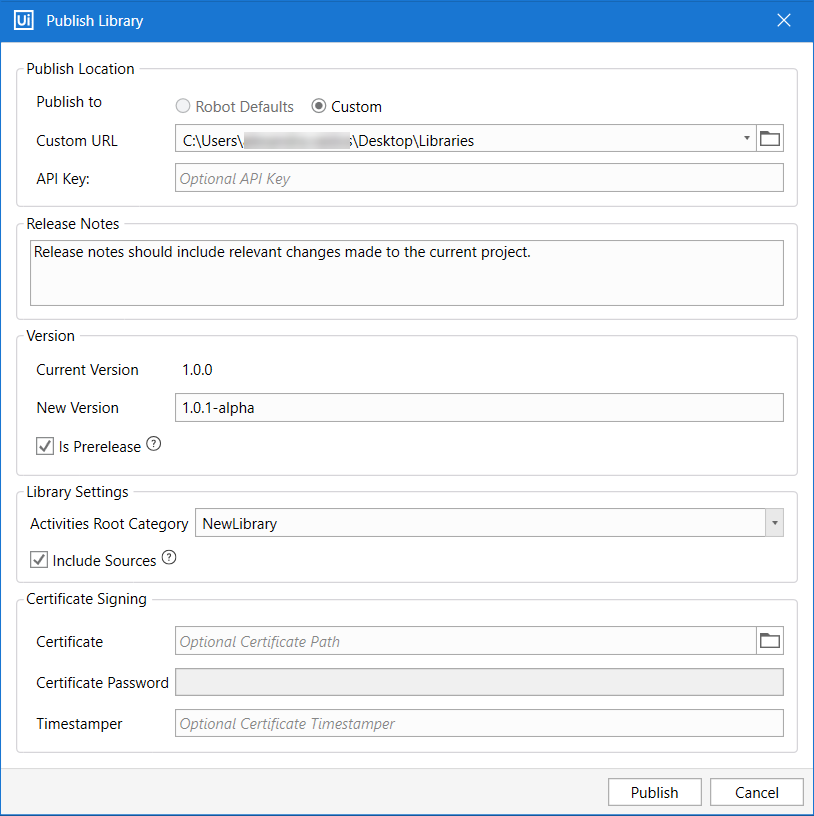
- In the Publish Location category, set the library to be published to Orchestrator, a custom NuGet feed or on the local machine. The API key can be used for authentication to the custom NuGet feed.
Once the library has reached Orchestrator, it is stored either in the host feed or in the tenant feed, as configured on the Settings page. Details about libraries feeds here.
Note:
Due to a NuGet limitation, you cannot publish libraries to locations that contain user-restricted subfolders using Windows environment path variables.
- In the Release Notes category, type in the details about the version and other relevant information. Release notes for published projects are visible in the Packages section in Orchestrator. Please note that the Release Notes field accepts a maximum of 10,000 characters.
- Add a New Version to the project, and check the Is Prerelease box to mark the version as
alphaif needed. Please note that this automatically changes the project’s version schema to semantic. When publishing a new version of the file locally, make sure that the custom location does not already include a file with the same proposed version number. For more details about project versioning, check the About Automation Projects page.
Note:
Release notes for published libraries are visible only in Orchestrator, due to a NuGet v3 limitation.
- In the Library Settings category, set a name for the Activities Root Category or leave the default library name. This creates a new category for the reusable component in the Activities panel. Please note that the previously set root categories are memorized in the drop-down list.
- Select the check box next to the Include Sources to package all
.xamlsources within the generated assembly file, including workflows that were previously made private. If needed, you can then decompile the assembly file and extract the workflows, which can be helpful at debug time. - In the Certificate Signing section, add a local Certificate Path next to the Certificate box. Furthermore, add Certificate Password and Optional Certificate Timestamper if needed. For more details, check out the Signing Packages page.
Note:
Currently, only
.pfxand.p12certificate extensions are accepted for signing projects.
- Select Publish. The entire project folder is archived into a
.nupkgfile, and uploaded to Orchestrator, the custom NuGet feed or saved in the local directory. - If the project is published successfully, the Info dialog box is displayed, which contains:
- The name under which the package was published to Orchestrator or locally;
- The version number under which the package was published;
- The location where the project was published if the project was published locally.
- The Copy to Clipboard option.
Limitations when Publishing Libraries
The following limitations prevent library projects from being published:
- Libraries containing Invoke Workflow File activities with the Isolated option selected cannot be published. An error message is displayed in the Output panel.
- When using Invoke Workflow File activity, make sure the invoked file is located in the same folder as the library project.
- The Launch Workflow Interactive activity is not supported for libraries.
- Using Invoke Workflow File inside a library to reference the library itself is not supported.
- If both the following conditions are met, libraries cannot be published from Studio v2019.10.4:
- a folder or
.xamlfile inside the project has the exact same name as the library; - an Invoke Workflow File activity part of a
.xamlfile located in any child folder part of the project.
- a folder or
Attempting to publish such a library results in the following error message: Compilation failed or was canceled., with the following error in the Output panel:

Below is the project we tried to publish:
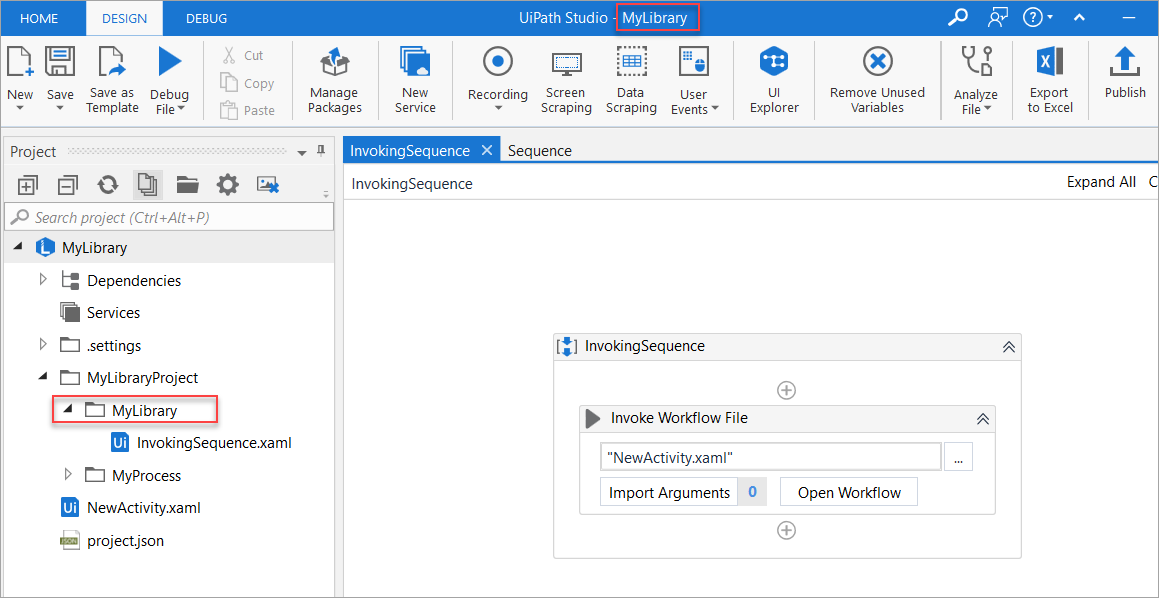
Notice that the two conditions are met:
- The name of the library MyLibrary is identical to the name of a subfolder in the MyLibraryProject folder;
- The InvokeWorkflowFile is part of the InvokingSequence file, not located in the root folder MyLibrary.
To solve this, we need to either rename the MyLibrary folder inside the project, or move the InvokingSequence file in the root folder, like in the two examples below:
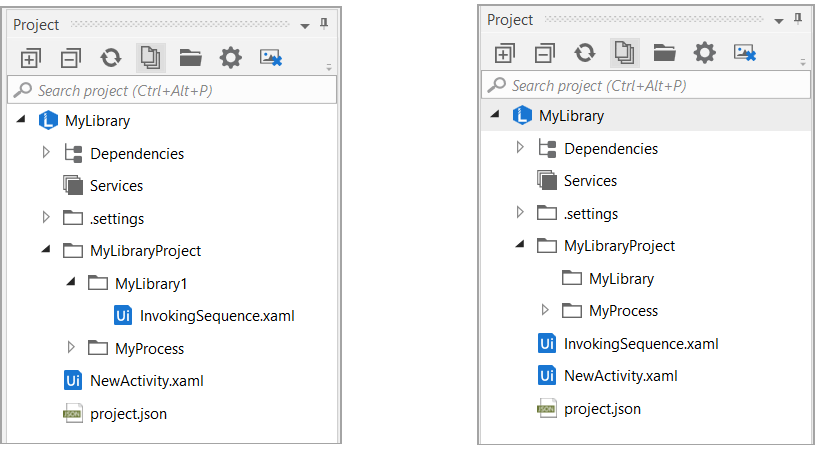
Notice that in the first example, we renamed the MyLibrary subfolder to MyLibrary1, while in the second example we moved the .xaml file which contains the Invoke Workflow File activity, InvokingSequence to the root of the project.
- Libraries containing
.xamlfiles invoked from parent folders cannot be published from Studio v2019.10.3.
If you have encountered this issue, use one of the two available workarounds:
- Move both files to the same folder or level in the project, and then publish the library.
- Switch to the legacy library compiler. To do so open the
Development.jsonlocated at%ProgramFiles(x86)%\UiPath\Studio\Profiles. For theUseLegacyLibraryCompilerflag set its value totrue. Do not make any other changes to this file!
{
      "name": "UseLegacyLibraryCompiler",
      "value": true
    },
Warning!
Manually editing the
Development.jsonfile in any other way than presented here can lead to unexpected behavior.
Adding Reusable Components to Automation Projects
- Open or create a new project.
- Under the All Packages category, pick the feed under which the library is saved and install the package.
- Select OK and the package is added to the project definition.
- The activity is found in the custom category of the Activities panel.
Note:
Libraries are forward compatible, which means that they can only be used with projects created with Studio v2018.3 and later. Libraries cannot be published to Orchestrator versions prior to 2018.3.
Please note that in a library project, when using Import Workflows to add a workflow that contains a library, the dependencies referenced in the library are not imported.
Updated about a year ago