Since OCR and Image automation usually go hand in hand due to the difficulty of automating in virtual environments, we created an automation that retrieves an employee’s email and the invoice number from a scanned invoice. Afterwards, it inputs the information into a dummy expense app (ExpenseIt) on a virtual machine, and compares the total from the invoice with the one in the app:
- Create a new Sequence.
- Open the scanned invoice, the invoice used in the example can be downloaded here. We recommend using Adobe Acrobat Reader for compatibility reasons.
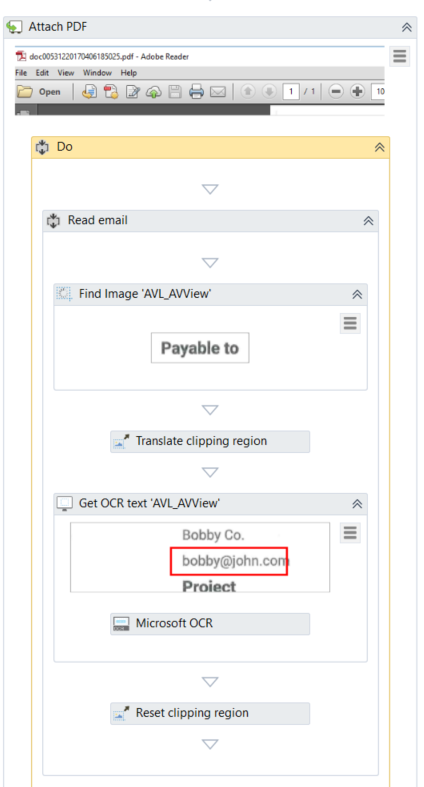
- As explained here, scrape the employee’s email by using OCR technology. A container, Attach Window renamed in this example to Attach PDF, that holds the selector and lets all the other activities know where to perform actions is generated. In it, there are a Find Image, that selects the anchor for relative scraping, a Get OCR Text that retrieves the email address of the employee, and two Set Clipping Region activities: one to translate the first clipping region to the second one, and the other to reset the clipping region.
- In the Variables Panel, create a new GenericValue variable, called
email. - Enter the email variable into the Text property of the previously generated Get OCR Text activity.
- Name the above sequence Read Email.
Note:
The OCR engines featured by UiPath Studio have their pros and cons, using them depends on the circumstances, and testing which one does the best job in each situation is key in deciding which one to use. Changing the OCR engine for different tasks can make your results better.
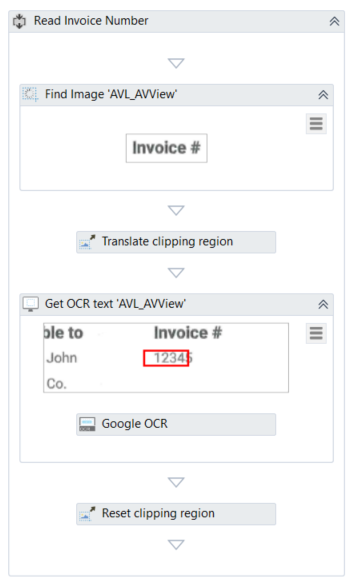
- As explained here, scrape the invoice number by using OCR technology. The recorder generates a container, Attach Window renamed in this example to Attach PDF, that holds the selector and lets all the other activities know where to perform actions. Inside the container, there are a Find Image, that selects the anchor for relative scraping, a Get OCR Text that retrieves the invoice number of the employee, and two Set Clipping Region activities, one to translate the first clipping region to the second one, and one to reset the clipping region.
- In the Variables Panel, create a new GenericValue variable called
invoiceNo. - Enter the
invoiceNovariable into the Text property of the previously generated Get OCR Text activity. - Name the above sequence Read Invoice Number
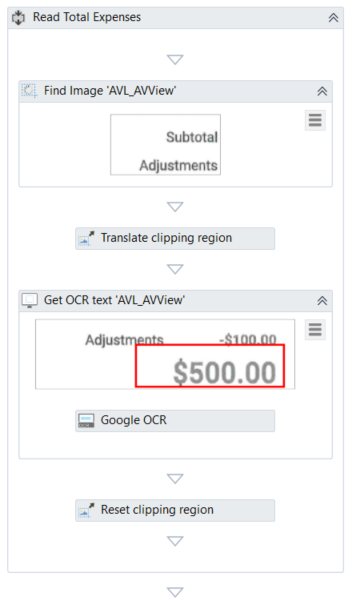
- As explained here, scrape the employee’s total expenses by using OCR technology. The recorder generates a container, Attach PDF, that holds the selector and lets all the other activities know where to perform actions. Inside it, there are a Find Image, that selects the anchor for relative scraping, a Get OCR Text that retrieves the total expenses of the employee, and two Set Clipping Region activities, one to translate the first clipping region to the second one, and one to reset the clipping region.
- In the Variables Panel create a new GenericValue variable called
totalValue. - Enter the
totalValuevariable into the Text property of the previously generated Get OCR Text activity. - Name the above sequence Read Total Expenses.
Note:
A best practice in opening applications in virtual machine environments is creating a shortcut for the application that is to be opened on the desktop of the machine and assigning it a hotkey. Trying to click the application’s icon by using Click OCR Text can sometimes fail due to changes in the background colour or to the icon being selected.
- Create a shortcut for the ExpenseIt application on the desktop of the virtual machine.
- Right-click the shortcut and select Properties from the context menu. The Shortcut Properties window is displayed.
- On the Shortcut tab, in the Shortcut Key field, assign a hotkey to the app by pressing the keys you want to use, for example Alt + Ctrl + T.
- Start a new recording session by opening the Citrix Recording Wizard.
- Record sending the virtual machine window the hotkey that was previously assigned to the application’s shortcut.
- Use Relative Scraping to click the Email field in the ExpenseIt application based on its label’s location.
- In the Email field of the ExpenseIt application, enter the
emailvariable. - Use Relative Scraping to click the Employee Number field in the ExpenseIt application based on its label’s location.
- Add the
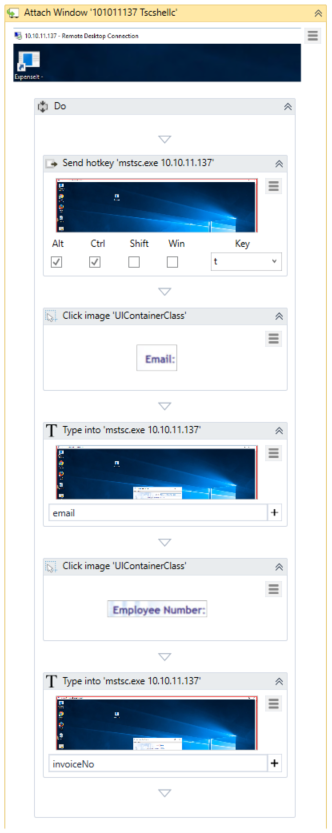
invoiceNovariable in the Employee Number field of the ExpenseIt application. - Click Save & Exit in the Recording Wizard. The recorder generates an Attach Window container that holds the selector and lets all the other activities know where to perform actions. It contains a Send Hotkey activity, a Click Image activity that clicks the field to the right of the Email label, a Type Into activity that types the email variable into the field, a Click Image activity that clicks the field to the right of the Employee Number label and a Type Into activity that types the
invoiceNovariable into the field.
- Start a new recording session by opening the Citrix Recording Wizard.
- Record clicking the Create Expense Report button in the ExpenseIt application.
- Use Relative Scraping to scrape the value that corresponds to the Total Expenses ($) label.
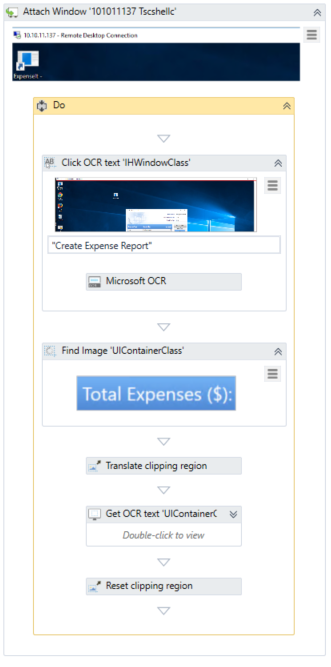
- Click Save & Exit in the Recording Wizard. The recorder generates an Attach Window container that holds the selector and lets all the other activities know where to perform actions. It contains a Click OCR Text that clicks the Create Expense Report button, a Find Image that sets the anchor for the relative scrape, a Get OCR Text that retrieves the total expense value and two Set Clipping Region activities, one to translate the first clipping region to the second one, and one to reset the clipping region.
- In the Variables Panel, create a new GenericValue variable called
totalExpense. - Enter the
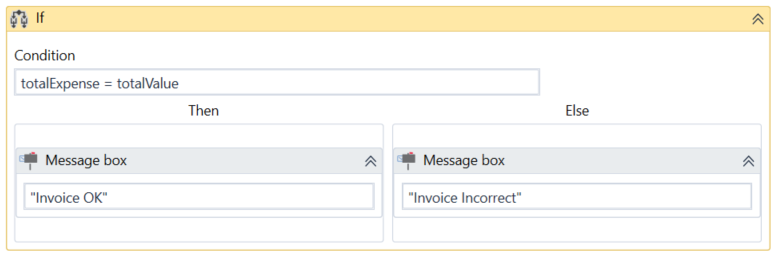
totalExpensevariable in the Text property field of the previously generated Get OCR Text activity. - Drag an If activity after the last generated recording sequence.
- Set the Condition property of the If activity to
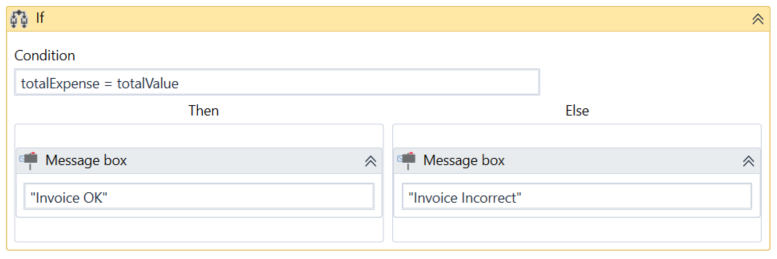
totalExpense = totalValue. This means that the automation checks if the total value of the invoice equals the value in the expense application. - Drag a Message Box activity to the Then section of the If activity.
- In the Text property field of the Message Box, write a message that states the values are equal, hence the invoice is correct.
- Drag a Message Box activity to the Else section of the If activity.
- In the Text property field of the Message Box, write a message that states the values are not equal, hence the invoice is incorrect.
- Press F5 to run the automation. Note that the automation inputs the employee data from the scanned invoice into the ExpenseIt application, compares the total value of the invoice with the total expenses registered, and informs the user if the values are equal or not.
Since this automation involves connecting to a virtual machine, uploading the original project is redundant, as it would not work on another machine. We encourage you to build your own project by following the above steps.
Updated 3 years ago