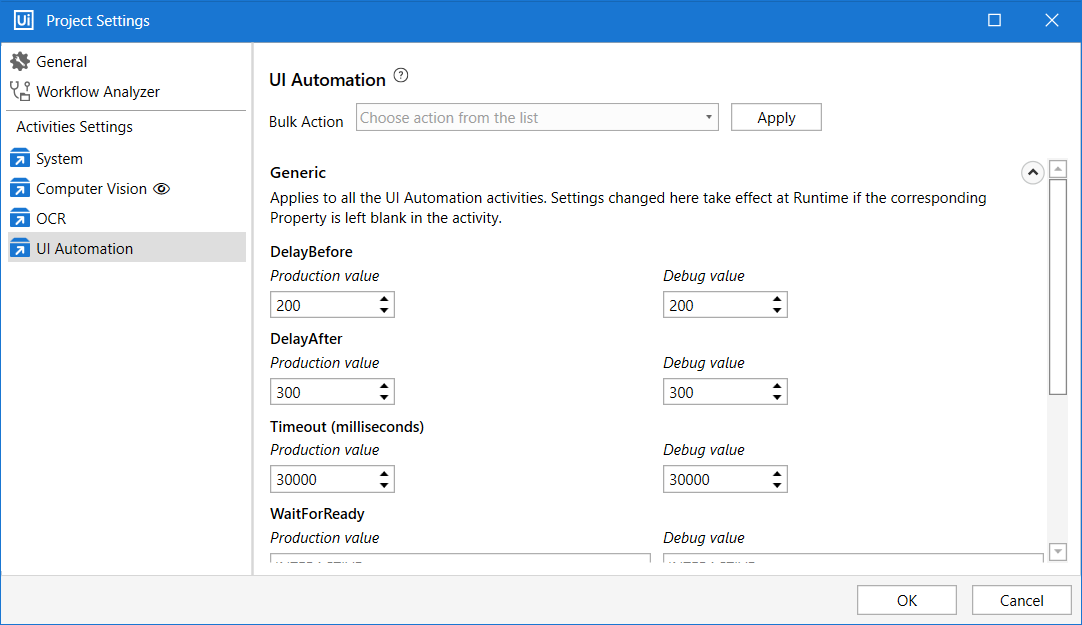
Using the UiPath.Activities.API package from the Official feed (https://www.myget.org/F/workflow), you can create and add your own custom activity project settings in Studio.
Important!
The UiPath.Activities.API package must be used as a development dependency in your custom project. Read more about Development Dependencies.
Activity project settings encompass a set of options that can be adjusted on a project level directly from the Project Settings window.

How to Use the API
When the activities are loaded into Studio, a reference to IWorkflowDesignApi is provided in several ways:
- Inside the
IRegisterMetadataimplementation add apublic void Initialize(object api)method. This method is called during the activity loading process and the activity can store theapiparameter for later usage. - Define a class that implements
IRegisterWorkflowDesignApi. The methodIRegisterWorkflowDesignApi.Initialize(IWorkflowDesignApi api)is called during the activity loading process, and the activity can store theapiparameter for later usage. When using this method only Studio versions from 2019.6 are able to load your package. - Obtain a reference of the
apiobject by callingcontext.Services.GetService<IWorkflowDesignApi>()wherecontextis a System.Activities.Presentation.EditingContext, usually accessible for activity designers.
Check for Feature Keys
It is important to perform a preliminary check against the DesignFeatureKeys to see if the needed feature keys are supported.
The feature keys below are what Studio supports as of 2019.10.1, but can change in a future version.
namespace UiPath.Studio.Activities.Api
{
    /// <summary>
    /// Supported Studio feature keys.
    /// </summary>
    public static class DesignFeatureKeys
    {
        /// <summary>
        /// Studio 19.8
        /// </summary>
        public const string Settings = nameof(Settings) + "V1";

        /// <summary>
        /// Studio 19.8
        /// </summary>
        public const string Theme = nameof(Theme) + "V1";

        /// <summary>
        /// Studio 19.8
        /// </summary>
        public const string Wizards = nameof(Wizards) + "V1";

        /// <summary>
        /// Studio 19.8
        /// </summary>
        public const string AccessProvider = nameof(AccessProvider) + "V1";

        /// <summary>
        /// Studio 19.10
        /// </summary>
        public const string Telemetry = nameof(Telemetry) + "V1";
    }
}
In order to check for a feature, you need to call the HasFeature method on the IWorkflowDesignApi reference, otherwise calls to the relevant api methods might fail with MissingMemberException or MissingMethodException on older Studio versions.
IWorkflowDesignApi studioActivitiesApi;
            // How to check for a feature.
            if (studioActivitiesApi.HasFeature(UiPath.Studio.Activities.Api.DesignFeatureKeys.Settings))
            {
                // Call Method or lambda that is using specific feature
                // This ensures that the code is JIT compiled only after the feature check
           }
Build Activity Settings
The following sample builds a set of settings for a music player sample activity.
Add the Tab and Section
using UiPath.Studio.Activities.Api;
using UiPath.Studio.Activities.Api.Settings;

namespace MyCustomActivityPack
{
    public static class SettingsCreator
    {
        // This is the key used to reference a tab, even across packages.
        internal const string CategoryKey = "DemoTabUniqueKey";

        // This is the key used to reference the setting, even across packages.
        internal const string CommentTextKey = CategoryKey + ".Comment";

        internal const string PresetKey = CategoryKey + ".Preset";

        internal const string ShuffleKey = CategoryKey + ".Shuffle";

        public static void CreateSettings(IWorkflowDesignApi workflowDesignApi)
        {
            var settingsApi = workflowDesignApi.Settings;

            // Add the category (a tab in the settings page)
            var category = new SettingsCategory()
            {
                Description = "Settings Sample",
                Header = "Settings Sample",
                Key = CategoryKey
            };

            settingsApi.AddCategory(category);
            AddMusicPlayerSection(settingsApi, category);
            AddMiscSettings(settingsApi, category);
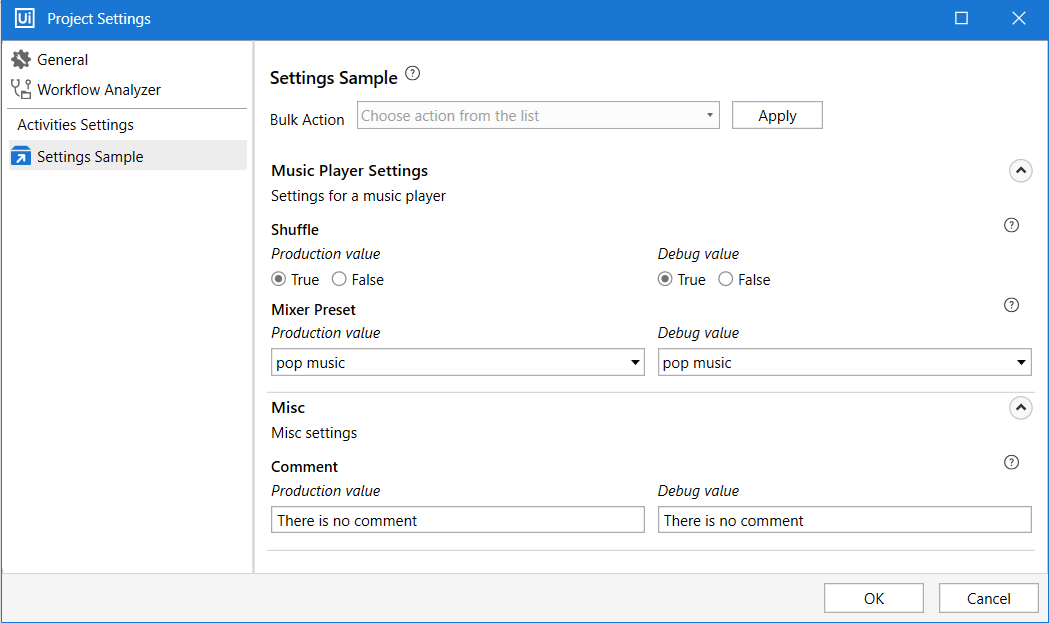
This adds a tab and section to the Activity Project Settings window. The tab description is visible when hovering over the tab's tooltip:

Add Settings
- Expandable settings section:
private static SettingsSection AddMusicPlayerSection(IActivitiesSettingsService settingsApi, SettingsCategory category)
        {
            var section = new SettingsSection()
            {
                Description = "Settings for a music player",
                IsExpanded = true, //set this to control default expansion
                Title = "Music Player Settings",
                // the key of a section has to be unique only within the category
                Key = "Player"
            };
            settingsApi.AddSection(category, section);

            AddSimpleBoolean(settingsApi, section);
            AddSingleChoice(settingsApi, section);
            return section;
        }
This results in:

- Radio button for Boolean values:
private static void AddSimpleBoolean(IActivitiesSettingsService settingsApi, SettingsSection section)
        {
            var booleanSetting = new SingleValueEditorDescription<bool>
            {
                DefaultValue = true,
                Description = "If active, the playlist is shuffled",
                // The value returned by GetDisplayValue should be localized
                GetDisplayValue = b => b ? "On" : "Off",
                Key = ShuffleKey,
                Label = "Shuffle"
            };

            settingsApi.AddSetting(section, booleanSetting);
        }
This results in:

- Multiple choice list of values:
private static void AddSingleChoice(IActivitiesSettingsService settingsApi, SettingsSection category)
        {
            var booleanSetting = new SingleValueSelectorDescription
            {
                DefaultValue = "pop",
                Values = new[] { "classic", "pop", "rock" },
                Description = "Sample single choice setting",
                // The value returned by GetDisplayValue should be localized
                GetDisplayValue = choice => choice + " music",
                Key = PresetKey,
                Label = "Mixer Preset"
            };

            settingsApi.AddSetting(category, booleanSetting);
        }
This results in:

- Input text field with validation:
private static void AddSimpleString(IActivitiesSettingsService settingsApi, SettingsSection section)
        {
            var simpleStringSetting = new SingleValueEditorDescription<string>()
            {
                Description = "A free text comment that can't contain the word 'invalid'",
                // The GetDisplayValue obtains a localized screen representation of the underlying setting value.
                GetDisplayValue = LocalizeSimpleSettingValue,
                IsReadOnly = false,
                DefaultValue = "There is no comment",
                Label = "Comment",
                Validate = ValidateSimpleStringSetting,
                Key = CommentTextKey
            };
            // Add the setting to the section.
            // A setting may also be directly added on a category. It will appear as a setting without a section (top level setting)
            settingsApi.AddSetting(section, simpleStringSetting);
        }
private static string LocalizeSimpleSettingValue(string s) => $"A localized value of `{s}`";
private static string ValidateSimpleStringSetting(string arg)
        {
            if (arg?.ToLowerInvariant().Contains("invalid") == true)
            {
                return "The sample string setting is invalid if it contains the `invalid` keyword";
            }

            return string.Empty;
        }
This results in:

Get Process ID and Logs
Using methods applied to the IExecutorRuntime reference, you can get information about the process ID which is being executed by the Robot, as well as execution logs. The following methods can be used:
IRunningJobInformation- Collects information about the process which is being executed, and supports the following properties:JobID- retrieves the process IDProcessName- retrieves the process nameProcessVersion- retrieves the process versionWorkflowFilePath- retrieves the full path of the process
LogMessage- Generates Robot Execution Logs according to a Logging Level you specify. Read more about logs on this page. The following properties are supported:EventType- the logging level to retrieveMessage- the message to display
The following code exemplifies the use of the LogMessage method:
public class MyLogMessageActivity : CodeActivity
{
    protected override void Execute(CodeActivityContext context)
    {
        var executorRuntime = context.GetExtension<IExecutorRuntime>();
        var jobInfo = executorRuntime.RunningJobInformation;
        executorRuntime.LogMessage(new LogMessage
        {
            EventType = TraceEventType.Warning,
            Message = $"Job {jobInfo.JobId}: My log message from workflow {jobInfo.WorkflowFilePath}"
        });
    }
}
Add the Project to Studio
To make the settings visible in Studio in the Activity Project Settings window, you need to publish your custom activities to a NuGet package and make it available to a feed defined in Studio, version 2019.10.1 or above.
Create the NuGet Package

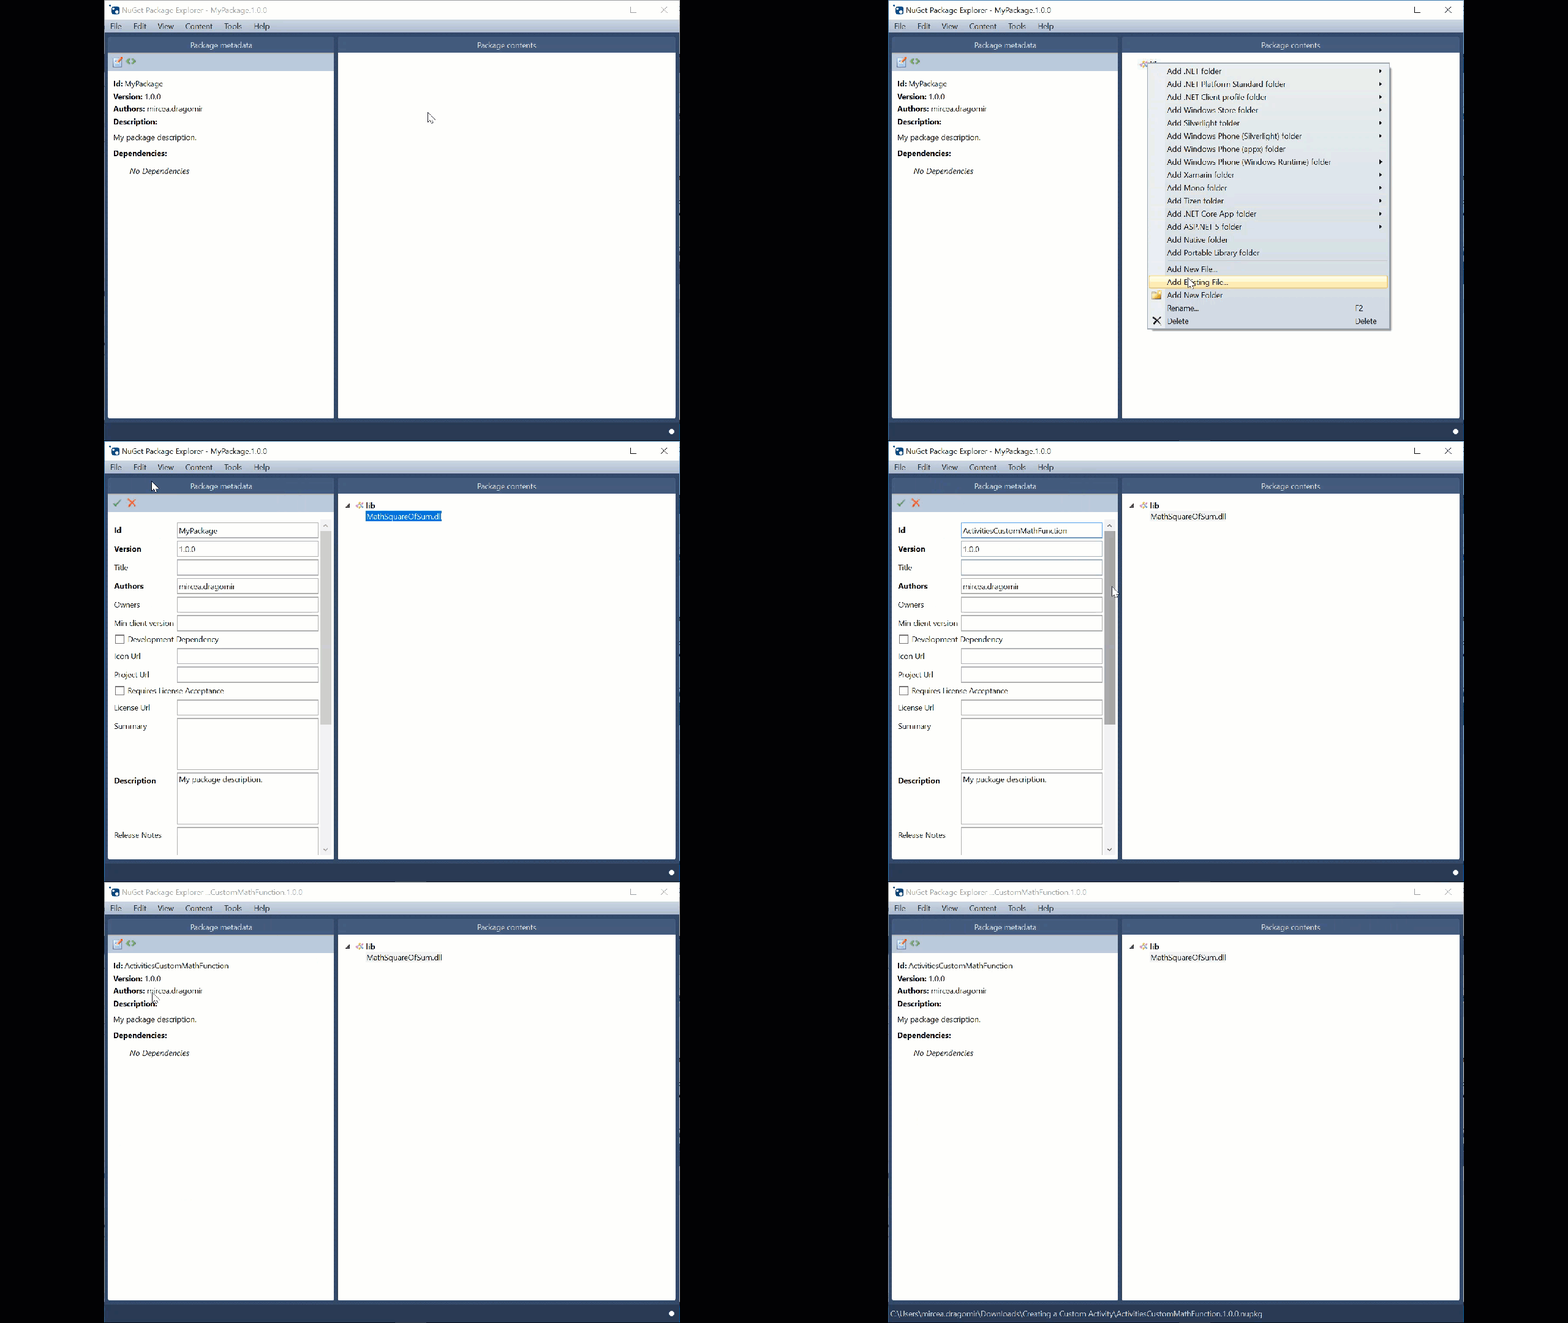
- Launch NuGet Package Explorer.
- Click Create a new package (Ctrl + N). A split-window is displayed which shows Package metadata and Package contents. We need to add all dependencies in the latter section.
- Right-click the Package contents section. A context menu is displayed.
- Click Add lib folder. Notice a new lib item is created in the Package contents section.
- Right-click lib and select to Add Existing File….
- Load the external assembly (.dll) of your project.
- Click Edit > Edit Metadata. The Package metadata section is displayed.
- Fill in the fields as you see fit to better describe your project.
- Fill in the Id field and make sure to include the keyword “Activities” so the package can be displayed in the Manage Packages window, in Studio.
- Click File > Save. In our case, the
.nupkgfile is created.
Note:
Be sure to create an intuitive folder structure for your activities. All empty folders inside the custom activity get removed when used with Orchestrator.
Install the NuGet Package in UiPath Studio
Once the .nupkg file is created, add it to a custom feed in Studio, as explained here.
Open the Manage Packages window and install the package. Make sure the custom feed is enabled in Studio.
Sample Settings
Put together, the above-created tab, section, and settings are visible in the Activity Project Settings window:

Simply follow the link below to download the sample, which also contains an example of creating wizards.
Updated 2 years ago