The date and time variable is a type of variable that enables you to store information about any date and time. This type of variable can be found in the Browse and Select a .Net Type window, under the System namespace System.DateTime. For more information, see Browsing for .Net Variable Types.
For example, they can be used to append dates to invoices or any other documents you may be working with and are time-sensitive.
Example of Using a Date and Time Variable
To exemplify how you can work with a date and time variable, we are going to build an automation that gets the current date and time, subtracts a specific amount of time and writes the result to a Microsoft Excel spreadsheet.
- Create a new sequence.
- Create two DateTime variables,
TodayandLastTime. - Create a TimeSpan variable, called
Span, and in the Default field type1.02:10:04.
Note:
The default value attributed to the
Spanvariable uses the day.hh:mm:ss format.
- Add an Assign activity to the Designer panel.
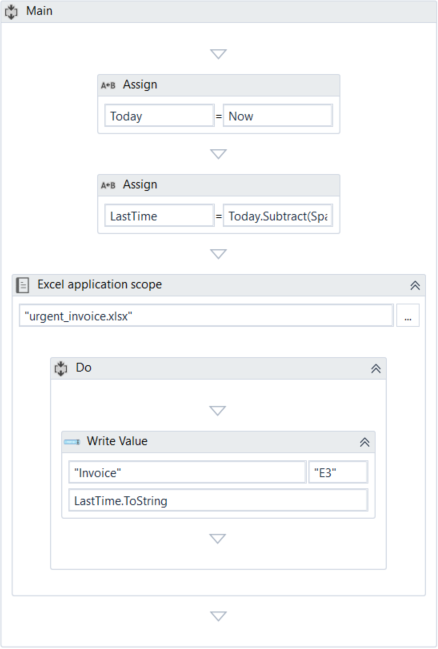
- In the Properties panel, in the To field, add the
Todayvariable. - In the Value field, type
Now. This gives you the date and time when the project is executed, in thedd/MM/yyyyandhh:mm:ssformats. - Add another Assign activity under the previous one.
- In the Properties panel, in the To field, add the
LastTimevariable. - In the Value field, type
Today.Subtract(Span). This is going to subtract the default value of theSpanvariable from the current date and time, stored in theTodayvariable. - Add an Excel Application Scope activity under the last Assign one.
Note:
Use the Manage Packages feature to download the Excel activities, if you do not already have them installed.
- In the Properties panel, in the WorkbookPath field, type the path of the Excel file you want to write to, between quotation marks. In our case,
"%HOMEPATH%\Desktop\urgent_invoice.xlsx".
Note:
If the file does not exist at the provided path, it is going to be created.
- Add a Write Cell activity in the Excel Application Scope activity.
- In the Properties panel, in the Range field, type the coordinates of an Excel cell between quotation marks. In our case,
"E3". - In the Sheet Name field, type the name of the sheet in which you want to write. In our case,
"Invoice". Note that if the sheet does not exist, it is going to be created. - In the Value field, type
LastTime.ToString. This transforms the value of theLastTimevariable to a string and writes it to the coordinates previously given.
The final project should look as in the following screenshot:

- Press F5. The automation is executed.
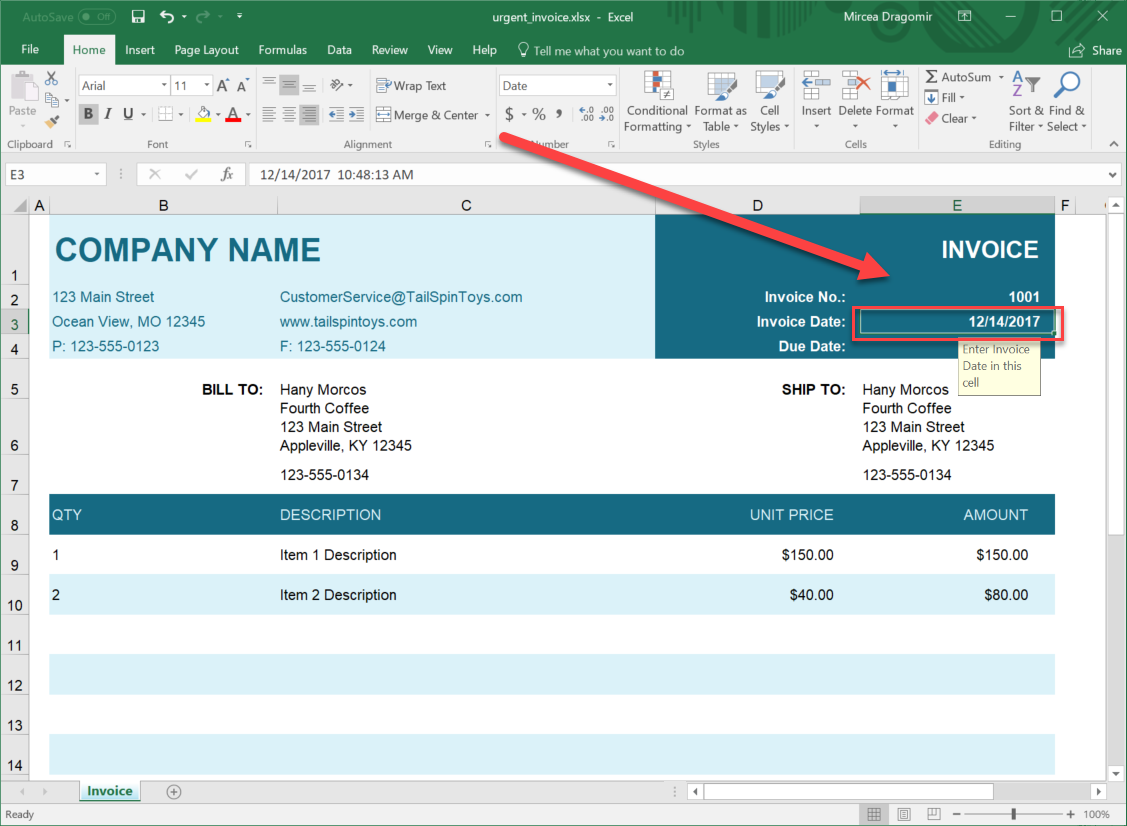
- Navigate to your Excel file and double-click the cell in which you added the date. Note that the time and date information is displayed in the cell you pointed towards.

Updated 3 years ago