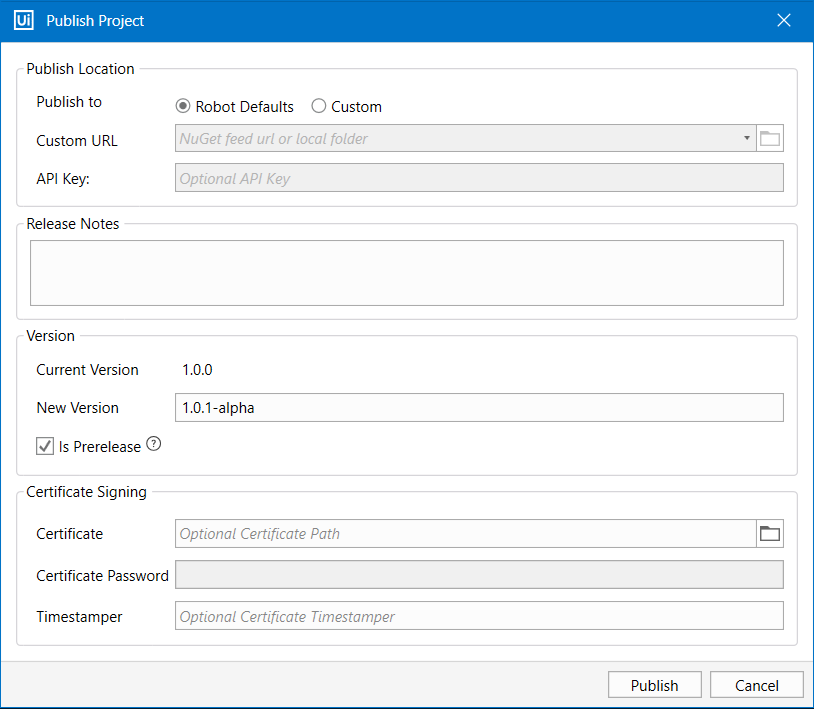
Publishing an automation project means archiving the workflow and all the other files in the folder so that it can be sent to Robots and then executed.
Automation projects can be published to Orchestrator, a custom NuGet feed or locally. After publishing to Orchestrator, the archived project is displayed in the Packages page. From here you can distribute it to other Robots, by assigning the package to an environment (creating a process).
Additionally, automation projects may be published to a custom NuGet feed, with the option to also add an API key if the feed requires authentication.
Publishing projects locally requires you to provide a path on the local machine, different than the location where process packages are published. From here, you can later manually send the packages to the Robots, so they can be executed. The default local publish location is %ProgramData%\\UiPath\\Packages.
This can be easily done by using the Publish button on the Design ribbon tab. Please note that automation projects cannot be published if the project.json file is located in a read-only location.

To publish an automation project:
- In Studio, create a new project.
- In the Design ribbon tab, click Publish. The Publish Project window opens.

- In the Publish Location category, set the project to be published to Orchestrator, a custom NuGet feed or on the local machine.
- In the Release Notes category, type in the details about the version and other relevant information. Release notes for published projects are visible in the Packages section in Orchestrator. Please note that the Release Notes field accepts a maximum of 10,000 characters.
- Add a New Version to the project, and check the Is Prerelease box to mark the version as
alpha, if needed. Please note that this automatically changes the project’s version schema to semantic. When publishing a new version of the file locally, make sure that the custom location does not already include a file with the same proposed version number. For more details about project versioning, check the About Automation Projects page. - In the Certificate Signing section, add a local Certificate Path next to the Certificate box. Furthermore, add the Certificate Password and an Optional Certificate Timestamper if needed. For more details, check out the Signing Packages page.
Note:
Currently
.pfxand.p12certificate extensions are accepted for signing projects.
- Click Publish. The entire project folder is archived into a
.nupkgfile, and uploaded to Orchestrator, the custom NuGet feed or saved in the local directory. - If the project is published successfully, the Info dialog box is displayed and the project is copied to the NuGet location set in the
NuGetServerUrlparameter, in theUiPath.settingsfile.
The Info dialog box displays:
- The name under which the package was published to Orchestrator, in the Packages page, or locally;
- The version number under which the package was published;
- The location where the project was published if the project was published locally.
- The Details option which expands a list containing the names of project files that were published.
- The Copy to Clipboard option.
Each time you click Publish, a new version of the project is created and sent to the packages feed. Publishing to a secure feed can be authenticated either through the Robot Key, Orchestrator credentials, Windows authentication or API key.
Important:
Published projects must not be unpackaged. To make any changes, please open the initial
.xamlfile in Studio, perform the changes and then publish the project again.
Updated 2 years ago